RSS

Category Archives: Vegetables

Elegant and Easy – Filet Mignon Roast with Roasted Winter Vegetables

Today is the first day of Fall and the look and feel around our area of New York certainly indicates that much. The weather is cool and crisp, the leaves are starting to turn and thoughts turn to fall and autumn fruits, vegetables and meals around here. Sure, that means soups, stews and the like but it can also mean fall entertaining with some elegant but easy meals that you can put together when you have friends and family over. We had just such a dinner this past weekend and I decided to make a filet mignon roast. It’s not something we have very often because of the price but it is a nice treat when you are having a larger party over. This recipe from Food Network is the perfect answer for your meal with a tender filet mignon roast along with some of your favorite roasted winter vegetables.

Filet Mignon with Roasted Winter Vegetables

For the Vegetables:

2 large parsnips, peeled and chopped

1 butternut squash, peeled and chopped

2 to 3 sweet potatoes, peeled and chopped

1 pound mini carrots, well cleaned

2 bunches beets, scrubbed, tops trimmed and halved

2 red onions, quartered

1 head of garlic, cloves separated and peeled

3 tablespoons olive oil

2 tablespoons minced fresh rosemary

Kosher salt and freshly ground black pepper, to taste

For the Filet Mignon Roast:

2 tablespoons olive oil

4 tablespoons stone ground mustard

6 cloves garlic, minced

3 tablespoons minced fresh rosemary

2 tablespoons freshly ground black pepper

1 (6-pound) whole beef tenderloin (filet mignon)

Kosher salt, to taste

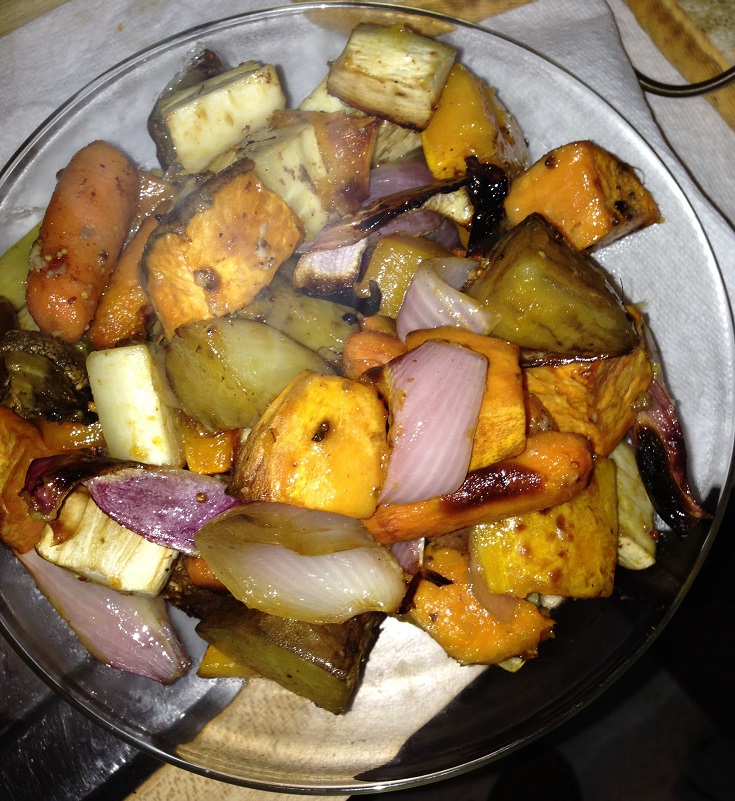
Preheat the oven to 425 degrees. For the vegetables, add all of the vegetables, the garlic, the olive oil, the rosemary, the salt and the pepper, to taste, in single layers on 2 rimmed baking sheets. Toss the vegetables until they are well coated with the olive oil. Roast the vegetables until they are golden brown and tender, about 45 minutes to 1 hour. Cover and keep warm until you are serving.

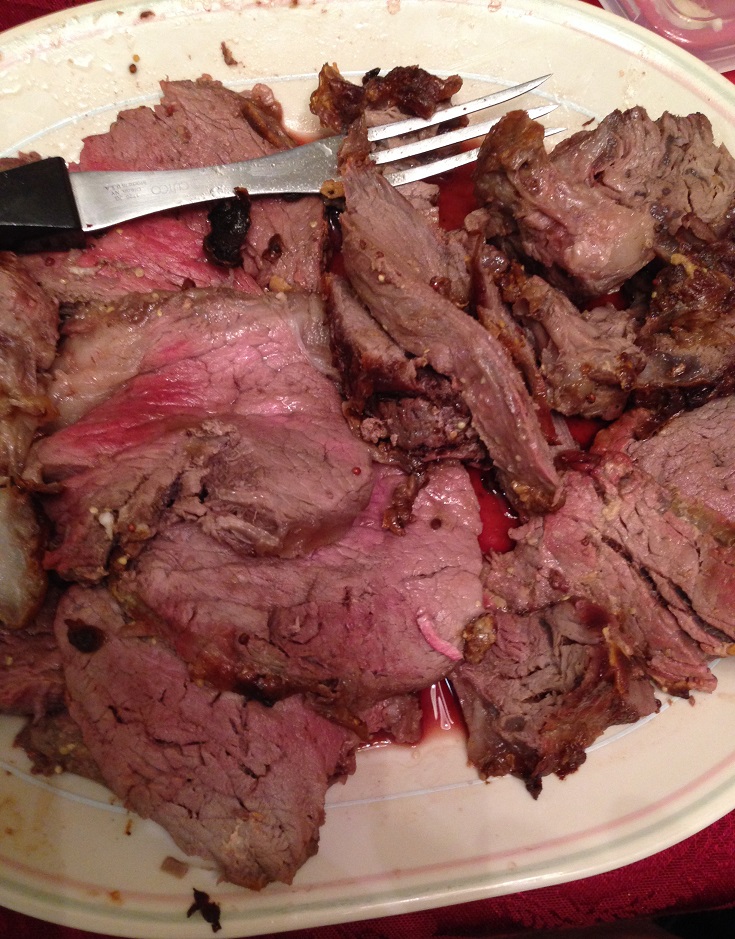
For the roast, preheat the oven to 500 degrees. Combine the olive oil, minced garlic, mustard, rosemary and pepper in a small bowl until they are blended. Coat the tenderloin all over with the mustard mixture. This can be done the day before and left in the refrigerator overnight if you like. Just before roasting, season the tenderloin generously with kosher salt, to taste. Set the tenderloin in a large roasting pan and place it in the center of the oven on the middle rack. Roast the tenderloin until an instant-read thermometer inserted into the tenderloin registers 135 degrees, about 20 to 25 minutes. Remove the roast from the oven to a cutting board and tent it with aluminum foil. Allow the tenderloin to rest for 10 minutes before slicing. Arrange the slices on a platter and serve alongside the warmed roasted vegetables.

It is a simple dish that looks great, smells great and tastes awesome. The meat was done just perfectly so that it was medium-rare to medium throughout and the vegetables were nicely browned and tender and full of flavor. Of course, you can always add whatever vegetables you like best to the dish besides what is in the recipe, like mushrooms, fingerling potatoes, acorn squash, Brussels sprouts or whatever happens to look good at the grocery store when you are shopping. I used golden beets in mine because I liked the look and the flavor but any beets you like will work here. Everyone really enjoyed it and it was a great night with some good food.

That’s all I have for today. Check back next time for another recipe. Until then, enjoy the rest of your day and enjoy your meal!

IMG_0697 IMG_0696

 
1 Comment

Posted by on September 23, 2014 in Beef, Cooking, Dinner, Produce, Vegetables


Tags: , , , , , , ,

Indoors or Out Enjoy Grilled NY Style Sausages with Balsamic Onion Sauce and Grilled Tomatoes

Not having a grill to use can be a detriment when I come across recipes that sound wonderful and would taste great. An electric grill just does not provide the same type of results and experience as a gas or charcoal grill, in my opinion, so when I see a grilling recipe I want to try I often try to adapt it to indoor cooking and use either a grill pan (much to the chagrin of my smoke alarm many times) or find a way to cook it in the oven. While the results may not be exactly the same for me, they can still get pretty close, or at least good enough for my purposes.. Such is the case of this recipe I saw from Bobby Flay for grilled New York-style sausages with a balsamic onion sauce and grilled tomatoes, a great alternative to the average hot dog on the grill. I am posting the grilling recipe that Bobby Flay uses even though I did everything indoors in cast iron pans or in the case of the sausages, in the oven.

Grilled NY Style Sausages with Balsamic Onion Sauce and Grilled Tomatoes

For the Balsamic Onion Sauce:

1/2 cup balsamic vinegar
2 tablespoons canola oil
2 large Spanish onions, halved and thinly sliced
Kosher salt and freshly ground black pepper
1 teaspoon ancho chile powder
1/2 teaspoon ground cinnamon
1/4 cup ketchup
1 teaspoon hot sauce

For the Grilled Cherry Tomatoes with Basil:

1 pint cherry tomatoes, cored
1 tablespoon canola oil
Kosher salt and freshly ground black pepper
2 tablespoons extra-virgin olive oil
2 tablespoons chopped fresh basil

For the Grilled Sausage:
4 hot Italian sausage links
4 sweet Italian sausage links
1 loaf seeded semolina bread, cut into thick slices

For the balsamic onions: Put the balsamic vinegar, oil, onions and some salt and pepper in a medium skillet over medium heat. Cook, stirring frequently, until the onions are very soft and soupy, about 15 minutes.

Stir in the chile powder and cinnamon and cook for 1 minute. Add the ketchup, 1/2 cup of water, the hot sauce, 1/2 teaspoon of salt and 1/4 teaspoon of black pepper, and bring to a simmer. Simmer, stirring occasionally, until the sauce has thickened, about 10 minutes. Transfer the onions to a bowl and cool to room temperature before serving.

For the grilled tomatoes: Heat the grill for high direct and indirect heat. Put the tomatoes in a bowl and toss them with the canola oil and some salt and pepper. Transfer the tomatoes to a grill basket and grill over direct heat, tossing occasionally, until the tomatoes are slightly charred all over and softened, about 5 minutes. Transfer the tomatoes to a bowl, drizzle them with the olive oil, and crush them lightly with a fork. Toss the tomatoes with the basil, then set them aside.

For the sausage: Put the sausages over the direct heat and cook until they are slightly charred on all sides, about 2 minutes per side. Move the sausages to the indirect heat, cover, and cook until they are just cooked through, about 10 minutes.

Transfer the sausage to a cutting board. Grill the bread over direct heat until it is lightly charred, about 15 seconds, then transfer the bread to a platter.

Slice the sausages about 1-inch thick. Top each slice of bread with some of the grilled tomatoes, a few slices of sausage and a dollop of the onion sauce.

As I stated, I made everything inside, using a cast iron skillet for the onion sauce, a grill pan for the tomatoes and the oven for the sausages. The onions were straightforward as I could follow the recipe. The tomatoes on the grill pan were cooked over low heat for about 4 minutes until they blistered and popped and then I took them off the pan and proceeded with the recipe. The sausages I baked in the oven for about 45 minutes in a 375 degree oven, half the time covered in foil and the other half without, allowing them to crisp up a bit. To me, this works out better than simply frying the sausages in a pan and you get better texture and pop. Overall, I loved the mix of the sausages with the tomatoes and the onion sauce. The onion sauce is the real winner, in my opinion, and we used it again on hamburgers and even as a topping on some pizza. It makes a great grilling alternative for you when you want something more than a hot dog or hamburger. I forgot to take a picture of the sausages, but I do have a picture of the onions and the tomatoes.

That’s all I have for today. Check back next time for another recipe. Until then, enjoy the rest of your day and enjoy your meal!

IMG_0672 IMG_0671

 
Leave a comment

Posted by on September 9, 2014 in Cooking, Dinner, Grilling, Pork, Side Dishes, Vegetables


Tags: , , , , , , , ,

50 After-School Snacks

50 After-School Snacks.

One thing that all kids seem to have in common, no matter what the age, is that they want to have some kind of snack as soon as they get home from school. They need something to tide them over before dinner and you want to try and give the best options possible when you can. Food Network has put together 50 after-school snack recipes for you that cover all kinds of options so you have something great to offer the kids when they get home. Check it out!


Tags: , , , , , ,

Gobble Down These Kickin’ Turkey Burgers with Caramelized Onions and Spicy Sweet Mayo

I have been on something of a turkey burger kick lately, wanting to try out different recipes that can bring flavor to a healthier alternative to the regular beef hamburgers. I have tried a few different things, and then I found this recipe at allrecipes.com for a very easy turkey burger that makes use of two things I really like on a burger – caramelized onions and a nice, spicy mayonnaise. The recipe itself can’t get much easier than this and you can make the mayo ahead of time so you have it ready to go when you put the burgers on the table.

Kickin’ Turkey Burgers with Caramelized Onions and Spicy Sweet Mayo

For the Spicy Mayo:

1 cup mayonnaise

1/4 cup coarse-grain mustard

1/4 cup honey

1 tablespoon prepared horseradish

Hot sauce, to taste

1 teaspoon cayenne pepper

For the Turkey Burgers:

1 1/4 pounds ground turkey

1/2 onion, grated

1 jalapeno pepper, seeded and minced

2 tablespoons barbecue sauce

2 tablespoons Worcestershire sauce

1/4 teaspoon liquid smoke

1 tablespoon Montreal Chicken seasoning

1 teaspoon dry mesquite seasoning

For the Caramelized Onions:

1 tablespoon olive oil

1/2 onion, sliced

Hamburger buns, for serving

For the mayonnaise, combine the mayonnaise, coarse-grain mustard, honey, horseradish hot sauce and cayenne pepper in a bowl until it is well blended. Adjust seasoning with the hot sauce to suit your tastes. Cover the mayonnaise and refrigerate it until the burgers are ready.

For the turkey burgers, combine the ground turkey, grated onion, jalapeno pepper, barbecue sauce, Worcestershire sauce, liquid smoke, Montreal Chicken seasoning and the mesquite seasoning together in a large bowl. Form the mixture into 5 or 6 patties.

For the caramelized onions, heat the olive oil in a medium skillet set over medium heat until it is shimmering. Add the sliced onions and cook and stir the onions until the onions have softened and turned translucent, about 5 minutes. Reduce the heat to medium-low and continue cooking and stirring until the onions are very tender and dark brown, about 15 to 20 minutes more.

In a large skillet set over medium heat, add 1 tablespoon of vegetable oil and heat until it is shimmering. Add the turkey patties to the skillet and cook, turning them once, until they reach an internal temperature of 180 degrees when an instant-read thermometer is inserted into the middle of the burger, about 5 to 6 minutes per side. Serve the turkey burgers on the hamburger buns and top each burger with caramelized onions. Pass the spicy mayo around the table for additional topping.

You can always add any of your own favorite toppings to the burgers as well, such as any type of cheese, pickles, tomato, lettuce, bacon or anything that you might like. The spicy mayo turned out really well and added great flavor to the burgers. I have even used it on other sandwiches for topping it tastes great. The burger itself was moist and flavorful and had a really nice smoky taste with a hint of heat from the jalapeno and the mesquite seasoning. Of course, everyone in my house loves caramelized onions and that just made the burger even better for everyone. It’s definitely a great recipe to try when you want to jazz up your turkey burgers. The tropical slaw recipe from yesterday would quite nicely with these as a side dish.

That’s all I have for today. Check back next time for another recipe. Until then, enjoy the rest of your day and enjoy your meal!

IMG_0664

 
3 Comments

Posted by on September 4, 2014 in Cooking, Dinner, Grilling, Lunch, Poultry, Sandwiches, Sauce, Turkey, Vegetables


Tags: , , , , , ,

Hold On to Summer with Tropical Slaw with Sweet and Sour Dressing

Even though everyone is back to work today and the kids are back to school this week around here, the weather has actually been a lot hotter the last few days than it has been all summer long. That makes you want to hold on to summer just a little bit longer and keep making some of those summer favorites that may not heat up the house and kitchen. Around here we have been having cold dinners the last few nights, including a sandwich night yesterday where I made some homemade potato salad and tried out a new coleslaw recipe that I found. This one is a very simple and refreshing recipe from Bobby Flay for a tropical slaw with a sweet and sour dressing so you can stay away from the typical mayo slaws and get something a little different to go with your meal.

Tropical Slaw with Sweet and Sour Dressing

1/4 cup apple cider vinegar

1/4 cup canola or vegetable oil

2 tablespoons sugar

Kosher salt and freshly ground black pepper

12 ounces fresh pineapple, cut into 1/2-inch cubes

1 large, ripe mango, cut into 1/2-inch cubes

1/2 head red cabbage, finely shredded

3 green onions, green and pale green parts only, thinly sliced

1/4 cup roughly chopped fresh cilantro leaves

Combine the apple cider vinegar, canola or vegetable oil, sugar and the kosher salt and black pepper (to taste) in a bowl and whisk the ingredients until the sugar has dissolved.

Combine the pineapple, mango and red cabbage in a large bowl. Season them with salt and pepper to taste; add the dressing to the fruit and cabbage and toss everything to coat it well with the dressing. Add the green onions and the cilantro and toss the ingredients again. Cover the slaw and refrigerate it for at least 1 hour before serving.

This is a very simple and refreshing alternative to traditional coleslaw recipes. You get great flavor from the pineapple and it seems to go very well with the red cabbage, green onions and cilantro. The dressing is light but adds just the right flavor and acidity to the slaw itself. I didn’t have any mango on hand when I made this salad so it is not in the one I did and I think it still turned out fine, though a nice, ripe mango in there would add even more to the dish. I also used pre-packaged shredded red cabbage instead of shredding it myself to save myself a step. This side dish would work really well with just about any type of sandwich meal and I think it would go really well with a pork dish like pulled pork or even just to have with sausages, hamburgers or hot dogs. I’ll definitely make this one again.

That’s all I have for today. Check back next time for another recipe. Until then, enjoy the rest of your day and enjoy your meal!

IMG_0666


Tags: , , , , , ,

31 Great Labor Day Grilling Recipes | Kitchen Daily

31 Great Labor Day Grilling Recipes | Kitchen Daily.

Planning on doing some grilling on Labor Day but what to go beyond the usual hamburgers and hot dogs? Kitchen Daily has put together 31 great grilling recipes for you that cover everything from your appetizers and main courses to side dishes and dessert so you can grill every part of your meal and make the most of that last unofficial day of summer. Check out the recipes and find one to try this weekend!


Tags: , , , , ,

A Fast Dinner on Friday (or Any Day) – Chicken Fried Rice

Sometimes you just want a meal that you know you can pull together in just a few minutes and without much of fuss. Maybe you can even make use of some of those leftover items you have in the fridge for the last few days and don’t really know what to do with them. That is when a meal like this can really come in handy. Making any type of stir fry is always a great way to use items, and having fried rice is always a favorite, but sometimes you would like the flavor without having the extra oil and fat involved in frying the rice itself. This recipe for chicken fried rice is originally from Food Republic, but I did modify it just a little to make it fit better with what I had on hand and what we like. It is still just as easy and tasty.

Chicken Fried Rice

2 cups long-grain riced, cooked and cooled completely

Nonstick vegetable oil spray

4 scallions, finely sliced

1 onion, thinly sliced

1 green pepper, seeded and cut into strips

1 red pepper, seeded and cut into strips

1 carrot, peeled and thinly sliced

4 ounces green beans, cut into 1-inch pieces

1/3 cup frozen peas, defrosted

1 pound boneless, skinless chicken (breast or thigh), diced or cut into thin strips

1 tablespoon light brown sugar

2 tablespoons chicken broth

2 tablespoons soy sauce

2 tablespoons sweet chili sauce

1/2 bunch cilantro, roughly chopped

Preheat the oven to 400 degrees. Line a shallow baking pan with a sheet of parchment paper. Turn the rice out onto the parchment paper, breaking up any lumps, and spray the surface with the nonstick vegetable oil. Place the pan in the oven and cook the rice for 12 minutes, it should be crisp on the surface. Season the rice to taste with salt and freshly ground black pepper and set the pan aside to keep the rice warm.

Meanwhile, in a large, nonstick skillet with a good coating of vegetable or canola oil set over high heat, fry the scallions, green pepper, red pepper, onions, carrot and green beans for about 2 minutes, stirring continuously until the vegetables are crisp-tender. Add the peas and the chicken and fry to give the chicken a little color and cook it through, about 3 to 4 minutes. Sprinkle over the brown sugar and then add the rice, breaking up any lumps along the way. Add the chicken broth, soy sauce and chili sauce and mix to blend everything well. Stir fry everything for about 3 to 4 minutes. Toss in the cilantro and serve.

Of course, as with any stir fry you can add just about any type of vegetable or protein that you like or have on hand. This would work well with shrimp, pork, beef or even just with the vegetables if you like. The rice does  come out nice and crisp without having to deal with all of the frying of it. You do want to make sure that the rice is dry before you put it in the oven so that it doesn’t just steam once it is in there. The whole dish comes together very easily, gives you a great one pot meal and has some great flavor with the chicken stock, chili sauce and soy sauce. This is an easy one you can use anytime.

That’s all I have for today. Check back next time for another recipe. Until then, enjoy the rest of your day and enjoy your meal!

IMG_0660


Tags: , , , ,

12 Make-Ahead Burger Toppings – Photo Gallery | SAVEUR

12 Make-Ahead Burger Toppings – Photo Gallery | SAVEUR.

There are fewer things better than having a great burger right off the grill. The flavor you get from grilling your burger is unlike any other method and I could eat them all day long myself, but having some great condiments to go on your burger makes things even better. If you want to go beyond the typical store-bought items and try some things of your own, Saveur Magazine has put together 12 great burger toppings that you can make ahead and have ready for your next barbecue, outdoor party or just to enjoy for yourself. Check it out!


Tags: , , , ,

A Quick Summer Meal That is Meat Free – Black Bean and Corn Tacos

When you are looking for something quick to make on these hot summer days and may even want to stay away from the meat for a dinner or for lunch, beans can be a great alternative for you. They can provide you with plenty of protein, vitamins and fiber and taste great in salads or as a taco or wrap. I decided to do this myself for lunch a few weeks ago and then brought it back as a dinner meal when we were looking for something quick and easy one night. All the ingredients can be things that you might normally have on hand in your pantry or refrigerator so you can have this ready to go in just minutes.

Black Bean and Corn Tacos

1 15 ounce can black beans, drained and rinsed (or 1 cup of cooked black beans)

5 teaspoons olive oil, divided

1 tablespoon fresh lime juice

1 cup frozen corn kernels, thawed

2 teaspoons ground cumin

1/2 cup onion, sliced thin

2 green onions, sliced thin

Corn or flour tortillas

Spinach leaves, for topping

Thinly sliced radishes, for topping

Sliced avocado or guacamole, for topping

Grated cheese (your choice) for topping

Sour cream, for topping

Diced tomatoes or salsa, for topping

Place the black beans and the cumin together in a small bowl and lightly mash the beans. Add 2 teaspoons of the olive oil along with the lime juice and mix together until well blended. In a saucepan set over medium heat, heat 1 teaspoon of the olive oil until it is shimmering. Add the sliced onion and saute the onion until it is tender, about 3 to 4 minutes. Add the corn kernels and the bean mixture to the onions and heat until the corn and beans are completely warmed through and fragrant, about 3 to 4 minutes. In a separate skillet, warm the remaining olive oil over medium heat. Warm the tortillas individually for about 1 minute per side. Remove the tortillas to a separate plate and place the bean and corn mixture in a separate bowl, sprinkling the beans mixture with the sliced green onions. Place any toppings you like on the table as well so people can assemble their own tacos to their specific liking.

You can really add anything you like to this dish to truly make it your own. Personally, I had tomato, avocado and radishes on mine while Sean put cheese on his and Michelle put sour cream and cheese on hers. The spinach was a nice touch as well. I actually have had this for lunch a number of times and they pack pretty well just as wraps if you didn’t want to cook the tortillas and just wanted to pack them up for a lunch on the go. you could certainly used dried beans that you have soaked and cooked beforehand in place of the canned, but the canned were convenient to use for my purposes and you can really make these with any type of beans you like, maybe throw in some chili peppers or hot sauce if you want some heat or any other type of vegetable you might like.

That’s all I have for today. Check back next time for another recipe. Until then, enjoy the rest of your day and enjoy your meal!

IMG_0592


Tags: , , , ,

It’s Tomato Time! Use Those Summer Tomatoes for a Simple Tomato Tart

There are few things better than when tomatoes are in season. Getting a really fresh tomato from the local farmer’s market can be a treat all of its own and there are lots of different varieties that you get to choose from this time of year. Around here in my area, the tomatoes get very reasonable in price so you can load up and make all kinds of different things with them. They are great to use to make your own tomato sauce, perfect for a Margherita pizza, ideal for any type of BLT that you might want to make, you can dice them up for some panzanella salad, just have them in a nice salad or even just eat them alone as a sandwich all of their own. I decided to take a few tomatoes that I had and make use of this really easy recipe from Food Republic for a very simple tomato tart.

Simple Tomato Tart

4 ripe tomatoes

2 tablespoons Dijon mustard

1 package puff pastry, thawed

2 teaspoons fresh thyme leaves, chopped

1 tablespoon butter

Salt

1/4 cup balsamic vinegar

Preheat the oven to 400 degrees. Slice the tomatoes in 1/4-inch slices and salt the tomatoes heavily. This so as much excess water as possible comes out of the tomatoes and this will help keep the tart from getting soggy. Leave the salted tomatoes aside for 10 minutes. After the 10 minutes have passed. use paper towels to wipe off the extra salt on the tomatoes and pat the tomatoes dry to pick up any excess moisture that may be left.

Arrange the thawed puff pastry in a pie plate or a baking dish. Make sure to add a little bit of butter into the dish before laying the puff pastry down in the dish to prevent the pastry dough from sticking to the dish. Spread the Dijon mustard evenly over the pastry dough. Add 1 teaspoon of the chopped thyme leaves and then arrange the tomatoes on top of the Dijon mustard and the thyme leaves. Add the other teaspoon of the chopped thyme leaves over the tomatoes. Drizzle the balsamic vinegar over the top of the tomatoes. Garnish the tart with a few sprigs of thyme.

Bake the tart in the oven for 45 minutes or until the pastry has achieved a deep caramel color. Take the tart out of the oven just before the edges of the tart begin to char and not sooner. Allow the tart to coll for 15 minutes before serving or allow it to cool at room temperature and serve when you are ready.

I loved the simplicity of this dish and you really get the deep flavor of the tomatoes that have been roasted in the balsamic vinegar and the Dijon mustard adds just a hint of flavor to the dish. This is a great side dish to make to go along with any type of meal you might serve in the summer or to go along with a barbecue. you could certainly use this as a dish to bring to any summer party you might attend as well. I’ll be making this one again as the summer goes on.

That’s all I have for today. Check back next time for another recipe. Until then, enjoy the rest of your day and enjoy your meal!

IMG_0603


Leave a comment

Posted by on July 15, 2014 in Cooking, Side Dishes, Vegetables, Vegetarian


Tags: , , , , ,

 
National Day Calendar

Fun, unusual and forgotten designations on our calendar.

Jennifer Probst

a little bit naughty a little bit nice

Laissez Faire

Letting Life Lead

simple cooking recipes

a blog to share with you the best