RSS

Category Archives: Vegetables

Monday’s Simple Stir Fry

For most people, Monday turns out to be the one day of the week where you really don’t want to do any cooking. It’s back to the weekly routine of school, work, after school activities and by the end of the day, you’re too exhausted to even think about having to cook something for dinner. That’s why Monday makes the perfect day to do something like a stir-fry  It’s quick, easy and gives you the chance to use either leftovers or any abundance of vegetables that you may have lying around the house. For me, yesterday turned out to be one of those days. I happen to have just a small package of beef in the freezer so it lent itself perfectly to this stir-fry recipe I found at America’s Test Kitchen for stir-fried beef and broccoli with oyster sauce.

Stir – Fried Beef and Broccoli With Oyster Sauce

1 pound flank steak, cut into 2 inch wide strips with the grain, then sliced across the grain into 1/8 inch thick slices
3 tablespoons soy sauce
1 tablespoon dry sherry
2 tablespoons chicken broth
5 tablespoons oyster sauce
1 tablespoon light brown sugar
1 teaspoon sesame oil
1 teaspoon cornstarch
6 medium cloves garlic, pressed through a garlic press or minced (about 2 tablespoons)
1 inch piece fresh ginger, minced (about 1 tablespoon)
3 tablespoons vegetable oil
1 1/4 pounds broccoli, florets cut into bite-size pieces, stems trimmed, peeled, and cut on diagonal into 1/8 inch thick slices
1/3 cup water
1 small red bell pepper, cored, seeded, and cut into 1/4 inch pieces
3 medium scallions, sliced half-inch thick on diagonal

Combined the beef and the soy sauce in a medium bowl; cover with plastic wrap and refrigerate for at least ten minutes or up to one hour, stirring once. Meanwhile, whisk the sherry, chicken broth, oyster sauce, brown sugar, sesame oil, and cornstarch in a measuring cup. Combine the garlic, ginger, and 1 1/2 teaspoons of vegetable oil in a small bowl.

Drain the beef and discard the liquid. Heat 1 1/2 teaspoons of vegetable oil in a large nonstick skillet over high heat until smoking. Add half of the beef to the skillet and break up any clumps; cook, without stirring, for one minute, then stir and cook until the beef is browned around the edges, about thirty seconds. Transfer the beef to a medium bowl. Heat 1 1/2 teaspoons of the vegetable oil in a skillet, and repeat with the remaining beef.

Add 1 tablespoon of vegetable oil to the now empty skillet; heat until just smoking. Add the broccoli and cook for thirty seconds; and the water, cover the pan, and lower the heat to medium. Steam the broccoli until tender – crisp, about two minutes; transfer to a paper towel – lined plate. Add the remaining 1 1/2 teaspoons of vegetable oil to the skillet; increase the heat to high and heat until just smoking. Add the bell pepper and cook, stirring frequently, until spotty brown, about 1 1/2 minutes. Clear the center of the skillet; add the garlic and ginger to the clearing and cook, mashing the mixture with the spoon, until fragrant, about 15 to 20 seconds, then stir the mixture into the peppers. Return the beef and broccoli to the skillet and toss to combine. Whisk the sauce to recombine, then add it to the skillet; cook, stirring constantly, until the sauce is thickened and evenly distributed over the beef and broccoli, about thirty seconds. Transfer to a serving platter, and sprinkle with scallions and serve.

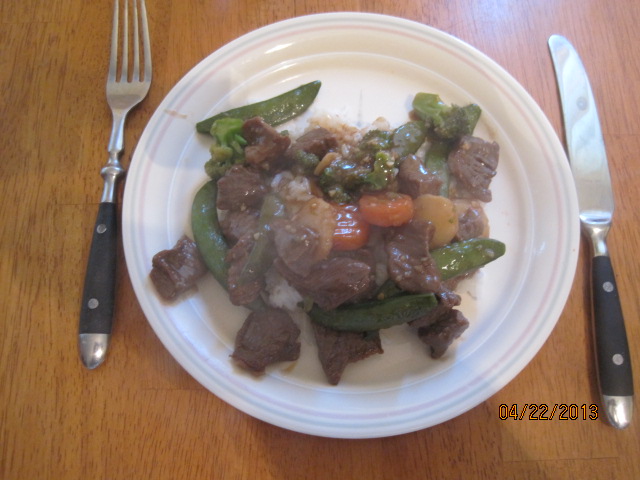
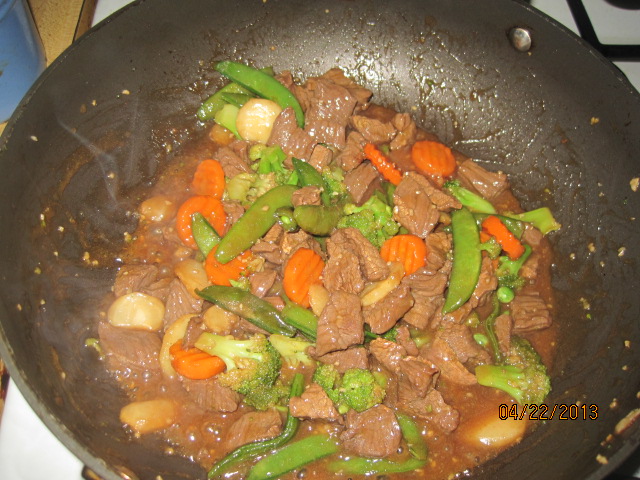
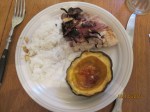
As with most stir-fried dishes, I served this one with white rice. Of course you could easily substitute brown rice for the white if that is what you prefer. Also, I did not have any fresh broccoli on hand; however, I did have a package of mixed frozen vegetables in the freezer which were ideal for a stir-fry  I try to keep one of these on hand to make a quick stir-fry whenever we need an easy meal and it worked last night. This bag in particular had broccoli, water chestnuts, snap peas, and carrots. It was a very simple meal, the sauce tasted great and I was all done with the cooking within fifteen minutes. It is a perfect meal for a day on the run.

That’s the only recipe for today. Tonight I have the fish tacos planned, which I have posted on here before. If you want to check the recipe for that, you can always check out the previous post I did. I do have a couple of other meals planned for later on in the week, including one for a fried chicken sandwich with spicy slaw and mayonnaise. We are also planning on having some chicken salad sandwiches later on in the week and I am looking to see if there is something new like can do with them or something new and interesting for a side dish. We’ll have to see what I can come up with. Until next time, enjoy the rest of your day and enjoy your meal!


002 001

 
Leave a comment

Posted by on April 23, 2013 in Beef, Cooking, Dinner, One Pot Meals, Vegetables


Tags: , , ,

Asparagus and Chicken Stir Fry

Since it is spring and asparagus has been in abundance lately, I have been buying a lot of it. It is a vegetable we all like in my family and in a variety of ways. I have had a lot of it around the house this week and decided last night to make some use of it with this chicken and asparagus stir fry recipe I found at Food Network. It’s light and easy, only taking me about fifteen minutes to prepare, just enough time to cook up some rice to go along with it.

Asparagus and Chicken Stir Fry

1 pound boneless, skinless chicken breasts

2 cloves garlic, minced

1 (2-inch) piece peeled fresh ginger, cut into thin matchsticks

1 tablespoon soy sauce

1 tablespoon sugar

1 tablespoon cornstarch plus one teaspoon

1 1/4 teaspoons kosher salt

1 tablespoon dry sherry

3/4 cup chicken broth or water

2 tablespoons vegetable oil

2 bunches medium asparagus (about 2 pounds), woody stems trimmed, sliced into 1-inch pieces

1 bunch scallions (white and green parts), thinly sliced

Freeze the chicken breasts for 20 to 30 minutes and then thinly slice the chicken against the grain into strips. Toss the strips with 1 clove of the garlic and about half the ginger, the soy sauce, sugar, 1 teaspoon of the cornstarch, 1 teaspoon of the salt and the sherry in a bowl. Marinate at room temperature for about 15 minutes. Mix the remaining corn starch with the chicken broth or water.

Heat 1 tablespoon of the vegetable oil in a large nonstick skillet over high heat. Add the asparagus, scallions, remaining garlic, remaining ginger, 1/4 cup of water and season with 1/4 teaspoon of salt. Stir-fry until the asparagus is bright green but still crisp, about 3 to 4 minutes. Transfer to a bowl and set aside.

Heat the same skillet until very hot and then add the remaining 1 tablespoon of vegetable oil. Add the chicken and stir-fry until it loses its raw color and gets a little brown, about 3 to 4 minutes. Return the asparagus to the pan and toss to heat through. Stir in the reserved cornstarch mixture and bring to a full boil to thicken. Mound the stir-fry on a serving platter and serve with white or brown rice.

The great thing about any stir fry is that you can add whatever you like to it. There are many other spring vegetables you could add to the mix right now, like fresh peas, or you can go with any of your favorites, like mushrooms, onions, carrots, green beans, sprouts, broccoli… the list can go on and on. You could also substitute for the chicken and use shrimp, pork, beef or no meat at all and just go with the vegetables if that is what you are looking for. I think any of the options are good, but I really liked this recipe as it is. The asparagus was nice and crispy and the chicken tasted great from the marinade. I think the fresh ginger really made the dish and the cornstarch mixture put  a nice glaze on the chicken.

Nice and simple for today. Today being Wednesday and usually a busy day around here, I don’t often cook anything new. We either have leftovers or something equally as simple, like burgers. I do have another chicken recipe I will be using later this week as well as the recipe for strawberry rhubarb pie, so check back for those towards the end of the week. Until next time, enjoy the rest of your day and enjoy your meal!

002

 
Leave a comment

Posted by on April 17, 2013 in Cooking, Poultry, Vegetables


Tags: , , ,

Grilled New York Strip Steaks and Sweet Pea Risotto

As promised, I did try a couple of new recipes last night for dinner. The first was from Williams – Sonoma and covered the main entrée for the evening, which was grilled steaks with cherry tomatoes and basil. It was pretty easy to make, although using the indoor grill pan always causes a problem around here with the smoke detector. After a few minutes of wrangling with this smoke detector, everything else was just fine.

Grilled Steaks with Cherry Tomatoes and Basil

1 teaspoon vegetable oil
1/2 teaspoon garlic powder
1/2 teaspoon onion powder
1/4 teaspoon paprika
1/4 teaspoon dried oregano
1/4 teaspoon freshly ground pepper, plus more, to taste
2 teaspoons kosher salt, plus more, to taste
2 New York strip steaks, each about 1 1/4 pound and 1 1/2 inches thick
8 ounces grape or cherry tomatoes
2 tablespoons olive oil
1 1/2 teaspoons red wine vinegar
2 tablespoons chopped fresh basil

Brush a cast-iron grill pan with the oil and heat over medium high heat until hot. Meanwhile, in a small bowl, combine the garlic powder, onion powder, paprika, oregano, the 1/4 teaspoon pepper and the 2 teaspoons of salt. Rub the spice mixture evenly onto both sides of the steaks. In another bowl, combine that tomatoes, olive oil, vinegar and basil. Season with salt and pepper to taste.

Place the steaks on the grill pan and cook, turning once, until nicely grill marked, approximately 4 to 5 minutes per side for medium rare, or a grill in till they are done to your specific liking. Add the tomato mixture to the pan during the last two minutes of cooking. Transfer the steaks to a carving board and let rest for five minutes. Transfer of the tomatoes to what warmed platter. Cut the steak crosswise into 1/4 inch strips and arrange on the platter with that tomatoes.

This would be a good meal for you to cook on your outdoor grill as well. If you have the proper tools to cook that tomatoes right on the grill you can do them outside as well. I cooked the steaks to him about medium, which is the way we prefer to have it. These spice rub that is applied to the steaks adds great flavor and seems to go very well with the tomatoes and basil.

As a side dish, I decided I wanted to make some risotto. I looked around for a few different recipes, and I wanted to try to find one that would make good use of some of the spring vegetables that are around right now. The best one I found came from Marcus Samuelsson on his website at Food Republic. It was for a spring peak risotto and sounded really good.

Spring Pea Risotto

1 tablespoon butter
1 tablespoon olive oil
1 cup arborio rice
1/2 cup white wine
5 to 6 cups chicken stock
1 large shallot, minced
1/2 bunch asparagus stalks, cut into 1 inch pieces
1/2 cup fresh peas, shelled
1 teaspoon lemon zest
1/4 cup fresh mint, chopped
1/3 cup grated Parmesan cheese
Salt and pepper, to taste

In a small sauce pan, heat the chicken stock to a warmed simmer. In a large stock pot, or any heavy bottomed pot, melt the butter and olive oil over medium low heat. Add the minced shallots and a pinch of salt, and sauté until the shallots are translucent. Add the rice, stir for about one minute until the grains begin to become translucent around the edges.

Pour in the wine and stir until the liquid is absorbed. Add one ladle of stock at a time, stirring frequently until all the liquid is absorbed. Add another ladle of stock, and stir frequently until liquid is absorbed again. Repeat this process until almost all the stock has been used in the rice is cooked but still al–dente. The entire process should take about twenty minutes.

About five minutes before the rice is done cooking, stir in the asparagus and the peas. Add more chicken stock as necessary to continue cooking the rice. Once the rice has achieved the desired texture, stir in the Parmesan cheese, lemon zest, and fresh mint. Season with salt and pepper and serve immediately.

Admittedly, making risotto is a lot of work. It requires constant attention and stirring on the stove. While it can be taxing, it is certainly worth the work that you put into it. I especially liked this recipe because of the fresh peas and asparagus that are used. It is the perfect time of year to try to incorporate some of the your spring vegetables into a dish like this and they tasted great. I would certainly make this dish again.

Those of the recipes for today. Tonight, I do plan to make some type of chicken and I have a couple of different recipes to choose from. Check back tomorrow and see which one I have decided to go with and see if you like the recipe yourself. I do have a couple of recipes for later on in the week that I plan to make. One is for another chicken dish, the other is for a strawberry rhubarb pie. I think both will be pretty good. Until then, enjoy the rest of your day and enjoy your meal!

004 001 002 003

 
2 Comments

Posted by on April 16, 2013 in Beef, Cooking, Cooking Websites, Dinner, Grilling, Rice, Vegetables


Tags: , ,

7 Ideas For Dinner Tonight, Starring Caramelized Onions | Food Republic

7 Ideas For Dinner Tonight, Starring Caramelized Onions | Food Republic.

We love caramelized onions in this house. They can add so much flavor to nearly add dish that you want to add them to, as evidenced here in this blog post from Food Republic with 7 different ideas for using caramelized onions in your dinner. They really can go with anything. I personally love them as a side with any steak or burger, they can mix nicely in with potatoes, rice or polenta and can go with any entree. Check it out and see if you like anything.

 
Leave a comment

Posted by on November 27, 2012 in Cooking, Cooking Websites, Dinner, Vegetables


Tags: , ,

Some Thanksgiving Side Dishes

Okay, so Sunday we did the turkey and stuffing, yesterday we did the soup, today we’ll do some side dishes. I wanted to choose some classic sides but maybe try something a little different with them, and I ended up choosing both of these recipes from Cook’s Country. The first takes the traditional sweet potato casserole and makes it a little differently. I am not a fan of marshmallow and didn’t want to make something that was going to use them and this recipe seems just perfect and it is not hard to make.

Sweet Potato Casserole with Bacon-Brown Sugar Topping

3 pounds sweet potatoes, peeled and cut into 1 1/2-inch pieces

1/4 cup packed brown sugar

5 slices bacon

4 tablespoons butter, cut into 6 pieces

1/4 cup heavy cream

1/2 teaspoon grated orange zest plus 2 tablespoons juice

1 teaspoon salt

1/2 teaspoon ground cinnamon

1/4 teaspoon pepper

1/8 teaspoon cayenne pepper

Adjust an oven rack to the middle position and heat the oven to 400 degrees. Lay two 24 by 12-inch sheets of heavy-duty aluminum foil perpendicular to each other inside a rimmed baking sheet. Place the sweet potatoes in the center of the foil and sprinkle with 1 tablespoon of sugar. Fold opposite sides of the foil toward each other and crimp edges to seal tightly. Transfer the baking sheet to the oven and bake until the sweet potatoes are tender, about 60 minutes. Remove the baking sheet from the oven and heat the broiler.

Cook the bacon in a large skillet over medium heat until crispy, about 5 to 7 minutes. Transfer the bacon to a paper towel-lined plate. When the bacon is cool enough to handle, crumble it into bite-size pieces. Pulse the bacon and the remaining 3 tablespoons of sugar in a food processor until coarsely ground, about 10 pulses; set aside.

Carefully open 1 end of the foil pouch, taking care to avoid escaping steam, and pout the potatoes and accumulated liquid into the food processor. Add the butter, cream, orange zest and juice, salt cinnamon, pepper and cayenne and process until smooth, 30 to 60 seconds, scraping down the bowl as needed.

Transfer the potato puree to a 2-quart souffle dish and sprinkle evenly with the reserved bacon-sugar mixture. Broil the sweet potatoes until the topping is lightly browned and bubbling, about 2 to 4 minutes.

You can make part of this ahead of time to save you time on Thanksgiving. The processed potatoes can be refrigerated without the topping for up to 2 days. To serve it, cover the dish with aluminum foil and bake on the middle rack of a 400 degree oven until hot throughout, about 30 to 40 minutes. Remove the foil, add the bacon-sugar topping and broil as directed.

I think it is going to turn out quite nicely and I’ll be sure to take some pictures of it so you can see it on Thursday.

My second recipe frees up some stove or oven space for you by making good use of your slow cooker. it is a version of the classic green bean casserole, but made using the slow cooker to make things a little easier for you along the way.

Slow-Cooker Green Bean Casserole

1 cup canned fried onions

3 tablespoons butter

10 ounces cremini or white mushrooms, cut into 1/4-inch-thick slices

Salt and pepper

4 garlic cloves, minced

1/2 teaspoon dried thyme

1/4 cup all-purpose flour

1 1/4 cups chicken broth

1 1/4 cups heavy cream

2 pounds green beans, trimmed and cut into 1-inch pieces

2 slices white bread, torn into pieces

2 tablespoons butter, melted

2 cups canned fried onions

To make the sauce, pulse the canned onions in a food processor until finely ground; set aside. Melt the butter in a large skillet over medium heat. Add mushrooms, 3/4 teaspoon salt and 1/2 teaspoon pepper and cook until the mushrooms release their liquid, about 5 minutes. Increase the heat to medium-high and cook until the liquid is evaporated, about 5 minutes. Stir in the garlic and thyme and cook until fragrant, about 30 seconds. Add the flour and ground onions and cook until golden, about 1 minute. Stir in the broth and the cream and bring to a boil. reduce the heat to medium-low and simmer, stirring occasionally, until the sauce is thick and creamy, about 10 minutes.

Combine the sauce and the green beans in the slow cooker. Cover and cook on low until the beans are tender, 5 to 6 hours.

Meanwhile, pulse the bread and butter in a food processor until coarsely ground. Toast the bread crumbs and onions in a skillet over medium-high heat until golden brown, about 3 to 5 minutes. Top the green beans with bread-crumb mixture and serve.

You can also start making this ahead of time as well to save you some effort on Thanksgiving. The sauce and the topping can be made and refrigerated in separate airtight containers for 2 days. To finish it, microwave the sauce, covered, for 1 minute before proceeding with slow cooking. Crisp the bread-crumb mixture in a skillet before topping and serving.

I like the idea of using the slow cooker, but I also like the not using canned green beans or cream of mushroom soup to make it. Personally, I am not a big fan of canned vegetables and soups. If you like them better, stick with what you like, but I think giving the freshness is worth the little bit of extra time it takes to prep everything.

Okay, so we almost have a complete meal for Thursday. Tomorrow, I am going to talk a little bit about some appetizers and a dessert to round out the meal if you want to check back and see. Until then, enjoy the rest of your day and enjoy your meal!


Tags: , , , , , , , ,

It’s Time For a Roast, Where’s Shecky Greene?

Okay, so it’s not really that kind of roast, but I decided I wanted to do an entire roast dinner tonight to try to make clean up as easy as possible for all of us here. Michelle had picked up a boneless leg of lamb roast that she wanted for dinner this week. I looked through some of my cookbooks for different recipes, and everything seemed pretty straightforward and not very exciting. I wanted to try something else, so I turned to my Twitter account and posed a question to some food experts to see what kind of response I would get. Bon Appetit gave me quite a list of recipes to choose from to make the lamb. America’s Test Kitchen and Christopher Kimball both gave me some good tips as well, but nothing really jumped out at me that I felt like I really wanted to try, so I kept asking. And then I got an answer I liked from Alton Brown. He gave me the link to a recipe of his called “Silence of the Leg O’ Lamb.” While this recipe does call for the lamb to be grilled, that wasn’t really an option for me in New York in November. He also uses a charcoal grill, which I do not have, so I had to modify the recipe a bit to be roasted in the oven.

Roasted Boneless Leg of Lamb

1 sirloin end leg of lamb, boned

4 cloves garlic

8 fresh mint leaves

1 tablespoon brown sugar

1 teaspoon kosher salt

2 teaspoons black pepper

5 tablespoons Dijon mustard

2 tablespoons vegetable oil

2 sprigs fresh rosemary

Preheat the oven to 400 degrees. Roughly chop the garlic cloves in the food processor. Add the mint and repeat. Add the brown sugar, salt, pepper, mustard and oil and blend into a paste. Spread the paste evenly on the meat side of the roast. Roll the leg into a roast shape and tie with butcher’s twine. Place the lamb in a shallow roasting pan and roast for about 20 minutes per pound, until the internal temperature of the lamb reaches 135 degrees. Remove the roast from the oven. Cover with foil and let the lamb rest for 15 minutes before slicing and serving.

The paste made more than enough to also do the outside of the lamb, which I also did, creating a nice crust on the outside of the lamb. It was cooked perfectly and tasted wonderful. The hint of mint coming through the mustard was great and I loved the garlicky flavor that went throughout the meat. I roasted some potatoes in the same pan with the lamb and they got some of the same mustard crust on them, which made them extra crispy on the outside.

For a vegetable, we had picked up a nice head of cauliflower. I find steamed cauliflower to be very bland and frankly, kind of smelly and not always appealing. I decided to try roasting it instead and I am glad I did. It seemed to make all the difference in the world in taste, flavor and smell and since I was roasting in the oven already anyway, it made it just as easy.

Roasted Cauliflower

1 head of cauliflower, cored and cut into florets

2 tablespoons extra-virgin olive oil

1/2 teaspoon kosher salt

Preheat the oven to 400 degrees. Arrange the cauliflower florets in a single layer on a rimmed baking sheet. Drizzle the olive oil evenly over the florets, then sprinkle with the salt. Toss to coat the cauliflower evenly, then spread the florets out evenly.

Roast the cauliflower, stirring 1 or 2 times, until golden brown and crisp-tender, 25 to 35 minutes. Transfer the cauliflower to a warmed serving bowl. Serve immediately.

I loved the way it came out this way and would make it like this all the time. I can also use some of the leftovers to make some cauliflower soup for later on this week.

That’s it for tonight. Check back later on this week to see what else I come up with for meals. I have some more chicken ideas for this week and also have some cod to make, so we’ll have to see what I can find. Until then, enjoy your evening and enjoy your meal!

 
2 Comments

Posted by on November 6, 2012 in Cooking, Dinner, Lamb, Vegetables


Tags: , , , , , , , ,

3 Tips for Roasting Vegetables | The Feed

3 Tips for Roasting Vegetables | The Feed.

I love roasted vegetables. I think it is my favorite way to make vegetables overall. You can get so much more flavor out of them through roasting than you can by steaming or making them in the microwave. Anyway, here are some tips from America’s Test Kitchen about the best way to approach roasting some of your favorite vegetables. Check it out!


Tags: , ,

Good Eats Meatloaf and Roasted Green Beans

I love meatloaf. I know I have said that on here many times, but it’s always worth repeating. When we got out somewhere, if it’s on the menu I want to try it. Of course, some times I am disappointed by the results, but hey, you still have to try, right? So tonight when I decided to make meatloaf, I turned to a recipe from Alton Brown and his “Good Eats” program. I like a lot of the things he makes (and he’s great to follow on Twitter if you are on there) so I figured this recipe was a no-brainer. It got a lot of good reviews from people on Food Network’s website also, so I had to give it a try.

Good Eats Meatloaf

6 ounces garlic-flavored croutons
1/2 teaspoon ground black pepper
1/2 teaspoon cayenne pepper
1 teaspoon chili powder
1 teaspoon dried thyme
1/2 onion, roughly chopped
1 carrot, peeled and broken
3 whole cloves garlic
1/2 red bell pepper
18 ounces ground chuck
18 ounces ground sirloin
1 1/2 teaspoon kosher salt
1 egg

For the glaze:
1/2 cup ketchup
1 teaspoon ground cumin
Dash Worcestershire sauce
Dash hot pepper sauce
1 tablespoon honey

Heat the oven to 325 degrees.


In a food processor bowl, combine croutons, black pepper, cayenne pepper, chili powder, and thyme. Pulse until the mixture is of a fine texture. Place this mixture into a large bowl. Combine the onion, carrot, garlic, and red pepper in the food processor bowl. Pulse until the mixture is finely chopped, but not pureed. Combine the vegetable mixture, ground sirloin, and ground chuck with the bread crumb mixture. Season the meat mixture with the kosher salt. Add the egg and combine thoroughly, but avoid squeezing the meat.


Pack this mixture into a 10-inch loaf pan to mold the shape of the meatloaf. Onto a parchment paper-lined baking sheet, turn the meatloaf out of the pan onto the center of the tray. Insert a temperature probe at a 45 degree angle into the top of the meatloaf. Avoid touching the bottom of the tray with the probe. Set the probe for 155 degrees.


Combine the ketchup, cumin, Worcestershire sauce, hot pepper sauce and honey. Brush the glaze onto the meatloaf after it has been cooking for about 10 minutes. Bake for 45 to 50 minutes. Allow it to rest for 10 minutes, covered, after removing from the oven. Slice and serve.

This recipe is great. The meatloaf and the glaze have a nice combination of bite from the hot sauce, cayenne and chili pepper and a sweetness from the honey. We all loved it and I’ll definitely be making this one again.

I decided to serve this with some boiled potatoes and green beans. I love green beans too, and I am always looking for a new way to make them. I came across this recipe from Williams-Sonoma that is simple and tastes great from the roasting.

Roasted Green Beans and Carrots with Red Onion

3/4 pound green beans, trimmed
1/2 pound carrots, peeled and cut diagonally about 1/4 inch thick
1 red onion, sliced
2 large garlic cloves, very thinly sliced
1 1/2 tablespoons olive oil
1 teaspoon ground cumin
Salt and freshly ground pepper, to taste

Preheat an oven to 350°F. Place an 8-by-11-inch heavy roasting pan or a very large, ovenproof fry pan on the rack.

Bring a large saucepan three-fourths full of water to a boil over high heat. Add a pinch of salt and the green beans. Cook the beans until they turn bright green and are just tender, 1 to 2 minutes. Drain the beans and plunge them into a bowl of ice-cold water to stop the cooking and drain again.

In a large bowl, toss together the beans, carrots, onion, garlic and olive oil. Sprinkle with the cumin, season with salt and pepper, and toss again to thoroughly combine. Transfer the vegetables to the preheated pan and spread them evenly. Roast, stirring occasionally, until the vegetables are tender and lightly browned, 45 to 55 minutes. Taste and adjust the seasonings with salt and pepper.

It was a something different to do and I like roasting vegetables. The flavor seems a little more intense when you roast them. You could easily add other vegetables to this if you wanted to, choosing some other fall root vegetables like parsnips, turnips, or sweet potatoes.
We also made some of the all-purpose gravy I have made before, because you must have gravy with meatloaf. Overall, it was quite a good meal.
Well, I have a doctor’s appointment tomorrow night, so I am not sure I’ll get a meal in, but we’ll see what happens. Until next time, enjoy your evening and enjoy your meal!


2 Comments

Posted by on October 24, 2012 in Beef, Cooking, Dinner, Gravy, Vegetables


Tags: , , , , , ,

Let’s (Bacon) Wrap It Up

I wanted to make something easy today and just use what we already had in the house since I have a bit of a cold and didn’t feel like going out. I checked in the freezer and we had some tilapia, so that’s what I am going with today. I found a great recipe idea from Mark Bittman in this weeks New York Times Sunday Magazine that makes some great use of fish and everybody’s favorite, bacon. It’s quick, easy and destined to taste great. I mean, it has bacon in it, it has to be great, right?

Bacon Wrapped Tilapia

6 slices bacon

1 pound firm whitefish, like tilapia or cod, cut into 4 filets

1 tablespoon olive oil

1/2 red onion, thinly sliced

Salt and pepper, to taste

Parsley, to garnish

In a large non-stick skillet over medium-high heat, add the olive oil and warm until shimmering. Add in the red onion and saute until they are just starting to soften, about 3 minutes. Meanwhile, wrap the bacon slices tightly around the fish fillets and lightly season with salt and pepper. Add this fish to the pan and saute until the fish and bacon are done and the bacon is starting to crisp, turning halfway through cooking, about 8 minutes. Garnish with parsley ans serve.

That’s all there is to this one. You get the smoky flavor of the bacon added to the fish along with the bite of the red onion and you have a nice meal. I served this with plain white rice, but I also had some acorn squash on hand, so I decided to bake that and have it as our vegetable. I love the way acorn squash tastes when it has been baked or roasted, and it tastes even better when you add in a little brown sugar and maple syrup.

Baked Acorn Squash

1 acorn squash, cut in 1/2
2 tablespoons brown sugar
2 tablespoons butter, softened
2 tablespoons maple syrup
Salt
Freshly ground black pepper

Scoop the seeds and stringy pulp out of the squash cavities and discard. In a small mixing bowl, combine the brown sugar, butter, syrup and salt and pepper, to taste. Rub the squash cavities and cut sides of the squash with the butter mixture and place them on a baking sheet, cut side up. Bake in the preheated oven for about 1 hour until the squash is tender when pierced with a fork. Serve 1 half per person.

There you have it, a quick meal for a Sunday, or any day, for that matter. There’s not a lot of clean up involved for this one either, and I plan to use the leftover rice with some turkey chili that I also made today to have for dinner tomorrow and lunches this week.

That’s all I have for tonight. I do have a few recipes that I plan to try this week, including a shrimp dish that I picked up this week that looks pretty tasty. We’re also heading into the soups and stews time of year, so I plan to be making more things like that in the coming weeks, so we’ll have to check for some recipes for them as well. Until next time, enjoy the rest of your day and enjoy your meal!


Leave a comment

Posted by on October 14, 2012 in Cooking, Dinner, Seafood, Vegetables


Tags: , , , , ,

50 Reasons You Should Be Eating Tomatoes Right Now: BA Daily: bonappetit.com

50 Reasons You Should Be Eating Tomatoes Right Now: BA Daily: bonappetit.com.

There is nothing better than a GOOD fresh tomato. This year, the local tomatoes here have been very good and I have been buying them frequently to use in salads, sandwiches and meals. I wish I had the space to grow my own but I can make do with what I can buy and the price has been good this year. This article from Bon Appetit gives you 50 more ideas for using tomatoes, in case you didn’t have enough already. Run out and get some and try some recipes!

 
Leave a comment

Posted by on August 16, 2012 in Cooking Websites, Vegetables


Tags: , , ,

 
National Day Calendar

Fun, unusual and forgotten designations on our calendar.

Jennifer Probst

a little bit naughty a little bit nice

Laissez Faire

Letting Life Lead

simple cooking recipes

a blog to share with you the best