RSS

A Spicy Side Dish – Tex-Mex Rice and Beans

When I made the surf and turf burritos last week, I wanted a simple side dish to go along with them and instead of making a standard rice and beans to go along with the meal,I decided to spice things up a bit and found a few different recipes for Tex-Mex rice, but I decided I wanted some beans in the dish too and made a minor adjustment to this recipe that I found from Cook’s Country. It is a very simple side dish that can go well with a bunch of different entrees and you can have it all done in about 30 minutes.

Tex-Mex Rice and Beans

1 (14.5-ounce) can diced tomatoes
1 1/2 cups long grain white rice
1/4 cup vegetable oil
1 onion, chopped fine
1 poblano chile, seeded and chopped fine
2 jalapeño chiles, seeded and chopped fine 
1 can black beans, drained and rinsed
1 teaspoon ground cumin
1 teaspoon dried oregano
1 1/2 cups chicken broth
Salt

Process the tomatoes in a food processor until they are smooth; set aside. Place the rice in a fine-mesh strainer set over a large bowl. Rinse the rice under running water until the water runs clear, about 1 minute. Drain the rice well.

 Heat the vegetable oil in a Dutch oven set over medium-high heat until the oil is shimmering. Add the onion, poblano, and jalapeños and cook until they are softened, about 5 minutes; reserve ¼ cup of the pepper mixture. Stir in the rice, black beans, cumin, and oregano into the pot and cook, stirring frequently, until the rice is a deep golden, about 5 to 6 minutes.
 Add the chicken broth, the processed tomatoes, and 1 teaspoon of salt and bring the mixture to a boil. Cover the pot, reduce the heat to low, and simmer until all of the liquid is absorbed and the rice is tender, about 25 minutes. Remove the pot from the heat and stir in the reserved pepper mixture. Cover and let the rice stand for 10 minutes. Fluff the rice with a fork and season with salt. Serve.
Just a couple of quick notes about this recipe. if you cannot find any poblanos or don’t want to use poblanos, you have lots of other choices as far as peppers. you can make this as hot or as mild as you want it to be. You could simply use some Anaheim peppers or just jalapenos or even just some bell pepper if you like. Also, rinsing the rice does make a big difference since it washes off a lot of the starch so you do not end up with gummy rice and get some nice fluffy rice instead. I liked the mix of the heat of the dish to go along with the burritos and adding the beans into the dish made it even heartier and they took on some of the flavor of the sauce and the peppers. This would work great for any Mexican or Southwestern dish you want to make, or even with pork, shrimp, a steak or some chicken. You get a lot of options with this dish and the recipe makes a lot of rice, so you will have leftovers to eat as well.
That’s all I have for today. Check back next time for another recipe. Until then, enjoy the rest of your day and enjoy your meal!
IMG_0508
 
1 Comment

Posted by on April 22, 2014 in Cooking, Dinner, Rice, Side Dishes


Tags: , , , ,

Keeping Up with the Classics – America’s Test Kitchen Classic Pot Roast

Making a pot roast dinner is always a family favorite for us. I can remember the days of having a pot roast when I was a child and just the smell of it cooking was enough to make you feel good and you could not wait for dinnertime. Pot roast takes a long time, but with this recipe most of the work is done before the cooking and then you have four hours or so to do other things, relax and wait for the wonderful meal to come. This recipe from America’s Test Kitchen is a really simple one and is a little bit different from the pot roast recipe I have posted in the past. With this recipe you let the meat cook for several hours without having to turn it every 30 minutes like I have in the past.

Classic Pot Roast

1 (3 1/2- to 4-pound) boneless beef chuck-eye roast, pulled into two pieces at natural seam and trimmed of large knobs of fat
Kosher salt
2 tablespoons butter
2 medium onions, halved and sliced thin (about 2 cups)
1 large carrot, chopped medium (about 1 cup)
1 celery rib, chopped medium (about 3/4 cup)
2 medium garlic cloves, minced or pressed through garlic press (about 2 teaspoons)
1 cup beef broth, plus 1 to 2 cups for sauce
1/2 cup dry red wine, plus 1/4 cup for sauce
1 tablespoon tomato paste
1 bay leaf
1 sprig plus 1/4 teaspoon chopped fresh thyme leaves
Ground black pepper
1 tablespoon balsamic vinegar

Sprinkle the pieces of meat with 1 tablespoon of kosher salt (1½ teaspoons if using table salt), place the meat on a wire rack set in a rimmed baking sheet, and let the meat stand at room temperature for 1 hour.

Adjust an oven rack to the lower-middle position and heat the oven to 300 degrees. Heat the butter in a heavy-bottomed Dutch oven over medium heat. When the foaming subsides, add the onions and cook, stirring occasionally, until the onions are softened and beginning to brown, about 8 to 10 minutes. Add the carrot and celery; continue to cook, stirring occasionally, for 5 minutes longer. Add the garlic and cook until it is fragrant, about 30 seconds. Stir in 1 cup of beef broth, ½ cup of red wine, tomato paste, bay leaf, and thyme sprig; bring the mixture to simmer.
 Pat the beef dry with paper towels and season it generously with pepper. Using 3 pieces of kitchen twine, tie each piece of meat into a loaf shape for even cooking.
 Nestle the meat on top of the vegetables. Cover the pot tightly with a large piece of aluminum foil and cover the pot with a lid; transfer the pot to the oven. Cook the beef until it is fully tender and a sharp knife easily slips in and out of the meat, about 3½ to 4 hours, turning the meat halfway through the cooking process.
Transfer the roasts to a cutting board and tent the meat loosely with foil. Strain the liquid through a mesh strainer into a 4-cup liquid measuring cup. Discard the bay leaf and the thyme sprig. Transfer the vegetables to a blender jar. Allow the liquid to settle for 5 minutes, then skim any fat off the surface. Add more beef broth as necessary to bring the liquid amount to 3 cups. Place the liquid in the blender with the vegetables and blend everything until it is smooth, about 2 minutes. Transfer the sauce to a medium saucepan and bring it to a simmer over medium heat.
 While the sauce heats, remove the twine from the roast and slice it against the grain into ½-inch-thick slices. Transfer the meat to a large serving platter. Stir the chopped thyme, the remaining ¼ cup of red wine, and the balsamic vinegar into the sauce and season it to taste with salt and pepper. Spoon half of the sauce over the meat; pass the remaining sauce separately.
This meal is wonderful and the sauce just tops everything off. Splitting the roast into 2 smaller roasts makes a big difference in the cooking time and really helps to soften and break down the meat, making it just melt and fall apart when you go to slice it. This recipe also only puts half of the broth in up front so instead of the meat braising in all of the liquid through the cooking time, it sits above a lot of the liquid, letting the roasts brown while cooking so you can skip searing the meat beforehand. The sauce tastes wonderful as well and makes great gravy for the meat, the vegetables and of course the mashed potatoes that you need to serve with any pot roast. I’ll certainly be using this recipe again when I make pot roast.
That’s all I have for today. Check back next time for another recipe. I just wanted to say a quick thank you to all that have been following along and visited the blog last week to help make it the busiest week I have ever had on the blog. Thanks for all of your interest in the recipes and I plan to keep on sharing all kinds of good things. Until next time, enjoy the rest of your day and enjoy your meal!
IMG_0500 IMG_0498 IMG_0499
 
Leave a comment

Posted by on April 21, 2014 in Beef, Cooking, Dinner, Gravy, Sauce


Tags: , , , ,

Easter Entertaining Guide

Easter Entertaining Guide.

If you are still looking for some great ideas for menus and entertaining for your Easter meal tomorrow, Saveur Magazine has all kinds of great ideas to cover everything that you might be interested in, including menus from all around the world so you can try different flavors and ideas. Check it out!

 
Leave a comment

Posted by on April 19, 2014 in Cooking, Cooking Websites, Dinner, Holidays


Tags: , , , ,

Easter Brunch Recipes – Bon Appétit

Easter Brunch Recipes – Bon Appétit.

Having a brunch on Easter is always a great idea for a special family meal that you can do early in the day, giving everyone time to relax and enjoy each other’s company. Bon Appetit has 21 great Easter brunch recipes here for you to try that can help to round out your meal with a little bit of everything. Check it out!


Tags: , , ,

Step Up the Burrito a Notch with These Surf and Turf Burritos

Burritos are one of those things that are great for breakfast, lunch or dinner because you can really put anything you want inside one to make it work for you. They are easy to make and take no time at all and you can even make them ahead of time and reheat them if you need a quick meal. I decided to jazz up our burritos meal last night by making some surf and turf burritos, not using lobster meat and filet mignon of course, but opting for shrimp and some skirt steak that I had placed in some carne asada marinade. The simple marinade makes a big difference with the skirt steak as it adds great flavor to the meat and helps to break it down some to make it easier to slice and eat. If you are going to use a skirt steak or flank steak for this, you want to make sure you use a marinade along the way.

Carne Asada Marinade

1/2 cup orange juice

1/4 cup fresh lemon juice

1/4 cup fresh lime juice

2 cloves garlic, minced

1/3 cup soy sauce

1 teaspoon finely chopped canned chipotle pepper

1/2 tablespoon chili powder

1/2 tablespoon ground cumin

1/2 tablespoon paprika

1/2 teaspoon dried oregano

1/2 tablespoon black pepper

1/2 bunch cilantro, chopped

1/4 cup olive oil

2 pounds skirt or flank steak

Combine the orange juice, lemon juice and lime juice in a large bowl along with the garlic, soy sauce, chipotle pepper, chili powder, cumin, paprika, dried oregano, black pepper and the cilantro. Slowly whisk in the olive oil until all of the marinade is well combined.

Place the steak between two sheets of plastic wrap on a solid, level surface and firmly pound the steak with the smooth side of a meat mallet so that is a thickness of about 1/4-inch. After pounding the meat, poke the steak all over with a fork. Add the meat to the marinade in the large bowl, cover the bowl and allow the steak to marinade in the refrigerator for 24 hours.

Heat a grill pan or cast iron skillet over medium high heat and lightly oil the surface with vegetable oil or olive oil.

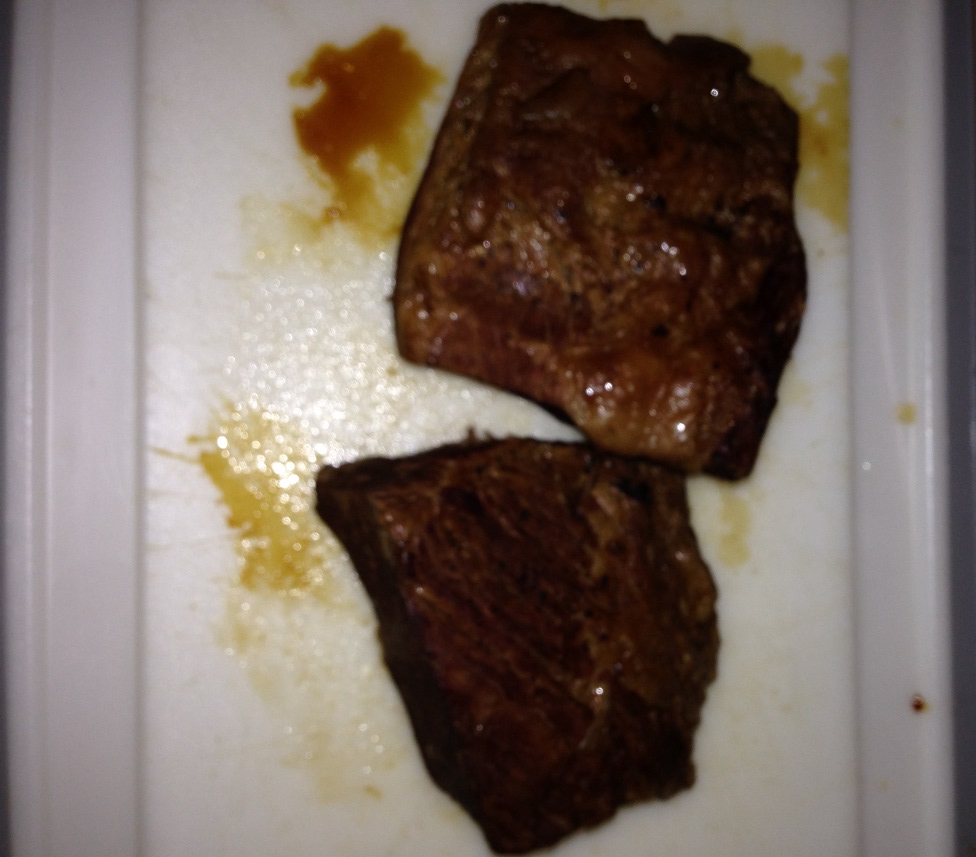
Remove the steak from the marinade and cook until your desired doneness, about 4 to 5 minutes per side for medium-rare. Discard the used marinade. When the meat is cooked to your liking, remove the steak from the grill pan or skillet and let it rest for 2 to 3 minutes before slicing thinly across the grain.

You could simply serve the meat this way with a couple of nice side dishes and you would have a great meal, but I decided to incorporate the steak into our surf and turf burritos for an extra special treat for dinner.

Surf and Turf Burritos

6 large, 10-inch flour tortillas

1 cup sour cream

1 cup guacamole or 1 avocado, peeled, pitted and sliced thinly

1 cup shredded Mexican blend cheese

2 pounds Carne Asada, sliced thinly (see above recipe)

1 pound medium shrimp, peeled, deveined and cooked, chopped

1 cup salsa or pico de gallo

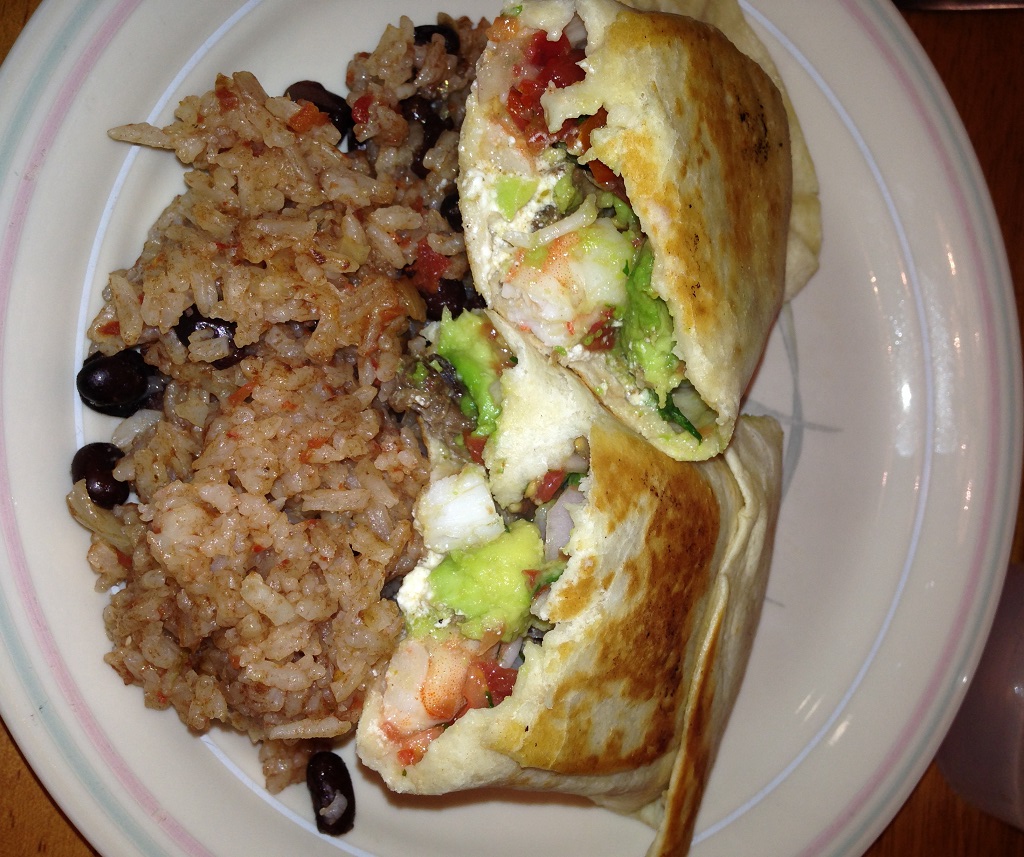
On a flour tortilla, spread a layer of sour cream, then a layer of guacamole or sliced avocado and then layer liberal amounts of cheese, carne asada, shrimp and salsa or pico de gallo. With wet fingertips, fold over the sides of the tortilla and roll it up. Repeat the process until you have filled 6 tortillas.

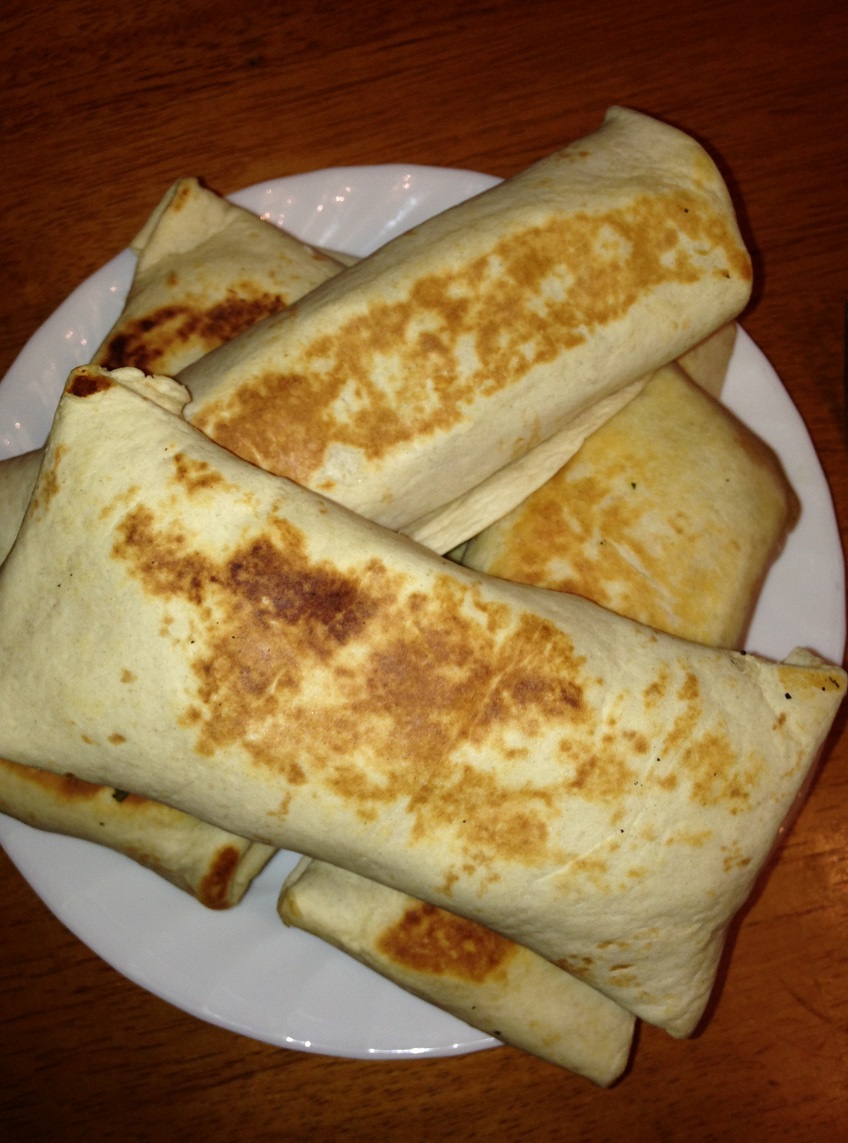
Place the rolled burritos in a hot skillet or on a medium-hot grill. Cook the burritos until they are golden brown on both sides, about 6 minutes total.

These were really good and very filling. The great flavors of everything combined were awesome and you can make a fancy sounding and great tasting meal in just minutes with this recipe. Of course, you could probably use filet mignon and lobster if you really wanted to, but for burritos this is ideal and tastes great. I also made some Tex-Mex rice and beans to go along with the meal and I will post the recipe for them tomorrow. This recipe is definitely one we will be having again since we all loved it.

That’s all I have for today. Check back next time for another recipe. Until then, enjoy the rest of your day and enjoy your meal!

IMG_0510 IMG_0509


3 Comments

Posted by on April 18, 2014 in Beef, Cooking, Dinner, Lunch, Sandwiches, Sauce, Seafood


Tags: , , , , , , ,

Keeping it Simple Again – Pan-Roasted Chicken Breasts

I find I do not make a lot boneless chicken breast dinners anymore. Actually, I shouldn’t say that; I don’t actually buy a lot of boneless chicken breasts anymore. The problem is that the boneless breasts often cost a lot more money then bone-in chicken breasts and you can just as easily cut the meat off the bone and make your own boneless breasts to cook and then you still have the option of keeping the skin on to get crispy flavor and you can use the bones, roast them with some salt and pepper and use them to make some tasty chicken stock for another use. I was able to get a family pack of bone-in chicken breasts for about $6.00 the other day and it gave me 5 large chicken breasts that I took off the bone and did just that with and we got many meals out of that six dollars. I went back and bought another package and made some of the chicken breasts using this simple pan roasting recipe from America’s Test Kitchen that was quick and easy and made a great little sauce to flavor the chicken along the way.

Pan-Roasted Chicken Breasts

4 (10-12-ounce) bone-in split chicken breasts, trimmed and brined if desired

Salt and pepper

1 tablespoon vegetable oil

1 shallot, minced

3/4 cup chicken broth

1/2 cup dry vermouth

4 large fresh sage leaves, each leaf torn in half

3 tablespoons butter, cut into 3 pieces and chilled

Using kitchen shears, trim off the rib section from the chicken breasts. If you are brining the chicken, dissolve 1 cup of kosher salt in 2 quarts of cold tap water in a large container or bowl; submerge the chicken in the brine and refrigerate it until it is fully seasoned, about 30 minutes. Rinse the chicken pieces under running water and pat them dry with paper towels. Season the chicken with pepper.

Adjust an oven rack to lowest position and heat the oven to 450 degrees.

Heat the vegetable oil in a heavy-bottomed 12-inch ovenproof skillet over medium-high heat until it is beginning to smoke; swirl the skillet to coat it with oil. Brown the chicken skin-side down until it is deep golden, about 5 minutes; turn the chicken pieces and brown them until they are golden on the second side, about 3 minutes longer. Turn the chicken skin-side down and place the skillet in the oven. Roast the chicken until the juices run clear when the chicken is cut with a paring knife, or the thickest part of the breast registers 160 degrees on an instant-read thermometer, about 15 to 18 minutes. Transfer the chicken to a platter, and let it rest while making the sauce. (If you are not making the sauce, let the chicken rest 5 minutes before serving.)

Using a pot-holder to protect your hands from the hot skillet handle, pour off most of the fat from the skillet; add the shallot, then set the skillet over medium-high heat and cook, stirring frequently, until the shallot is softened, about 1 1/2 minutes. Add the chicken broth, vermouth, and sage leaves; increase the heat to high and simmer the mixture rapidly, scraping the skillet bottom with a wooden spoon to loosen any browned bits, until the sauce is slightly thickened and reduced to about 3/4 cup, about 5 minutes. Pour the accumulated chicken juices into the skillet, reduce the heat to medium, and whisk in the butter 1 piece at a time; season to taste with salt and pepper and discard the sage leaves. Spoon the sauce around the chicken breasts and serve immediately.

That’s all there is to it. You can have tender, moist chicken with a nice crispy skin and make a great little sauce all in under 30 minutes. The brining does add some extra seasoning and helps to make the chicken moist but it is not a must for this recipe at all. We all really liked the simple sauce which had nice flavor from the sage and vermouth and if you didn’t want the bones in this one you could remove all the bones when you are cutting out the rib section. It was an easy, flavorful dish perfect for a weeknight dinner.

That’s all I have for today. Check back next time for another recipe. until then, enjoy the rest of your day and enjoy your meal!

IMG_0501

 
Leave a comment

Posted by on April 16, 2014 in Cooking, Dinner, Poultry, Sauce


Tags: , , , ,

Spice Up your Weeknight – Spice-Rubbed Pork Tenderloin with Roasted Carrots

Pork tenderloin is a great choice for a weeknight meal when you want something that seems a little more elegant and fancy and can still be done in under 45 minutes or even thirty minutes. I usually but tenderloin when it is on sale and since they come in a package of two tenderloins I freeze one and make one for dinner so I can always pull one out to have for a meal. There are lots of great things you can do with the tenderloin – roasting, grilling, pan roasting, cutting it into medallions, cutting it up for a stir fry – but I really liked this option of adding some nice spices to the tenderloin and roasting it with some carrots for a nice meal. This recipe comes from Bon Appetit and is for a spice-rubbed pork tenderloin with roasted carrots.

Spice-Rubbed Pork Tenderloin with Roasted Carrots

For the Carrots:

2 pounds carrots, peeled, trimmed and cut into 1/2-inch pieces
2 tablespoons water
1 tablespoon extra-virgin olive oil
1 tablespoon butter, diced
2 garlic cloves, thinly sliced
1 small jalapeño (preferably red), seeded, coarsely chopped
1 teaspoon honey
1/2 teaspoon ancho chile powder
1/2 teaspoon ground cumin
1/4 teaspoon coarse kosher salt

For the Pork Tenderloin

2 1- to 1-1/4-pound pork tenderloins
2 teaspoons dried oregano
2 teaspoons ground cumin
1 teaspoon ancho chile powder
1 teaspoon smoked paprika
1 teaspoon coarse kosher salt
1 tablespoon extra-virgin olive oil

For the carrots: Arrange the carrots on a large rimmed baking sheet. Whisk 2 tablespoons of water and all of the remaining ingredients in a small bowl; pour the mixture over the carrots and toss to coat. Cover the carrots tightly with heavy-duty foil.

For the pork tenderloin: Preheat the oven to 400°F. Roast the carrot mixture covered until the carrots are just tender, about 30 minutes.

Meanwhile, arrange the pork tenderloins on another rimmed baking sheet. Stir the oregano, cumin, chile powder, smoked paprika, and 1 teaspoon of coarse salt in a small bowl; rub the mixture all over the tenderloins. Heat the olive oil in a heavy, large nonstick skillet over medium-high heat. Add the pork to the skillet and cook until the pork is browned on all sides, about 5 minutes. Return the pork to the rimmed baking sheet.

Remove the foil from the carrots. Nestle the pork among the carrots on the baking sheet, arranging the carrots in a single layer around the pork. Roast uncovered until an instant-read thermometer inserted into the center of the pork registers 145°F, stirring the carrots occasionally if they are beginning to caramelize, about 18 minutes. Let the pork rest for 5 to 10 minutes.
Transfer the pork to a work surface. Cut the pork crosswise into 1/2-inch-thick slices. Arrange the carrots on the platter. Top the carrots with pork slices, drizzling any pan juices over the pork.
It is a very simple dish that gets great flavor from all of the spices used on the pork. You get a little bit of heat from the chile powder used on the carrots and pork and little bit of sweet from the sweetness of the carrots and the honey in the glaze. The original recipe calls for the use of whole baby carrots, which would work really well here, but I didn’t have any on hand and just went with carrots instead. Also, I only made one pork tenderloin instead of two so I did cut back on the recipe a bit for just one so it was not overloaded with spice. In either case, it is a great meal that can be ready and on the table in under and hour.
That’s all I have for today. Check back next time for another recipe. Until then, enjoy the rest of your day and enjoy your meal!
IMG_0503


Leave a comment

Posted by on April 15, 2014 in Cooking, Dinner, Pork, Vegetables


Tags: , , , ,

22 Classic Cocktails You Need to Know How to Make – Bon Appétit

22 Classic Cocktails You Need to Know How to Make – Bon Appétit.

To go along with your Sunday meal this week or just for your own knowledge to drink or make for friends, here are 22 classic cocktail recipes from Bon Appetit so that you can have access to making that Moscow Mule the next time someone wants one. Check it out!

 
Leave a comment

Posted by on April 14, 2014 in Beverages, Cooking Websites


Tags: , , ,

24 Recipes for Lamb, from Chops to Roasts to Kebabs – Bon Appétit

24 Recipes for Lamb, from Chops to Roasts to Kebabs – Bon Appétit.

With Easter this coming Sunday and springtime upon us, now is great time to make some lamb, a classic Spring and Easter meal (and it happens to be on sale this week too around here). Bon Appetit has put together 24 lamb recipes to cover everything you might be interested in when it comes to making lamb to give you some great ideas. Check it out!

 
Leave a comment

Posted by on April 14, 2014 in Cookbooks, Cooking Websites, Holidays, Lamb


Tags: , , , ,

Sunday Breakfast with Alton & Bobby – Southern Biscuits and Sausage Gravy

I’ve had a craving for biscuits and gravy lately and yesterday stopped over at Adam’s Farms and got some of their homemade bulk breakfast sausage so I could make some this morning for our Sunday breakfast. Sunday breakfast is usually the only day during the week where Sean, Michelle and I get to eat breakfast together, so we try to make it something different and special each week. I was looking for something quick and easy to use for the sausage gravy and for the biscuits, but I wanted homemade biscuits, not the stuff you get out of the refrigerated can. I turned to Food Network and found a good biscuit recipe from Alton Brown for southern biscuits to go alongside of the sausage gravy recipe I got from Bobby Flay. Both are really easy to make so you can get a different taste for breakfast in no time at all.

Alton Brown’s Southern Biscuits

2 cups flour
4 teaspoons baking powder
1/4 teaspoon baking soda
3/4 teaspoon salt
2 tablespoons butter
2 tablespoons shortening
1 cup buttermilk, chilled

Preheat the oven to 450 degrees.

In a large mixing bowl, combine the flour, baking powder, baking soda and salt. Using your fingertips, rub the butter and shortening into the dry ingredients until the mixture looks like crumbs.Try to do this quickly so that the fat does not completely melt. Make a well in the center of the mixture and pour in the chilled buttermilk. Stir just until the dough comes together. The dough will be very sticky.

Turn the dough onto a floured surface, dust the top of the dough with flour and gently fold the dough over on itself 5 or 6 times. Press into a 1-inch thick round. Cut out the biscuits with a 2-inch cutter, being sure to push straight down through the dough. Place the biscuits on baking sheet so that they just touch. Reform the scrap dough, working it as little as possible and continue cutting. 

Bake until the biscuits are tall and light gold on top, about 15 to 20 minutes.

Bobby Flay’s Sausage Gravy and Biscuits

1 1/2 pounds bulk breakfast sausage or mixture of hot and mild bulk sausage
4 tablespoons flour
1/2 gallon milk
Salt
Pepper
Biscuits, store-bought or homemade (see Alton Brown’s Southern Biscuit recipe above)

In a large pot, add the sausage and cook until it is browned and cooked through. Drain the grease and add the flour to the sausage. Cook the sausage in the flour over medium-high heat until the sausage is well-coated with the flour. Add the milk and stir until the gravy has the  desired thickness and add salt and pepper, to taste. Serve with the biscuits.


I did change up the sausage gravy recipe a little and did not use the 1/2 gallon of milk. I only use about 3/4 of a cup along with a 1/4 cup of heavy cream because we like a gravy that is much thicker for the sausage, and it turned out perfect. The real star here though is the biscuits. These are really easy to make, smell great and taste awesome. You could use these for all kinds of breakfast sandwiches that you like if you didn’t want the sausage gravy, like bacon, eggs, ham or anything else. They are also a great dinner biscuit and I plan to use the rest to go along with dinner tonight. You could even just have one warm with some butter to go with your tea or coffee in the morning and you would be all set.

That’s all I have for today. Check back next time for another recipe. Until then, enjoy the rest of your day and enjoy your meal!

IMG_0506 IMG_0505

 
4 Comments

Posted by on April 13, 2014 in Biscuits, Breads, Breakfast, Cooking, Gravy, Pork


Tags: , , , , , , , , , , ,

 
National Day Calendar

Fun, unusual and forgotten designations on our calendar.

Jennifer Probst

a little bit naughty a little bit nice

Laissez Faire

Letting Life Lead

simple cooking recipes

a blog to share with you the best