RSS

A Slow Cooked Meal Before the Holidays – Cuban Pork Shoulder with Beans and Rice

Okay, I needed room in my freezer to get things ready for all of our Christmas stuff late last week, so I knew it was time to make that pork shoulder that had been resting in the freezer. We had just had pulled pork on my birthday, so I set out to make something a little different with it this time and since I have been so busy with work and the holidays, it seemed like the perfect opportunity to make use of the slow cooker and just do everything in there. I came across this recipe at My Recipes for a Cuban pork shoulder with beans and rice that fit the bill perfectly, so I gave it a try.

Cuban Pork Shoulder with Beans and Rice

2 3/4 cups chicken broth

1 cup fresh orange juice (about 4 oranges)

1 medium orange, quartered

1/2 cup chopped cilantro stems

1 1/2 teaspoons freshly ground black pepper, divided

4 slices bacon, chopped

1 (2 1/2-pound) bone-in pork shoulder, trimmed

1 pound dried black beans

2 1/4 cups chopped onion, divided

10 garlic cloves, crushed and divided

1/4 cup chopped fresh oregano, divided

2 teaspoons paprika

2 teaspoons ground cumin

1 1/2 teaspoons crushed red pepper

1 bay leaf

1 1/2 cups chopped tomato

1 jalapeno pepper, seeded and thinly sliced

2 2/3 cup hot cooked white rice

1/4 chopped fresh cilantro

Combine the chicken stock, orange juice, cilantro stems and orange quarters in a blender. Process until the mixture is smooth. Strain through a fine mesh sieve over a bowl; discard any solids. Stir in 3/4 teaspoon of salt and 3/4 teaspoon black pepper.

Place the bacon in a large skillet over medium heat and cook until it is crisp, about 5 minutes. Remove the bacon with a slotted spoon and place it in the slow cooker. Sprinkle the pork shoulder with 1/2 teaspoon of salt and 1/2 teaspoon of black pepper. Return the skillet to medium-high heat and add the pork to the drippings in the skillet. Brown the pork on all sides, cooking for about 8 minutes. Add the pork shoulder to the slow cooker. Pour the uncooked black beans around the pork in the slow cooker.

Return the skillet to medium-high heat. Add 2 cups of the onions and 6 of the garlic cloves. Saute the mixture for 3 minutes. Add 3 tablespoons of the oregano, the paprika, the cumin, and the crushed red pepper to the pan and saute for about 1 minute. Add the orange mixture and the bay leaf to the pan. Bring the mixture to a boil and cook for 1 minute, stirring and scraping the pan to loosen any browned bits. Pout the onion mixture over the pork. Cover the slow cooker and cook on low setting for 8 hours or until the pork is very tender and the beans are done. Remove the pork from the slow cooker, shred the meat, and discard the bones. Discard the bay leaf. Stir in 1/4 teaspoon of salt to the beans in the slow cooker.

Combine the remaining 1/4 teaspoon of salt, remaining 1/4 teaspoon of black pepper, the remaining 1/4 cup of onion, the tomato and the jalapeno pepper in a bowl. Chop the remaining 4 garlic cloves and stir them into the tomato mixture. Spoon 1/3 cup of the hot rice onto each of 8 plates; top each serving with 1/2 cup of the bean mixture, about 3 ounces of the shredded pork and 3 1/2 tablespoons of the salsa. Garnish with the remaining oregano and the chopped cilantro.

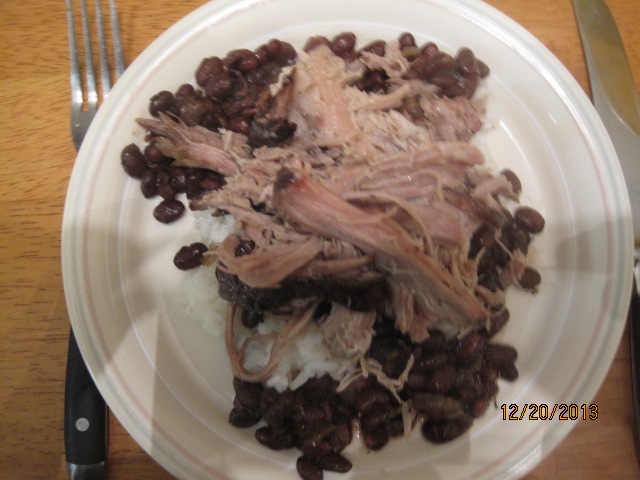
I did make a couple of changes to the recipe. Since tomatoes are not so great around here this time of year, I omitted the salsa completely from the recipe. I think the dish was fine without anyway, but it would make a nice addition if you have some good tomatoes. Also, the original recipe recommends that you use the whole orange, skin and all, in the blender. Personally, I thought it would be too bitter and peeled the orange. You still get good orange flavor. I do have to say the beans and the mixture they were in is delicious, but they get a lot of heat from the red pepper flakes, so next time I might cut back on that, but if you like the heat, then it would be perfect for you. The pork was done perfectly and had great flavor and since it was in the slow cooker, it is basically a one dish meal (except for the rice) and clean up was really easy. I would make this one again since it is so easy to do.

That’s all I have for today. Check back next time for another recipe. I will try to get one on tomorrow early for Christmas Eve and then I have to prepare for Christmas day cooking. I’ll be sure to post recipes and pictures from that. Until then, enjoy the rest of your day and enjoy your meal!

002


Leave a comment

Posted by on December 23, 2013 in Cooking, Dinner, One Pot Meals, Pork, Slow Cooker Meals


Tags: , , , ,

Christmas Cookie Ideas, Part 3: Alton Brown’s Gingersnap Cookies

Okay, so now that we have covered Sean’s cookie and Michelle’s cookie, it is time for the cookie that I made. There are a bunch of cookies I like that we eat fairly often, like chocolate chips, oatmeal raisin cookies and even Heath bar brickle cookies, but there is something about ginger snaps that I really enjoy. I love the deep ginger flavor a good one has, almost tasting spicy with a little bite to it. I can remember eating them out of the box when I was a little kid and just the smell of them alone is enough to get me thinking about them. I have made ginger snaps before, but I came across this recipe from Alton Brown a while back and had been holding back on it so that we  could use these for part of our Christmas cookies. The best thing is that they are really easy to make. One thing to note about this recipe is that Alton uses weight measurements for a few of the ingredients instead cup measurements. I don’t have a kitchen scale, but if you do you can make good use of one here. I did some research online to get some conversion rates and they seemed to work out fine, so I have included the conversions here.

Alton Brown’s Ginger Snaps

9 1/2 ounces (2 1/4 cups) all-purpose flour

1 1/2 teaspoons baking soda

1 tablespoon ground ginger

1/2 teaspoon ground cardamom

1/2 teaspoon ground clove

1/2 teaspoon kosher salt

7 ounces (1 cup) dark brown sugar

5 ounces butter, room temperature

3 ounces (1/4 cup) molasses

1 egg, room temperature

2 teaspoons finely grated fresh ginger

4 ounces (2/3 cup) finely chopped candied ginger

Preheat the oven to 350 degrees. In a medium bowl, whisk together the flour, baking soda, ground ginger, cardamom, clove and kosher salt.

Place the dark brown sugar and the butter in the bowl of a stand mixer fitted with the paddle attachment and beat on low-speed until the mixture is light and fluffy, about 1 to 2 minutes. Add the molasses, egg and fresh ginger and beat on medium speed for 1 minute. Add the crystallized ginger and, using a rubber spatula, stir the mixture to combine. Add the dry ingredients to the wet ingredients and stir the mixture until it is well combined and the dough has formed.

With a 2-teaspoon sized scoop, drop the cookie dough onto a parchment paper-lined cookie sheet or half sheet pan approximately 2 inches apart. Bake the cookies on the middle rack of the oven for 12 minutes for slightly chewy cookies or for 15 minutes for more crisp cookies. Rotate the pan halfway through the baking process to ensure even cooking and browning.

Remove the pan from the oven and allow the cookies to stay on the sheet pan for 30 seconds before transferring them to a wire rack to cool completely. Repeat the process with the remaining cookie dough. Store the cookies in an airtight container for up to 10 days.

You can even freeze the cookie dough if you want to make it ahead of time and then use it closer to your desired date for the freshest possible cookies. Just scoop and freeze the cookie dough on a sheet pan and once it is frozen place the  cookie dough in a resealable bag to store in the freezer. You can then bake the cookies directly from the freezer as the recipe instructions suggest.

One more thing about the recipe. The conversions can be a little confusing if you don’t have a scale and you may question if you have too much or too little of a particular ingredient.This recipe showed me that it is probably a good idea to have a kitchen scale for recipes like this. In any case, when I first mixed the dough it seemed way too loose and dry, as if it had too much flour. After some consideration, I decided to add another egg to help balance things out since that was the only liquid in the recipe other than the molasses. I think I could have added more molasses too and still have gotten good results but the taste might have been a lot stronger than I wanted. The extra egg seemed to even things out and the results were perfect. A very ginger-tasting cookie with just the right texture was what I ended up with.

That’s all I have for today. Check back next time for some more recipes. I made a nice Cuban pork shoulder and black beans in the slow cooker last night that was a great recipe that I will be sharing. Until next time, enjoy the rest of your day and enjoy your meal!

001


2 Comments

Posted by on December 21, 2013 in Cookies, Cooking, Dessert, Holidays


Tags: , , , , , , ,

Christmas Cookie Idea, Part Two – The Easiest Peanut Butter Cookie Ever

Continuing along with the Christmas cookie theme when we had made cookies this past weekend, Michelle opted to go for a peanut butter cookie. She and Sean both love these cookies, and even though I am not a big fan, they are always a big favorite whenever they are made. Now there are lots of peanut butter cookie recipes out there and most of them are not very difficult to do anyway, but this one seems to be the easiest one I have ever come across. All you really need to do is put the ingredients together in a bowl, give it a mix, portion out the cookies, bake and you are done. This particular recipe makes use of Bisquick to help it do everything and make it even faster.

Easy Bisquick Peanut Butter Cookies

1 cup smooth peanut butter

1/4 cup butter, softened to room temperature

1/2 cup granulated sugar

1/2 cup packed light brown sugar

1/3 cup boiling water

2 cups Bisquick

Preheat the oven to 400 degrees. Line some cookie sheets with parchment paper and spray the paper with nonstick cooking spray. In a large bowl of a standing mixer fitted with a paddle attachment, combine the peanut butter, butter, granulated sugar, brown sugar, water and Bisquick. Mix all of the ingredients on medium-low speed until everything is well combined and dough begins to form, about 2 to 3 minutes.

Using a small cookie scoop or tablespoon, scoop rounded mounds of the cookie dough onto the parchment paper-lined cookie sheets. Using the back of a fork, lightly press into the cookie dough mounds to flatten slightly and make a pattern into the cookie dough. Place the cookie trays in the oven and bake the cookies for until they are a lightly golden brown, about 8 to 10 minutes, rotating the cookie sheets about halfway through the baking process. Allow the  cookies to cool on the cookie sheets for about 2 to 3 minutes. Transfer the cookies to a wire cooling rack and allow them to cool completely.

This recipe generally makes 2 to 3 dozen cookies in total, depending on how big of a cookie you like to have. Michelle and Sean gobbled these up and loved the rich peanut butter flavor. it turns out to be a rather dense cookie in my opinion, which I attribute to using Bisquick in the recipe, but if you like that kind of cookie than this one is certainly for you. The best part is that the recipe requires very few ingredients, most which people usually have on hand (which was perfect for snowstorm weather) so you can really make them any time. Michelle actually makes these often when she makes cookies.

That’s all I have for today. Check back next time when I will feature the cookie recipe that I made that day. It is another easy one and a take on the classic gingersnap cookie, always one of my personal favorites. I also have some other recipes that I have tried recently to share, including a baked ziti, a roasted boneless leg of lamb, some quick biscuits you can make any time in a snap, and more. I also have my Christmas menu planned so I will get to share that with you as well. Until next time, enjoy the rest of your day and enjoy your meal!

004

 
1 Comment

Posted by on December 19, 2013 in Cookies, Cooking, Dessert, Holidays


Tags: , , , , ,

A Christmas Cookie Idea, Part One: Lemon Crinkle Cookies

After taking a couple of days off while a stomach virus ran rampant through our household, I am back with a new post. This past weekend while we were snowed in on Saturday we each decided we were going to make a Christmas cookie of our own. All three of us scoured recipes to try to find one that we would like to make while using only the ingredients we had in the house already since we were being pelted with snow. The first one to come up with one was Sean, who found this recipe online for lemon crinkle cookies. It’s a very straightforward recipe that produced some very yummy results.

Lemon Crinkle Cookies

1/2 cup butter, softened

1 cup granulated sugar

1/2 teaspoon vanilla extract

1 egg

1 teaspoon lemon zest

1 tablespoon fresh lemon juice

1/4 teaspoon salt

1/4 teaspoon baking powder

1/8 teaspoon baking soda

1 1/2 cups all-purpose flour

1/2 cup confectioners’ sugar

Preheat the oven to 350 degrees. Grease light-colored baking sheets with nonstick cooking spray or cover them in sheets of parchment paper and set them aside.

In a large bowl, cream the butter and the granulated sugar together until the mixture is light and fluffy. Whip in the vanilla, the egg, the lemon zest and the lemon juice. Scrape the sides of the bowl and mix again until everything is well incorporated. Stir in the salt, baking powder, baking soda and flour slowly until it is all just combined. Scrape down the sides of the bowl and mix everything together again briefly. Pour the confectioners’ sugar onto a separate plate. Roll a heaping tablespoon of the cookie dough into a ball and then roll it in the confectioners’ sugar to coat. Place the cookie on a baking sheet and repeat the process with all of the remaining dough.

Place the cookie sheets in the oven and bake the cookies for 9 to 11 minutes or until the bottoms of the cookies begin to barely brown and the cookies look like they have a matte finish, not melted or shiny. Remove the cookies from the oven and allow them to cool for about  3 minutes on the trays before transferring them over to a wire cooling rack to cool completely.

This recipes makes about two to three dozen cookies, so you should get plenty from them. I really enjoyed the lemon flavor of these cookies. It is subtle and not overpowering like some lemon cookies can be and it combined nicely with the sweetness of the sugar. Best of all, it was really simple to make and doesn’t require a lot of ingredients. For most people, it may be things you already have on hand all the time so you could easily make these any time of year, not just for the holidays. We were all quite pleased with the results of this one and Sean was very happy that he made such a good cookie himself.

That’s all I have for today. Check back next time for another cookie recipe from our cookie day. Next up will be Michelle’s choice of cookie. Until then, enjoy the rest of your day, and enjoy your meal!

003

 
1 Comment

Posted by on December 17, 2013 in Cookies, Cooking, Dessert, Holidays


Tags: , , ,

A Cold Day Calls for a Good Soup – Classic Tomato Soup

We are well into the winter weather here in New York, especially over the last few weeks where it has been quite cold. Today we are getting slammed with a lot of snow, but last night was pretty darn chilly as well. The best way to combat the cold weather? Make some soup for dinner. That is what I decided to do last night and I wanted to try to keep things simple. I am a big fan of tomato soup and I found this very simple recipe from Saveur to make a tomato soup in under 45 minutes and it will have great flavor. You don’t even need a lot of ingredients for this one.

Classic Tomato Soup

2 slices bacon cut into thin matchsticks

1/2 tablespoon butter

1 small onion, thinly sliced

1 small carrot, halved and thinly sliced

1 tablespoon tomato paste

2 teaspoons all-purpose flour

2 cups chicken broth

1 1/2 cups canned diced tomatoes, well drained

2 sprigs thyme

1 bay leaf

1 garlic clove, lightly crushed

2 tablespoons heavy cream

Render the bacon over medium heat in a 3-quart saucepan until it is crisp, about 3 minutes. Remove the bacon to a paper towel-lined plate and set it aside, reserving the rendered fat in the saucepan.

Increase the heat to medium-high and add the butter. Saute the onion and carrot for 8 to 10 minutes or until they are very soft and beginning to caramelize, stirring occasionally. Add the tomato paste and continue cooking for about 2 minutes, stirring it frequently. Sprinkle the flour over the vegetable mixture, mix well and continue cooking for another minute. Gradually pour in the chicken broth, whisking constantly to prevent any lumps from forming. Add the diced tomatoes, thyme, bay leaf and garlic and bring the mixture to a boil. Reduce the heat and simmer the soup for 25 to 30 minutes, stirring occasionally.

Remove the soup from the heat. Add the heavy cream and puree the soup with an immersion blender until it is smooth. Season the soup to taste with salt and pepper and serve the soup garnished with the crisped bacon.

It is very simple to put together and gives you a nice, smooth, creamy texture. This tomato soup is better than any that you will pour out of a can and takes no effort at all. You can even make it completely vegetarian by eliminating the bacon and just adding an extra 1/2 tablespoon of butter instead. You can serve this just by itself or with a nice side salad or even some sandwiches. A lot of people love the grilled cheese and tomato soup combination. For me personally, I love a nice tuna salad sandwich or chicken salad sandwich to go along with it. You could even make some of your own croutons to sprinkle on the soup as well, or try some homemade bread.

That’s all I have for today. Check back next time for some more recipes. We’re making cookies today for the holidays, so I’ll have some cookie recipes to share this week. Until next time, enjoy the rest of your day, stay warm and dry and enjoy your meal!

002

 
Leave a comment

Posted by on December 14, 2013 in Cooking, Dinner, One Pot Meals, Soups & Stews


Tags: , , ,

Simple, One Dish Italian Dinners, Part 1 – Lasagna

Okay, anyone who knows me personally know I don’t eat pasta or cheese, but that does not mean I won’t make it for someone else to enjoy. Michelle and Sean both really like lasagna, and since we had Sean’s birthday meal not that long ago, he decided that he wanted to have some lasagna for his dinner. For me, this needs to be as simple of a recipe as it can be, and Cook’s Illustrated gave me just that in their cookbook with a straightforward meat lasagna with not a lot of ingredients that was easy to make.

Meat Lasagna

Tomato Meat Sauce:

1 tablespoon olive oil

1 onion, chopped fine

6 garlic cloves, minced

1 pound ground beef

1/2 teaspoon salt

1/2 teaspoon pepper

1/4 cup heavy cream

1 (28-ounce) can tomato puree

1 (28-ounce) can diced tomatoes, drained

Cheese Filling:

14 ounces (1 3/4 cups) ricotta cheese

2 1/2 ounces (1 1/4 cups) Parmesan cheese, grated

1/2 cup chopped fresh basil

1 egg

1/2 teaspoon salt

1/2 teaspoon pepper

16 ounces mozzarella cheese, shredded (4 cups)

12 no-boil lasagna noodles

For the sauce: Heat the olive oil in a Dutch oven over medium heat until shimmering. Add the onion and cook, stirring occasionally, until softened, about 5 minutes. Stir in the garlic and cook until it is fragrant, about 30 seconds. Stir in the ground beef, salt, and pepper, increase the heat to medium-high and cook, breaking up any large pieces with a wooden spoon, until the meat is no longer pink, about 3 minutes. Add the heavy cream and bring the mixture to a simmer, and cook, stirring occasionally, until the liquid evaporates and only rendered fat remains, about 4 minutes. Stir in the tomato puree and the diced tomatoes, bring to a simmer, and cook until the flavors meld, about 3 minutes. Set the sauce aside.

For the cheese filling: Adjust an oven rack to the middle position and heat the oven to 375 degrees. Combine the ricotta cheese, 1 cup of the Parmesan cheese, the basil, egg, salt and pepper in a bowl.

Spread 1/4 cup of the meat sauce evenly over the bottom of a 13-inch by 9-inch baking dish. Arrange 3 lasagna noodles in a single layer on top of the meat sauce. Spread each noodle evenly with 3 tablespoons of the ricotta cheese mixture and sprinkle the entire layer with 1 cup of the mozzarella cheese. Spoon 1 1/2 cups of meat sauce over the top. Repeat the layering of the noodles, ricotta cheese mixture, mozzarella cheese and the meat sauce 2 more times. For the final layer, arrange the remaining 3 noodles on top and cover the top completely with the remaining meat sauce.. Sprinkle the top with the remaining 1 cup of mozzarella cheese then sprinkle it with the remaining 1/4 cup of Parmesan cheese.

Cover the dish tightly with aluminum foil that has been sprayed with nonstick cooking spray. Bake for 15 minutes, then remove the aluminum foil and continue to bake until the cheese is spotty brown and the edges are just bubbling, about 25 to 30 minutes longer. Cool the lasagna for 15 minutes before serving.

It was much easier to make this way using the no-boil noodles, but if you prefer to make your own noodles then you should go right ahead. I know everyone has their own family lasagna recipe, but if you are making your own for the first time and need one to start with then this one is pretty good to use because it is easy to follow and gives you good results. you can serve this with a simple side salad and some homemade garlic bread and you are good to go for the night. I know we’ll be making it again since Sean and Michelle love it so much.

That’s all I have for today.Check back next time for another recipe and see what comes along. I still have lots to choose from. Until next time, enjoy the rest of your day and enjoy your meal!

006 005


7 Comments

Posted by on December 13, 2013 in Beef, Cooking, Dinner, One Pot Meals, Pasta, Uncategorized


Tags: , , ,

Chicken Thigh Recipes Slideshow – Bon Appétit

Chicken Thigh Recipes Slideshow – Bon Appétit.

Chicken thighs are my favorite piece of the chicken to make. They seem to have the most flavor and there are so many different things you can do with them, whether you have bone-in, boneless, skim-on or skinless. Bon Appetit offers up 16 great ways to make chicken thighs. Give one or two or ten a try and see how they go. Check it out!

 
Leave a comment

Posted by on December 12, 2013 in Cooking, Cooking Websites, Dinner, Poultry


Tags: , , ,

It’s My Birthday (Cake)! – Bananas Foster Cake

Today is my birthday and since it falls in the middle of the week this year we decided to have my birthday dinner this past weekend. We made some pulled pork, homemade cole slaw,German potato salad and some barbecued baked beans for the meal itself. The only new recipe there is for the baked beans, which I will post tomorrow. For dessert, Michelle had asked me what kind of cake I would like. Normally, I would have selected a Black Forest cake as it is one of my all-time favorite desserts and takes some time to make so I don’t get it very often. However, I saw this cake in the last issue of Cook’s Country and knew right away that I had to try this one for my birthday. It is for a Bananas Foster Cake and just the look and the description of the cake made it sound wonderful.

Bananas Foster Cake

For the Cake:

4 eggs, room temperature

1/2 cup milk, room temperature

2 teaspoons vanilla extract

1 3/4 cups cake flour

1 1/2 cups granulated sugar

2 teaspoons baking powder

3/4 teaspoon salt

16 tablespoons (2 sticks) butter,cut into 16 pieces and softened

For the Filling and Frosting:

3/4 cup dark rum

1/2 cup packed dark brown sugar

Salt

2 tablespoons butter, chilled, plus 20 tablespoons (2 1/2 sticks) softened

4 ripe bananas

1/8 teaspoon ground cinnamon

2 1/2 cups confectioners’ sugar

1 teaspoon vanilla extract

For the cake: Adjust an oven rack to the lower-middle position and heat the oven to 350 degrees. Grease two 9-inch or three 8-inch round cake pans, line them with parchment paper, grease the parchment and the flour pans.

Whisk the eggs, milk and vanilla together in a bowl. Using a stand mixer fitted with a paddle, mix the cake flour, granulated sugar, baking powder and salt on low-speed until combined. Add the butter, 1 piece at a time, until only pea-size pieces remain, about 1 minute.

Add half of the egg mixture, increase the speed to medium-high, and beat the mixture until it is light and fluffy, about 1 minute. Reduce the speed to medium-low, add the remaining egg mixture and beat until it is incorporated, about 30 seconds. The batter may look slightly curdled. Give the batter a final stir by hand.

Divide the batter evenly among the prepared cake pans and smooth the tops with a rubber spatula. Bake until the tops are light golden and a toothpick inserted into the center comes out clean, about 18 to 22 minutes for 8-inch pans and 20 to 25 minutes for 9-inch pans, rotating the pans halfway through the baking process. Let the cakes cool in the pans on a wire rack for 10 minutes. Remove the cakes from the pans, discarding the parchment paper, and let them cool completely on the rack, about 2 hours.

For the caramel: Cook 1/2 cup of the dark rum, the brown sugar and a pinch of salt in a large skillet over medium-low heat, stirring frequently, until the spatula leaves a 2-second trail when dragged through the sauce, about 7 to 10 minutes. Remove the caramel from the heat. Whisk 3 tablespoons of the caramel and 2 tablespoons of the chilled butter together in a small bowl until combined; set both caramels aside and let the mixed caramel cool completely.

For the filling: Peel and cut 2 of the bananas into 1/4-inch-thick slices. Add the sliced bananas and the cinnamon to the remaining warm caramel in the skillet and stir gently to combine. Set this aside and let it cool completely.

For the frosting: Using a stand mixer fitted with a whisk, mix the remaining 20 tablespoons of softened butter and 1/8 teaspoon of salt on medium-low speed until it is smooth, about 10 seconds. Slowly add the confectioners’ sugar and continue to mix until the mixture is smooth, about 2 minutes. Add the remaining 1/4 cup of dark rum and the vanilla and mix until incorporated, about 1 minute, scraping down the bowl as needed. Increase the speed to medium-high and whip the frosting until it is light and fluffy, about 5 minutes.

To assemble the cake: Place 1 cake layer on a cake plate or pedestal. Spread half of the banana filling over the cake. Top with the second cake layer and the remaining filling. Top with the final layer of cake and frost he top and the sides of the cake. Just before serving, peel and cut the remaining 2 bananas into 1/4-inch-thick slices and shingle them around the top edge of the cake. Pour the reserved caramel-butter mixture over the bananas, allowing the excess to drip down the sides of the cake. Serve.

All I can say about this cake is that it tastes amazing! If you like bananas foster, and I love it, then this is the cake for you. you get great banana flavor from the filling of the cake and the frosting is out of this world with the rum in it. The caramel just tops everything off, adding amazing texture and flavor to the whole thing. This is my new favorite cake and I would have it again and again (and I have for dessert the last few nights). The only change we made is that we did two 9-inch layers instead of the three 8-inch layers. Other than that, we followed along and did everything. You absolutely must try this cake out!

That’s all I have for today. Check back again next time for some more recipes. Until then, enjoy the rest of your day and enjoy your meal!

005 004


6 Comments

Posted by on December 11, 2013 in Cakes, Cooking, Dessert


Tags: , , , ,

A Simple Side for Your Burgers and Sandwiches – Beer Battered Onion Rings

I love onion rings. Admittedly, they are not the healthiest  choice when it comes to things to make. The frozen ones, even when baked in the oven, are not the best thing for you but I still love them. I have tried a few times to make my own and have made them by baking them in the oven and by frying them, but I had never really tried a beer batter recipe before. I cam across this one in Saveur Magazine not long ago and had been waiting for the right opportunity to make them. I made some burgers for dinner one night last week and the onion rings were just the perfect accessory for the burgers.

Beer Battered Onion Rings

1 3/4 cups all-purpose flour

1/2 cup cornstarch

1 1/2 teaspoons paprika

1 teaspoon dry mustard

1 tablespoon baking powder

1 tablespoon kosher salt, plus more to taste

2 teaspoons honey

12 ounces lager-style beer

Vegetable or canola oil, for frying

2 large onions, cut crosswise into 1/2-inch thick slices and separated into rings

In a large bowl, whisk together the flour, cornstarch, paprika, dry mustard, baking powder and salt. Add the honey and the beer and whisk the mixture until it is smooth.. Allow the mixture to sit for 10 minutes.

Pour the vegetable or canola oil to a depth of 2 inches in a Dutch oven or large skillet with high sides and heat the pan over medium-high heat until the temperature of the oil registers 375 degrees on a candy or deep-fry thermometer. Working in batches, dip the onion rings into the batter, shaking off any excess, and lower them into the oil. Fry the onion rings, flipping once, until they are golden brown, about 3 minutes total. Transfer the onion rings to a paper towel lined plate to drain briefly and season with more salt. Cover the onion rings and repeat the process with any remaining onion rings until they are all fried. Serve immediately.

The batter was a lot thicker than I thought it was going to be and it made for an excellent crust on the onion rings. You got some really great flavor from the mix of the beer, honey and paprika and they were done quite quickly. We all loved the taste of them and devoured all the onion rings with our burgers pretty quickly. These would be great to make with any burgers or other sandwiches like a chicken sandwich or even with some corned beef or pastrami. They would also make an awesome appetizer or snack when you are watching a football game or having some friends over for a party. I’ll definitely be trying this recipe again.

That’s all I have for today. Check back tomorrow for another recipe. Tomorrow is my birthday, so I will be posting the recipe Michelle used for my wonderful birthday cake that she made. Check back tomorrow to see what it is. Until then, enjoy the rest of your day and enjoy your meal!

003


Leave a comment

Posted by on December 10, 2013 in Appetizers, Cooking, Picnic Fare, Side Dishes, Snacks


Tags: , , , ,

Sean’s Birthday Cake – Peppermint Mocha Cupcakes

Sean’s birthday was last week (he is officially a teenager now) and he invited a few of his friends over this past weekend to hang out and have some snacks and then have some cake. Since he did not want a traditional birthday cake while his buddies were here, he decided he would like some cupcakes instead. I went about trying to find something special when I came across this wonderful recipe on Sally’s Baking Addiction for these peppermint mocha cupcakes. They were the perfect thing for some teenage boys looking for a tasty and sweet snack and it fits the holiday season as well.

Peppermint Mocha Cupcakes

Cupcakes:

1/2 cup butter

2 ounces semisweet baking chocolate

1 heaping tablespoon instant coffee

1/2 cup unsweetened cocoa powder

3/4 cup all-purpose flour

12 teaspoon baking soda

3/4 teaspoon baking powder

1/4 teaspoon salt

2 eggs, room temperature

1/2 cup granulated sugar

1/4 cup light brown sugar

1 teaspoon vanilla extract

1/2 teaspoon peppermint extract

1/2 cup buttermilk

Peppermint Vanilla Frosting:

1 cup butter, softened to room temperature

3 to 4 cups confectioners’ sugar

1/4 cup heavy cream

1 teaspoon vanilla extract

1/4 teaspoon peppermint extract

Salt, to taste

Cupcake Decor:

4 ounce semisweet baking chocolate,melted

Crushed candy canes

For the cupcakes: preheat the oven to 350 degrees. Line a 12-cup cupcake pan with cupcake liners and set it aside.

Melt the butter and the chocolate together in the microwave. Microwave in 30 second increments, stirring between each time. You may also melt the butter and chocolate over low heat on the stove top. Stir until the mixture is combined, then mix in the instant coffee. Set the mixture aside to cool slightly.

In a medium bowl, toss the  cocoa powder, all-purpose flour, baking soda, baking powder, and salt together until thoroughly combined. Set this bowl aside. In a large bowl, whisk the eggs, granulated sugar, brown sugar, vanilla extract and peppermint extract together until it is smooth. Add the cooled butter/chocolate and whisk it together until smooth. Add half of the flour mixture, then half of the buttermilk. repeat until everything is added together. Stir until it is just combined; do not overmix. The batter will be very thick, like pudding.

Divide the batter between the 12 cupcake liners in the cupcake pan. Bake the cupcakes for 18 minutes, or until a toothpick inserted into the center of a cupcake comes out clean. Allow he cupcakes to cool completely before frosting.

For the frosting: Beat the softened butter on kedium speed with an electric or stand mixer. Beat for about 3 minutes until it is smooth and creamy. Add the powdered sugar, heavy cream, vanilla extract and peppermint extract with the mixer running. Increase the mixer to high-speed and beat for 3 full minutes. The longer you beat the mixture, the creamier the frosting will be. Add more powdered sugar if the frosting is too thin or more cream if the frosting is too thick. Add the salt if the frosting is too sweet (about 1/4 teaspoon).

Decorate the cupcakes: Frost the cooled cupcakes. There may be leftover frosting depending on how much you use on each cupcake. Drizzle the cupcakes with the melted chocolate and top with the crushed candy canes.

I really liked the flavor of the cupcakes. The hint of coffee with the peppermint may this cupcake delicious. This recipe does make a lot of frosting, so if you have something else you can use it for, go right ahead or make some extra cupcakes and you will be able to frost them. The frosting has a great mint flavor and adding the drizzled chocolate and the candy canes just topped everything off, literally. The boys really enjoyed them and each had at least one and we still had some leftover for the next day. i would make this again for sure. They are great for a party and would be perfect for a Christmas or holiday party as well.

That’s all I have for today. Check back next time for more recipes. I have a huge backlog of recipes I have made to post and not enough time to post them as I have been busy with work and Christmas stuff, but I will try my best to get everything on here. Until next time, enjoy the rest of your day and enjoy your meal!

001


Leave a comment

Posted by on December 9, 2013 in Cakes, Cooking, Cooking Websites, Dessert, Holidays


Tags: , , ,

 
National Day Calendar

Fun, unusual and forgotten designations on our calendar.

Jennifer Probst

a little bit naughty a little bit nice

Laissez Faire

Letting Life Lead

simple cooking recipes

a blog to share with you the best