RSS

Mother’s Day Dinner Part 2 – Chicken Parmesan

For the second recipe that I made for Mother’s Day, we selected another meal from the Cook’s Illustrated Cookbook. This time it was a more updated version of chicken Parmesan. We wanted to make something that was not cooked directly in the tomato sauce as I have found that this can make the breading on the chicken quite soggy. I prefer to have it crisp along with the baked cheese on top. This recipe seems to fit all of these requirements. I used the exact same tomato sauce recipe as I had posted yesterday with the eggplant Parmesan.

Updated Chicken Parmesan

Recipe for Tomato Sauce (See yesterday’s post)

4 (8-ounce) boneless, skinless chicken breasts

2 large eggs
Salt and pepper
2 cups panko breadcrumbs
1/2 cup extra-virgin olive oil
6 ounces mozzarella cheese, shredded (1 1/2 cups)
2 ounces Parmesan cheese, grated (1 cup), plus extra for serving
8 ounces spaghetti

Adjust an oven rack 6 inches from the broiler element and heat the broiler. Set a wire rack in a rimmed baking sheet. Halve the chicken horizontally, then cut each half down the middle to create four pieces. Cover the chicken with plastic wrap and pound each piece to an even 1/4-inch thickness with a meat pounder.

Lightly beat the eggs and 1/2 a teaspoon of salt together in a shallow dish or a pie plate. Combine the breadcrumbs, 1/2 teaspoon of salt, and 1/2 teaspoon of pepper in a second dish. Pat the chicken dry with paper towels and season with salt and pepper. Working with one cutlet at a time, coat each piece with the egg mixture, allowing any excess to drip off. Coat all sides of the cutlet with the breadcrumb mixture, pressing gently so that the crumbs adhere. Transfer the breaded cutlets to the prepared wire rack.

Heat oil in a large skillet over medium-high heat until shimmering. Working in batches, place the cutlets in the skillet and cook until a deep golden brown and crisp on the first side, about three minutes. Flip the cutlets, reduce the heat to medium, and continue to cook until they are a deep golden brown and crisp on the second side, about two minutes longer. Transfer the cutlets to a clean wire rack set in a baking sheet and repeat the process until all the cutlets have been cooked. Sprinkle the cutlets evenly with mozzarella and Parmesan. Broil the cutlets until the cheese is melted and spotty brown, about three minutes.

Meanwhile, bring 4 quarts of water to a boil in a large pot. Add the pasta and 1 tablespoon of salt and cook, stirring often until al dente. Drain the pasta. Serve the chicken with the pasta, spooning sauce over individual portions and passing the Parmesan separately.

I did change up the recipe just a bit. After slicing the chicken horizontally, I cut it again to make smaller portions. If you want the larger portions, just eliminate the second cut.The nice thing about this recipe, besides the fact that it did not take long to cook it all, is that some people don’t like the chicken drowning in tomato sauce. This gave them the opportunity to have the chicken with as much sauce as they like or with no sauce at all. The chicken came out very crispy and tasted great.

That’s the recipe for today. Tomorrow I will post the recipe I used for the sausage and peppers that I made. I have made sausage and peppers many times in the past and posted another recipe on my blog here, but this one I found does everything exclusively in the oven, and I think it turned out much better. Check back tomorrow to see if you like it. Later on in the week I will also have recipes that I used for a wilted spinach salad and a simple tomato and mozzarella cheese appetizer. Until the next time, enjoy the rest of your day and enjoy your meal!

008

 
Leave a comment

Posted by on May 14, 2013 in Cookbooks, Cooking, Dinner, Holidays, Pasta, Poultry


Tags: , , , , , , ,

Mother’s Day Dinner, Part 1 – Eggplant Parmesan

Cooking on Mother’s Day is always a special event. I wanted to make sure I made things that Michelle really wanted to have for dinner and that would be good for the guests that we were having for the day. After some back and forth we decided on a few different things to make, but it was mostly going to have an Italian theme to it. I made a few things, so for the first day of the recipes I am going to post the recipe I used for Eggplant Parmesan that I got from the Cook’s Illustrated Cookbook. Actually, a lot of recipes that I used for the Mother’s Day meal came from this cookbook. This one, I think, was my favorite of the day.

Eggplant Parmesan

1/4 cup extra-virgin olive oil
2 garlic cloves, minced
1 (28-ounce) can crushed tomatoes
1/2 teaspoon dried basil
1/4 teaspoon dried oregano
1/4 teaspoon sugar
Salt and pepper
2 pounds eggplant, sliced into one fourth-inch-thick rounds
Kosher salt and pepper
8 slices white sandwich bread, torn into quarters
2 ounces Parmesan cheese, grated (1 cup)
1 cup flour
4 large eggs
6 tablespoons vegetable oil
8 ounces mozzarella cheese, shredded (2 cups)
1 ounce Parmesan cheese, grated (1/2 cup)
10 fresh basil leaves, roughly torn

For the tomato sauce, heat the oil and garlic in a large saucepan over medium heat. Cook, stirring often, until the garlic turns golden but not browned, about three minutes. Stir in the tomatoes, basil, oregano, sugar, 1/4 teaspoon pepper, and a pinch of salt, bring to a simmer, and cook until the sauce thickens and the flavors meld, about 10 to 12 minutes. Take the sauce off the heat, season with salt to taste and cover to keep warm.

For the eggplant, line a baking sheet with a triple layer of paper towels and set it aside. Toss the eggplant and 1 1/2 teaspoons of salt together in a bowl, then transfer it to a colander. Let it sit until the eggplant releases about 2 tablespoons of liquid, about 30 to 45 minutes. Wipe the excess salt from the eggplant, then arrange it on a prepared baking sheet. Cover the eggplant with another triple layer of paper towels and firmly press each slice to remove as much liquid as possible.

While the eggplant is draining, adjust oven racks to the upper-middle and lower-middle positions, place a rimmed baking sheet on each rack, and heat the oven to 425°. Pulse the bread in a food processor to fine, even crumbs, about 15 pulses. You should have about 4 cups of breadcrumbs when you are done. Transfer the crumbs to a pie plate or shallow dish and stir in the Parmesan cheese and a half teaspoon of pepper; set aside.

Combine the flour and 1 teaspoon of pepper in a large zipper-lock bag and shake to combine. Beat the eggs in a second pie plate or shallow ditch. Place 8 to 10 eggplant slices in the bag with the flour, sealed the bad, and shake to coat the eggplant. Remove the eggplant slices, shaking off any excess flour, then dip in the eggs, letting any excess egg run off. Then coat the eggplant evenly with the bread-from mixture. Set the breaded slices on a wire rack set in a rimmed baking sheet. Repeat the process with the remaining eggplant.

Remove the preheated baking sheets from the oven. Add 3 tablespoons of oil to each sheet, tilting the sheet to coat it evenly with the oil. Place half of the breaded eggplant on each baking sheet and a single layer; bake until the eggplant is well browned and crisp, about 30 minutes, switching and rotating the baking sheets after 10 minutes, and flipping the eggplant slices with a wide spatula after 20 minutes. (Do not turn off the oven.)

To assemble the dish, spread 1 cup of the tomato sauce over the bottom of a 13 x 9-inch baking dish. Layer in half of the eggplant slices, overlapping slices to make sure everything fits. Distribute 1 cup of sauce over the eggplant, then sprinkle with 1 cup of the mozzarella cheese. Layer in the remaining eggplant, then.with 1 cup of sauce, leaving the majority of the eggplant exposed so it will remain crisp. Sprinkle with the Parmesan cheese and the remaining 1 cup of mozzarella. Bake until bubbling and the cheese is browned, 13 to 15 minutes. Cool for 10 minutes, and scattered the basil over the top, and serve, passing the remaining tomato sauce separately.

I had never made eggplant Parmesan before, and the few times that I have had it be eggplant to me comes out to be quite soggy and full of oil. I think a lot of this is because most people just simply fry the eggplant before they put it in the oven. This technique seems to work better to me as salting the eggplant first helps draw out a lot of the moisture out of it, and then the baking process helps to keep it crisp. I actually used Panko breadcrumbs instead of making the breadcrumbs in the food processor as suggested and I think it actually came out better. Only putting a little bit of sauce on the eggplant cook in the dish also seem to help keep it nice and crisp as well. I used the same technique with the chicken Parmesan that we also made for dinner and that seemed to work really well too; you’ll see that recipe posted tomorrow. Everyone seemed to love the eggplant and it disappeared quite quickly, so fast in fact that I never even got a picture of it to take to post on here, so for that I apologize. But I will certainly make this dish again as the recipe proved to be popular even with those who are not big fans of eggplant.

That’s it for today. Time to get back to work. Tomorrow I will post the recipe for the chicken Parmesan that I need it. It is slightly different than the recipe I have posted here in the past and that everyone seemed to really like the way that came out as well so I think you’ll enjoy it. Check back tomorrow and see if you like it. Until then, enjoy the rest of your day and enjoy your meal!

 
1 Comment

Posted by on May 13, 2013 in Cookbooks, Cooking, Dinner, Holidays, Sauce, Vegetables


Tags: , , , , ,

Bon Appetit and Blackberry Farm Griddle Cakes

When we receive the latest issue of Bon Appétit magazine a few weeks ago, we knew right away that we wanted to try to make the cover picture that was on there. They had a great recipe from Blackberry Farm, a hotel in Tennessee that offers these incredible cradle cakes. Just the picture alone would make you want to at least give them a try. The recipe is not hard to make, although it has a number of ingredients in it that took me a little while to track down in our location. I can tell you that it certainly worth the effort to put into it to try to find some of the flour that you need.

Blackberry Farm Griddle Cakes

1 large egg
2 cups buttermilk
1/4 cup pure maple syrup
1 cup gluten-free oat flour
2/3 cup yellow cornmeal
1/3 cup brown rice flour
1/4 cup buckwheat flour
1 tablespoon baking powder
1 teaspoon baking soda
1 teaspoon kosher salt
1/4 cup (half stick) butter, melted
Vegetable oil (for skillet)

Whisk the egg, buttermilk and maple syrup in a small bowl. Whisk the oat flour, cornmeal, rice flour, buckwheat flour, baking powder, baking soda, and salt together a large bowl. Whisk the buttermilk mixture into the dry ingredients, then whisk in the melted butter until no lumps remain.

Heat a large nonstick or cast-iron skillet over medium heat; lightly brush the pan with oil. Working in batches, pour the batter by one fourth-cupfuls into the skillet. Cook until the bottoms are browned and bubbles begin to form on the top of the griddle cakes, about three minutes. Flip the cakes and cook until the griddle cakes are cooked through, about two minutes longer.

I have to say that these were better than any other pancakes that I have had in a long time. I love the nutty flavor that you got from the cakes themselves. They are a little bit darker in color than what you would normally have from pancakes, but I assume that is due to the different types of flours you were using, such as the brown rice flour and the buckwheat flour. Altogether they create an incredible flavor. You could easily double or triple the ingredients in this recipe and store it so that you have a mixture ready to go with any time. Another great thing about this recipe is that it is gluten-free so you can make it for yourself or others who may have issues with that. We had these for dinner a couple of nights ago and serve them with some links sausage and a little bit of bacon. We also had some syrup and butter and while my picture does not look nearly as nice as the one in the magazine, I sure think it tasted just as good.

That’s it for today. Tomorrow is Mother’s Day and we have dinner planned over here, I’ll be making Chicken Parmesan, Eggplant Parmesan, Sausage and Peppers and a Wilted Spinach Salad with a Warm Bacon Vinaigrette. Check back on Monday and I will see if I can post a couple of the recipes for everyone else to try. Until then, enjoy the rest of your day today, enjoy your meal and have a wonderful Mother’s Day!

002 001

 
Leave a comment

Posted by on May 11, 2013 in Breakfast, Cooking, Cooking Websites


Tags: , , , , ,

Pan-Fried Crab Cakes and Oven Fries

I have posted crab cakes and oven fries recipes on the blog before, but I did make them a little differently this past week when we had them for dinner. This time, I decided to use the Cook’s Illustrated Cookbook, which I find I used for many different things. It has lots of great recipes in it, both basic and a little more technical see you can cover just about everything. The cookbook also has a lot of great hints as far as equipment, kitchen accessories, techniques, and more. I highly recommend it if you are looking for a cookbook batting compresses everything. The crab cakes recipe that I used is pretty basic and easy to follow.

Pan-Fried Crab Cakes

1 pound jumbo lump crab meat, picked over to remove cartilage and shell fragments
4 scallions, green parts only, minced
1 tablespoon chopped fresh parsley, cilantro, dill, or basil
1/4 cup mayonnaise
2-4 tablespoons plain dried breadcrumbs
1 1/2 teaspoons Old Bay seasoning
Salt and ground white pepper
1 large egg, lightly beaten
1/4 cup flour
1/4 cup vegetable oil
Lemon wedges
Tartar sauce (recipe to follow)

Line a rimmed baking sheet with parchment paper. Gently mix the crab meat, scallions, parsley, mayonnaise, 2 tablespoons of breadcrumbs, and Old Bay in a medium bowl, being careful not to break up crab lumps. Season with salt and white pepper to taste. Carefully fold in the egg with a rubber spatula until the mixture just clings together. If the cakes do not bind, add more breadcrumbs, 1 tablespoon at a time, until they do.

Divide the crab mixture into four portions and shape each portion into a fat, round cake, about 3 inches in diameter and 1 1/2 inches thick. Arrange on a prepared baking sheet, cover, and refrigerate at least 30 minutes or up to 24 hours.

Place flour in a shallow baking dish or pie plate. Lightly dredge the cakes in the flour. Keep your loyal in a large nonstick skillet over medium-high heat until shimmering. Gently lay the flowered cakes in the skillet and cook until the exteriors are crisp and browned, about 4 to 5 minutes per side. Serve immediately with lemon wedges or sauce.

I’ve always found that the key to really good crab cakes is having less breadcrumbs, less filling and more crab. Most of the crab cakes you seem to get when you go out to a restaurant are just filled with breadcrumbs and don’t have much crab in them at all. Also, I have found many places tend overcook them so you really only need about four minutes per side just to crisp them up. Jumbo lump crabmeat can be quite expensive, so if you want a cheaper alternative you can certainly buy pasteurized crabmeat. That is what I used this time and I think the recipe turned out just fine. Another key is you really do need a good nonstick skillet to use to make these. There is nothing worse than trying to flip the crab cake that is stuck to the bottom of the pan. I served the crab cakes with that recipe that I also got from this cookbook for the tartar sauce. It’s really easy to make and it’s certainly better than anything you’re going to find in a store.

Homemade Tartar Sauce

3/4 cup mayonnaise
1/2 shallot, minced
2 tablespoons capers, rinsed and minced
2 tablespoons sweet pickle relish
1 1/2 teaspoons white vinegar
1/2 teaspoon Worcestershire sauce
1/2 teaspoon pepper

Mix all the ingredients together in a small bowl. Cover and let sit to blend of flavors together, about 15 minutes. Stir again before serving. The sauce can be refrigerated and stored for up to one week.

I didn’t have sweet pickle relish on hand, but I did have bread-and-butter pickles so I use them instead, I minced a few up and added a tiny bit of pickle juice to the mixture and I think it came out great. I also cut back a little bit on the mayonnaise as I am the only person leads tartar sauce in our house so this way we didn’t end up with a lot left over. The final piece of the dinner was one of Sean’s particular favorites for the night, which were the oven fries. I’ve tried making oven fries in the past with mixed results and this recipe is very similar to one I have tried before.

Oven Fries

2 1/4 pounds russet potatoes, peeled and cut lengthwise into 10 to 12 even wedges
5 tablespoons vegetable oil
Salt and pepper
Adjust an oven rack to the lowest position and heat the oven to 475°. Place the potatoes in a large bowl, cover with hot tap water, and soak for 10 minutes. Meanwhile, coat a large, heavy-duty rimmed baking sheet with 4 tablespoons of oil and sprinkle evenly with 3/4 teaspoon of salt and 1/4 teaspoon of pepper; set aside. Line the second baking sheet with triple layers of paper towels and set aside.

Drain the potatoes. Spread the potatoes out on the paper towel lined baking sheet, then thoroughly Pat dry the potatoes with additional paper towels. Rinse and wipe out the now empty bowl. Return the potatoes to the bowl and toss with the remaining 1 tablespoon of oil. Arrange the potatoes in a single layer on the oil baking sheet, cover tightly with aluminum foil, and bake for five minutes. Remove the foil and continue to bake until the bottoms of the potatoes are spotty golden brown, about 15 to 20 minutes, rotating the baking sheet after 10 minutes. Using a metal spatula and tongs, scraped to loosen the potatoes from the pan, then flip each wedge, keeping the potatoes in a single layer. Continue baking until the fries are golden and crisp, about 5 to 15 minutes longer, rotating the pan as needed if the fries are browning unevenly.

While the fries bake, line a baking sheet with a triple layer of paper towels. Transfer the baked fries to the prepared baking sheet to drain. Season with additional salt and pepper to taste and serve.

There seems to be a couple of keys to the recipe that made it turn out better for me this time than the past. First, I tried to cut the potatoes as evenly as possible so everything would cook at about the same time frame. Soaking the potatoes for the required amount of time really makes a big difference as it pulls out a lot of the starch from the potato and helps to keep them from sticking to the pan. Adding the oil to the pan and a little bit to the potato not only helps with the sticking but helps with the browning process. Finally, covering the potatoes with aluminum foil for five minutes at the beginning of cooking allows the potatoes to steam so you can then crisp them up the rest of the cooking time. I certainly think it was a pretty successful effort this time out.

That’s it for today. Time for me to get back to work after spending yesterday evening at Citi Field watching the Mets game. I’ll have another recipe for you tomorrow so check back and see if it’s something you are interested in giving a try. Until then, enjoy the rest of your day and hopefully you were not in the rain as we are here in New York. Enjoy your day and enjoy your meal!

002 001

 
4 Comments

Posted by on May 8, 2013 in Cookbooks, Cooking, Dinner, Potatoes, Sauce, Seafood


Tags: , , , , , , ,

Sweet and Sour Pork Stir Fry

I try to do a different stir-fry each week for one of our dinners. It gives us a chance to have a good meal loaded with vegetables and it usually only takes about 15 or 20 minutes to actually cook. The cleanup from a stir-fry meal is also very easy as there are usually only two pots to clean, one for this stir-fry and one for the race. The leftovers are also make a great lunch for the next day or so. This past week, I used the recipe I found on Food Network for a sweet and sour pork recipe.

Sweet and Sour Pork

1 pound pork tenderloin, cut into 1/2 inch pieces
2 1/2 tablespoons balsamic vinegar
Kosher salt
2 teaspoons low-sodium soy sauce
1 tablespoon cornstarch
3 tablespoons ketchup
3 tablespoons sugar, plus a pinch
3 tablespoons of vegetable oil
3 cloves garlic, minced
2 carrots, thinly sliced
3 scallions, cut into 1/2-inch pieces
3 cups snow peas, cut in half

Toss the pork with 1/2 tablespoon of the balsamic vinegar and a pinch of salt in a bowl. Mix the remaining 2 tablespoons of vinegar, the soy sauce, cornstarch, catch up, 3 tablespoons of sugar, 1/3 cup of water and half a teaspoon of salt in another bowl.

Heat 2 tablespoons of vegetable oil in a large skillet over high heat. Add the pork and slowly stir until it turns mostly opaque, about two minutes. Remove the pork with a slotted spoon and transfer it to a plate. Discard the oil and wipe out the skillet.

Keep the remaining 1 tablespoon of vegetable oil in the skillet, then stir-fry the garlic with the pinch each of salt and sugar, about 15 seconds. Add the carrots and scallions and stir-fry until crisp-tender, about two minutes. Add a little water if the garlic starts to stick to the skillet. Add the pork, snow peas and soy sauce mixture; stir until the pork is cooked through and the sauce is thickened, about three minutes.

As usually happens when I am making a stir-fry, I don’t always use the vegetables that are exactly in the recipe. As I’ve said before, I usually have the bag in the freezer of mixed frozen vegetables that are packaged specifically with a stir-fry in mind. This is what I ended up using this time as well. The mixture had broccoli, carrots, water chestnuts, snow peas, peppers and onions. You can always use whatever vegetables you like where keep things simple and just use the carrots and snow peas that are in the ingredients for this recipe. I served it with white Rice, but you could certainly use brown rice or any of the type of race you like or no rice at all if you are trying to eliminate the starch.

That’s all I have for today. I need to get back to work to try to get as much done as I can. Sean and I are heading out to the Mets game tonight at Citi Field. Were hoping to see a good game and of course we always enjoy whatever food happens to be available while we watch the game. I know they have a few new places as far as eating this year, so I’ll have to check it out and see what they have and report back. Until the next time, enjoy the rest of your day and enjoy your meal!

Sweet and Sour Pork 004

 
Leave a comment

Posted by on May 7, 2013 in Cooking, Dinner, One Pot Meals, Pork


Tags: , , , , ,

Dessert Special – Mango Pineapple Fruit Salad and Tapioca Pudding

Very often, I do not make desserts. We don’t usually have dessert during the week, and when I’m cooking dinner I usually don’t have a lot of energy left over to make something. On the weekends, very often Michelle will make something for dessert. Yesterday we split the duty, she made one dessert while I made another. Both were very easy to make, although the tapioca pudding did seem to take a little while as far as the procedure. The recipe I made, however, for a mango pineapple fruit salad was very easy and only took a few minutes.

Mango Pineapple Fruit Salad

1 fresh pineapple
1 pint strawberries, sliced
2 bananas, sliced
1 kiwi, peeled and sliced
1 mango, sliced
1/2 cup red seedless grapes, halved
1/3 cup honey
2 limes, juiced
1/2 teaspoon cinnamon
1/4 cup coconut flakes (optional)
1 bunch fresh mint

Cut the pineapple in half lengthwise. Carve out the insides from the pineapple halves. Save the halves to serve the fruit salad in. Dice the pineapple, discarding the core from the center. Mix the pineapple, strawberries, bananas, kiwi, mango and grapes together. In a small bowl, combine the honey, lime juice and cinnamon. Pour the mixture over the fruit and toss well. Place the fruit in the pineapple shell, sprinkle with coconut flakes (if using) and garnish with the fresh mint leaves.

Michelle it also made some homemade whipped cream which we served on the side to put on the fruit if you want to date me. I did not have a kiwi on hand so I did not use them. I also omitted the coconut flakes as none of us are really crazy about coconut here. The great thing about fruit salad is they you can really add whatever you want to and it will always taste great, so if you have any fruit on hand that you wanted to use this is the perfect opportunity for you.

We had bought the small pearl instant tapioca a few weeks ago since I use it when I am making fruit pies. We had also picked up a bag of the large pearl tapioca by accident and needed something to do with it, so naturally we simply decided to make some tapioca pudding.

Tapioca Pudding

1/2 cup large pearl tapioca
2 1/2 cups milk
1/4 teaspoon salt
1/2 cup sugar
2 eggs, separated
1 teaspoon vanilla

In a bowl, soak the tapioca in 2 cups of room temperature water overnight. Drain the water. In a double boiler, heat the milk just until no longer cold. Add the salt and the tapioca. Continue heating until small bubbles appear at the sides of the pan. Cover, turn the heat to very low and cook for one hour. Make sure that the milk mixture does not simmer or boil.

Separate the egg whites from the egg yolks. Beat the egg yolks and sugar together until light yellow in color. Add a little of the hot mixture to the egg yolks and blend thoroughly. Add the egg yolk mixture to the hot milk mixture, stirring constantly. Place the double boiler over medium heat and cook until the tapioca mixture is very thick, about 15 minutes.

Beat the egg whites until they are stiff and. Slowly fold the egg whites into the hot tapioca mixture. Stir in the vanilla. Serve the pudding warm or chilled.

Personally, I am not a big fan of putting of any flavor really. There’s a long story behind it, and it has to do with when I was in the hospital doing my recovery and was forced to eat pudding two and three times a day. Ever since then I’ve kind of gotten away from it, but Michelle and Sean both enjoy it and they really liked the large pearl tapioca.

There was the only recipes I have for today. I do have several other recipes of items I made last week and things I have planned for this week, so you can expect to see some new postings later on this week. I think the recipes are things everyone will enjoy. Until the next time, enjoy the rest of your day and enjoy your meal!

001 006

 
Leave a comment

Posted by on May 6, 2013 in Cooking, Dessert, Fruit


Tags: , , , ,

Cinco de Mayo Feast

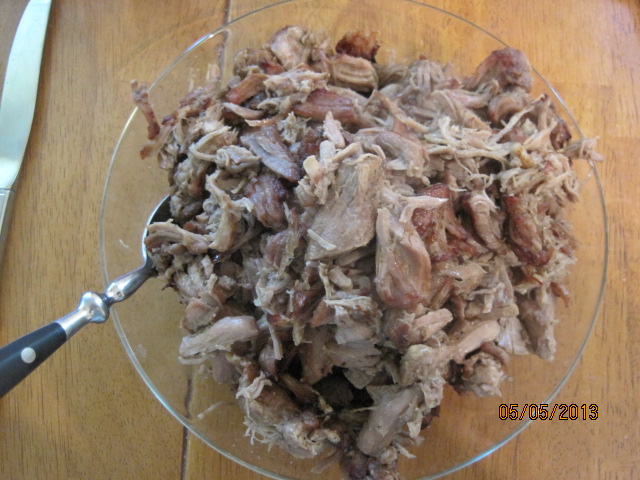
I wanted to make something for Cinco de Mayo today that was different for me at least without it taking me hours in the kitchen or having something that is smothered in cheese (I am not a fan of all things cheesy). I looked around this past week and saw some great recipes in a few places and decided to give them a try. The bulk of them came from America’s Test Kitchen, including this one for Mexican Pulled Pork, or Carnitas.

Mexican Pulled Pork (Carnitas)

1 (3 1/2 to 4-pound) boneless pork butt, fat cap trimmed to 1/8 inch thick, cut into 2-inch chunks

Salt and ground black pepper

1 teaspoon ground cumin

1 small onion, peeled and halved

2 bay leaves

1 teaspoon dried oregano

2 tablespoons juice from 1 lime

2 cups water

1 medium orange, halved

Tortillas

Lime wedges

Minced red onion

Fresh cilantro leaves

Thinly sliced radishes

Sour cream

Guacamole (recipe to follow)

Salsa

Adjust an oven rack to the lower-middle position and heat the oven to 300 degrees. Combine the pork, 1 teaspoon of salt, 1/2 teaspoon of pepper, cumin, onion, bay leaves, oregano, lime juice and water in a large Dutch oven. The liquid should just barely cover the meat. Juice the orange into a medium bowl and remove any seeds. You should have about 1/3 a cup of juice. Add the juice and the spent orange halves to the pot. Bring the mixture to a simmer over medium-high heat, stirring occasionally. Cover the pot and transfer it to the oven; cook until the meat is soft and falls apart when prodded with a fork, about 2 hours, flipping pieces of meat once during the cooking process.

Remove the pot from the oven and turn the oven to broil. Using a slotted spoon, transfer the pork to a bowl; remove the orange halves, onion, and bay leaves from the cooking liquid and discard. Do not skim the fat from the liquid. Place the pot over high heat and simmer the liquid, stirring frequently, until thick and syrupy. A heat-safe spatula should leave a wide trail when dragged through the glaze. The process should take 8 to 12 minutes. You should have about 1 cup of reduced liquid when done.

Using two forks, pull each piece of pork in half. Fold in the reduced liquid; season with salt and pepper to taste. Spread the pork in an even layer on a wire rack set inside a rimmed baking sheet or on a broiler pan. The meat should cover almost the entire surface of the pan. Place the baking sheet on the lower-middle rack and broil until the top of the meat is well browned but not charred and the edges are slightly crisp, about 5 to 8 minutes. Using a wide metal spatula, flip the pieces of meat and continue to broil until the top is well browned and edges are slightly crisp, about 5 to 8 minutes longer. Serve immediately with warm tortillas and any garnishes that you like.

All 3 of us loved this pork. These tacos were easily some of the best I had made. The pork just melted in your mouth and was cooked perfectly. You could easily use this pork in other ways for other Mexican meals if you wanted, such as burritos, enchiladas or tamales, but I think they worked great as a taco myself. We did have some good leftovers which I am looking forward to having for lunch this week.

As a good side dish to go along with this, I decided to make a Cuban-Style Black Beans and Rice (Moros y Cristianos). I thought it would make a nice accompaniment to the pork and I got the recipe from America’s Test Kitchen as well.

Cuban-Style Black Beans and Rice (Moros y Cristianos)

Salt

1 cup dried black beans, rinsed and picked over

2 cups chicken broth

2 cups water

2 large green peppers, halved and seeded

1 large onion, halved at the equator and peeled, root end left intact

1 head garlic, 5 medium cloves removed and minced, remaining head halved at the equator with skin left intact

2 bay leaves

1 1/2 cups long grain white rice

2 tablespoons olive oil

6 ounces lean salt pork, cut into 1/4 inch dice

1 tablespoon minced fresh oregano leaves

4 teaspoons ground cumin

2 tablespoons red wine vinegar

2 medium scallions, sliced thin

1 lime, cut into 8 wedges

Dissolve 1 1/2 tablespoons salt in 2 quarts of cold water in a large bowl. Add the beans and soak at room temperature for at least 8 hours and up to 24 hours. Drain and rinse well.

In a large Dutch oven with a tight-fitting lid, stir together the drained beans, broth, water, 1 pepper half, 1 onion half (with root end), halved garlic head, bay leaves and 1 teaspoon salt. Bring to a simmer over medium-high heat, cover, and reduce the heat to low. Cook until the beans are just soft, about 30 to 40 minutes. Using tongs, remove discard the pepper, onion, garlic and bay leaves. Drain the beans in a colander set over a large bowl, reserving 2 1/2 cups of the bean cooking liquid. If you don’t have enough bean cooking liquid left, add some water to equal 2 1/2 cups. Do not wash out the Dutch oven.

Adjust an oven rack to the middle position and heat the oven to 350 degrees. Place the rice in a large fine-mesh strainer and rinse under cold running water until the water runs clear, about 1 1/2 minutes. Shake the strainer vigorously to remove all excess water; set the rice aside. Cut the remaining peppers and onion into 2-inch pieces and process them in a food processor until broken into rough 1/4-inch pieces, about eight 1-second pulses, scraping down the sides of the bowl as necessary; set the vegetables aside.

In the now-empty Dutch oven, heat 1 tablespoon of oil and the salt pork over medium-low heat; cook, stirring frequently until lightly browned and rendered, about 15 to 20 minutes. Add the remaining oil, chopped peppers and onion, oregano, and cumin. Increase the heat to medium and continue to cook, stirring frequently, until the vegetables are softened and beginning to brown, about 10 to 15 minutes longer. Add the minced garlic and cook, stirring constantly, until fragrant, about 1 minute. Add the rice and stir to coat, about 30 seconds.

Stir in the beans, reserved bean cooking liquid, vinegar and 1/2 teaspoon of salt. Increase the heat to medium-high and bring to a simmer. Cover and transfer to the oven. Bake until the liquid is absorbed and the rice is tender, about 30 minutes. Fluff with a fork and let rest, uncovered, for 5 minutes. Serve, passing the scallions and lime wedges separately.

A few things about this recipe. First, I did not use salt pork. I had bacon on hand, so that is what I used. If you are using bacon, you only need to cook it for about 4 to 8 minutes instead of the 15 to 20 for the salt pork. If you want a more vegetarian version of the recipe, eliminate the pork altogether and use water instead of the chicken broth. You could also add a little tomato paste when cooking the vegetables for some more body and flavor. Lastly, although a traditional sofrito calls for green peppers, green peppers upset my stomach and Michelle’s, so I went for red pepper instead. I actual like the flavor better and the color of the final product. This recipe makes a lot of rice and could easily feed 8 people, so you may want to cut it down to half if you have a smaller table to feed. Overall, I thought it was a very nice side dish and I could use the leftovers with a wide variety of other dishes.

I also made the fresh salsa that I usually make, which is America’s Test Kitchen as well if you want to check it out. I also made the guacamole I had made in the past as well if you want to see that recipe. The entire meal turned out great and we had a very relaxing late lunch/early dinner for the day.

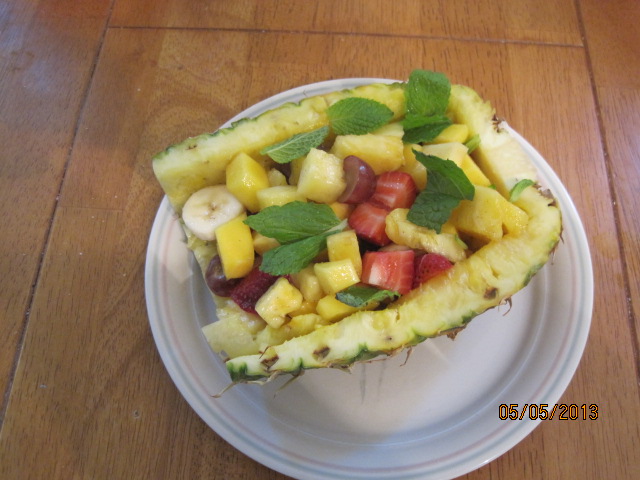
I do have several other recipes to share for this week, including the dessert I made for tonight of a Mango-Pineapple Fruit Salad. I also have recipes this week for chicken, crab cakes, griddle cakes and a few others since I didn’t get to share any this past week. Check back and see if you like anything you see. Until then, enjoy the rest of your day and enjoy your meal!010 007 008 009


Tags: , , , , , , , , , ,

How to Roast a Chicken « Chef Marcus Samuelsson

How to Roast a Chicken « Chef Marcus Samuelsson.

Roasting a chicken is something I do about every 10 days. It’s a great meal that is not hard to make and usually will give you leftovers for at least one other meal and a carcass to make your own stock, which leads to even more meals. Some people feel intimidated about cooking a whole bird and want it to come out nice and crispy like it does when you go out to eat. It’s easier to do than you think and Marcus Samuelsson did a great blog post today with some recommendations on what you should do and a couple of recipes to boot. Check it out!

 
Leave a comment

Posted by on May 3, 2013 in Uncategorized


Tags: , ,

Top Five Foods to Avoid « Chef Marcus Samuelsson

Top Five Foods to Avoid « Chef Marcus Samuelsson.

After having gone to the doctor yesterday for my three month visit and gotten fairly good feedback, I know I could still do better as far as watching what I eat and serve to my family. This blog post from Marcus Samuelsson could not have come at a better time as it outlines five food types that we should all do our best to avoid if we want to be healthier. I know it’s much easier to say than to do with some of these things, but I am going to make a better effort. Take a look and see if there are things you can cut out to make things better for you and your family!

 
Leave a comment

Posted by on April 30, 2013 in Cooking Websites


Tags:

Lunch with My Sweetie at the Shannon Rose Irish Pub

Michelle and I were out and about running errands yesterday in Northern New Jersey and saw a place that seemed like it would be great to have lunch. It is called the Shannon Rose Irish Pub. There are a few of them in Northern New Jersey and it was the first time we had come across it. Since it was lunch time anyway, we figured we would stop in and give it a try.

The site in Ramsey, NJ is quite spacious with a very large bar in the center room. We were greeted nicely by a hostess and offered the opportunity to sit outside and eat or dine in. We opted for inside and enjoyed the decor that was around the place. Our server Ryan immediately introduced himself and offered us drinks while we looked over the menu. Michelle opted for a Diet Pepsi (no Diet Coke, to her disappointment) and I decided, since we were in an Irish pub, that I was going to have a Guinness. I noticed that they offered a Black and Tan made with Guinness and their own Shannon Rose Amber Ale, so I decided to give that one a try. our drinks arrived quickly and I have to say the Black and Tan was very good with the right balance of Guinness and ale.

The menu itself was plentiful but not overwhelming. There was a great choice of typical pub and bar fare mixed in with some entrees. Many of the dishes offered also include and Irish slant, which is a nice touch. Since we were there for lunch, we opted to go for burgers to keep it simple. Michelle decided to have the Dublin Burger. It is a hamburger with Irish cheddar cheese, Irish bacon, onion and tomato. The thing she loved the most is that you had the option between french fries or tater tots! Of course, she chose to have the tater tots. I went for the Guinness Burger, which was a hamburger with their own specially made Guinness barbecue sauce. It is typically also served with the Irish cheddar, which I opted not to have. I went just for fries myself.

The burgers arrived in a very timely fashion and we were very happy with them. First off, the burgers are served on toasted English muffins, which we both loved. They were cooked to perfection, nice and juicy and medium, just the way we ordered them. The fries I had were also cooked perfectly, not soggy or over cooked, but just right. Michelle loved the tater tots. The burgers were a pretty decent size and very filling (and also served with a nice deli pickle spear on the side).

While we would have loved to have room for dessert or another drink, we were both pretty full. Ryan did let us have a look at the dessert menu as a reference for the next time we return. It has some great choices, among them a homemade Irish soda bread pudding, Bailey’s ladyfingers and a Guinness cake. The table just behind us had ordered desserts and they seemed like large portions that looked great, so you could easily share.

I would definitely go back to Shannon Rose again. We had a very nice meal, great service and the prices seemed quite reasonable for the drinks and the food. They have live Irish music there often; on every Sunday at 4 PM in fact. They also offer a Sunday brunch that you could check out. It seemed they have a great balance of pub food and dinner food to choose from. I could easily see just sitting at the bar and having a drink or two and hanging out to watch a game or just be with friends. If you live in the area, I would recommend stopping in to check it out.

That’s it for today. Michelle and I don’t go out that much so it’s nice to be able to say we went to a place that we enjoyed. Give them a look if you are nearby Ramsey and see how you like it. Until next time, enjoy your day and enjoy your meal!

397964_4892615832831_413269345_n

 
Leave a comment

Posted by on April 28, 2013 in Eating Out, Restaurants


Tags: , , ,

 
National Day Calendar

Fun, unusual and forgotten designations on our calendar.

Jennifer Probst

a little bit naughty a little bit nice

Laissez Faire

Letting Life Lead

simple cooking recipes

a blog to share with you the best