RSS

Category Archives: Cooking

Wow the Crowd With Porchetta Pork Roast

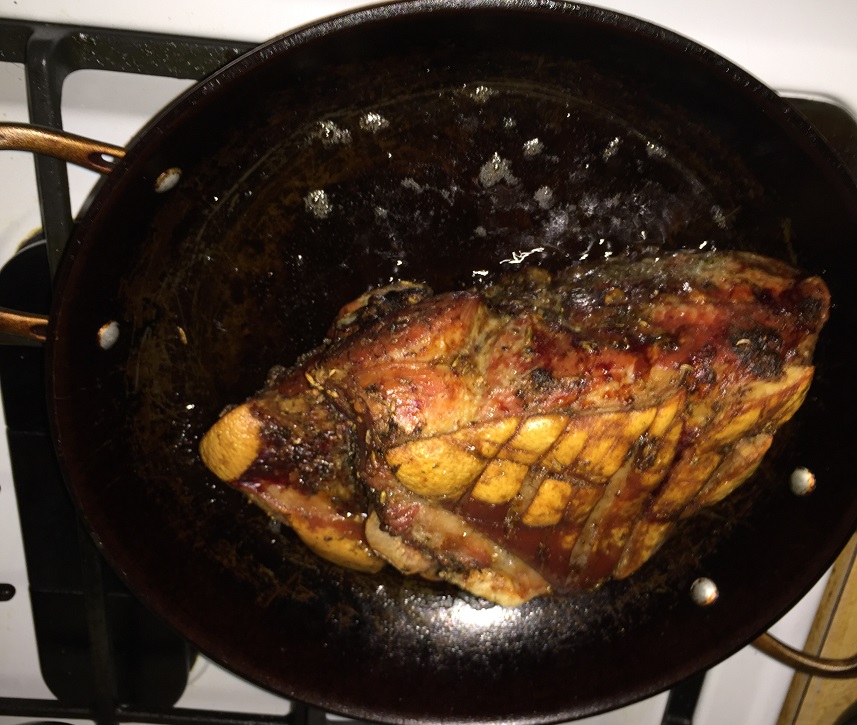
Cooking up a pork shoulder roast slowly in the oven produces a really tender and flavorful roast unlike any other, especially if you choose some type of rub or herbs that really help to boost the flavor of the roast itself. I have always been intrigued by porchetta roasts, but I hardly have the time or room to make a real traditional porchetta where you make use of the entire pig and de-bone it, stuff it, roll it and slow roast it. This particular recipe from Melissa Clark at New York Times Cooking lets you get the great tastes and flavors of the traditional Italian dish without having to use anything more than a pork shoulder roast and some great spices. Just the picture alone at NYT Cooking made me want to make this and getting a pork shoulder on sale just made it even more urgent for me.

Porchetta Pork Roast

1 (7- to 8- pound) bone-in, skin on pork shoulder roast, or a 6- to 7- pound boneless roast, fat trimmed to 1/4-inch thickness

1/4 cup chopped fennel fronds

1/4 cup chopped fresh rosemary

2 teaspoons chopped fresh sage

5 garlic cloves, grated or mashed to a paste

Finely grated zest of 1 lemon

1 1/2 tablespoons kosher salt

1 teaspoon fennel seed

3/4 teaspoon red pepper flakes

1/2 teaspoon black pepper

1/4 cup extra-virgin olive oil

Score the skin and fat all over the pork roast, taking care not to cut down to the meat. In a food processor or using a mortar and pestle, combine the fennel fronds, rosemary, sage, garlic, lemon zest, kosher salt, fennel seed, red pepper flakes and the black pepper. Pour in the olive oil. Pulse or mash the mixture until it forms a paste. Rub the paste all over the pork. If you are using a boneless roast, tie the roast with kitchen twine at 2-inch intervals. Transfer the pork roast to a large bowl and cover it with plastic wrap. Refrigerate the roast for at least 6 hours and preferably overnight.

Remove the pork from the refrigerator 1 to 2 hours before you want to cook it. Heat the oven to 450 degrees. Transfer the pork to a rimmed baking sheet and roast it for 35 minutes. Reduce the temperature to 325 degrees and cook the roast for an additional 2 hours 45 minutes to 4 hours, until a thermometer inserted into the thickest part of the meat registers 180 degrees, which will give you sliceable, tender meat. Bone-in roasts will take longer to cook than boneless, thus the varying time range.

Transfer the pork to a cutting board and allow the roast to rest for 15 to 30 minutes before serving. Make sure everyone gets some of the cracklings of the roast.

This roast is really easy to make and if you are leery of trying to score the skin yourself, you can always ask the butcher to do it for you, but it can be done pretty simply with a good knife. The recipe produces a super tender pork roast and the cracklings you get from the fat and the skin are out of this world. You get a lot of meat from this recipe, so it is good to make for a crowd and the rub that you use gives great flavor to the roast with the fennel and the sage. Leftovers are perfect for sandwiches the next day and you can even throw the meat in some of your favorite store-bough or homemade barbecue sauce to make a pulled pork like sandwich for yourself or use the meat on some nachos. I’ll definitely be making this one again since it was so easy to do.

That’s all I have for today. Check back next time for another recipe. Until then, enjoy the rest of your day and enjoy your meal!

porchetta

 
Leave a comment

Posted by on January 10, 2015 in Cooking, Dinner, Pork


Tags: , , , , , ,

A Quicker and Healthier Snack Alternative – Banana-Oat Snack Cake

Trying to find snacks to eat to appeal to kids and that provide something of a healthier alternative is not always an easy thing to do. Kids get turned off just by the name of something if it sounds healthier a lot the time and aren’t always willing to even give it a chance of tasting good, so it can be a challenge to find something that is better than the usual snack cakes, candy, chips, brownies, ice cream and the like. I saw this recipe recently in Bon Appetit for a banana-oat snack cake that provides a good alternative to a typical snack using some healthier choices like oats and bananas. This recipe only uses a few ingredients and can be done in under an hour to give you something quick and easy to offer as a dessert or snack after school.

Banana-Oat Snack Cake

6 tablespoons butter, cut into 1/2-inch pieces, melted, plus more for the baking dish

1 1/2 cups old-fashioned oats

1 cup all-purpose flour

2 teaspoons baking powder

1 teaspoon ground cinnamon

1 teaspoon kosher salt

1 1/4 cups (packed) light brown sugar

2 eggs

1 teaspoon vanilla extract

3 bananas, chopped

Preheat the oven to 350 degrees. Lightly coat an 8 x 8 inch baking dish with butter and line the baking dish with parchment paper. Whisk the oats, all-purpose flour, baking powder, cinnamon and salt in a large bowl and set it aside. Whisk the brown sugar, eggs and vanilla in another large bowl until the mixture is smooth.

Slowly stream the butter into the brown sugar mixture, whisking constantly until the mixture is well blended. Add the bananas to the dry ingredients and toss the bananas to coat them well. Stir the banana mixture into the brown sugar mixture. The resulting batter will be quite thick. Spread the batter evenly into the prepared baking dish. Place the dish in the oven and bake until the cake is golden brown and the edges start to pull away from the sides of the dish, about 35 to 40 minutes. Transfer the cake to a wire rack and let it cool completely in the dish. Cut the cake into 12 servings and serve.

The resulting cake has great flavor from that oats and bananas with a nice hint of cinnamon throughout the cake. I think it is a great snack cake and it stayed quite moist for the few days we had it around the house, making it the perfect after school snack. it also goes really well with your coffee in the morning if you are looking for something a little different for your breakfast and it certainly is a great dish that you could add to any breakfast buffet or lunch or something you can throw together easily if you have some last-minute guests drop by and want something tasty to serve over coffee.

That’s all I have for today. Check back next time for another recipe. Until then, enjoy the rest of your day (we have a snow day here in our area of New York today) and enjoy your meal!

bananaoatcake

 
Leave a comment

Posted by on January 9, 2015 in Breakfast, Brunch, Cakes, Cooking, Dessert, Fruit, Snacks


Tags: , , , , ,

Trying a Family Favorite Again – Fried Chicken Biscuit Sandwiches

If it were up to me, I could pretty much eat sandwiches all of the time and probably every day. They’re great for breakfast, lunch or dinner and very often we will have different variations of sandwiches for dinner during the week to make things a little bit easier to fit into our crazy schedules. Chicken sandwiches are always a personal favorite and there are a lot of different things you can do with them. Sean really liked the fried chicken sandwiches I have made in the past and I have done them on biscuits before, but when I came across this particular recipe at Chow.com, it seemed like a really easy one to do and it made use of the boneless chicken thighs that I already had on hand. The recipe makes both the biscuits and the chicken and both are really simple to do so that you can have in easy meal just about any night of the week.


Fried Chicken Biscuit Sandwiches

For the biscuits:

2 cups all-purpose flour, plus more for dusting

2 teaspoons baking powder

1/2 teaspoon baking soda

1 teaspoon kosher salt

1/2 cup cold butter (1 stick), cut into 12 pieces

1 cup cold buttermilk

For the fried chicken:

6 boneless, skinless chicken thighs

Kosher salt

1 cup all-purpose flour

2 teaspoons sweet paprika

1/4 teaspoon cayenne pepper (optional)

1/4 teaspoon dried thyme

1 cup buttermilk

Vegetable oil or canola oil

To serve:

Sliced dill pickles

Hot sauce

Honey (optional)

For the biscuits, preheat the oven to 425° and arrange a rack in the middle of the oven. Line a large rimmed baking sheet with parchment paper. In a food processor, add the flour, baking powder, baking soda, and salt. Pulse to combine the mixture. Scatter the butter pieces over the top of the flour mixture and pulse until the butter is pea-sized. Add the buttermilk and pulse the mixture just until a moist, shaggy dough comes together.


Alternatively, in a mixing bowl, the whisk together the flour, baking powder, baking soda, and salt. Scatter the butter pieces over the top of the flour mixture and toss to coat them in the flour mixture. Using a pastry blender, and working quickly, cut the butter into the dry ingredients until it is pea-sized. Drizzle in the buttermilk and stir the mixture just until he moist, shaggy dough comes together.


Dust a work surface with flour. Scrape the dough onto the surface and dust the top with more flour. With floured hands, pat the dough into a circle 1-inch thick. Using a 3 1/2-inch round (or fluted) cutter dipped in flour, cut out as many biscuits as possible. Press straight down through the dough — do not twist the cutter, or the biscuits will not rise properly.


Transfer the biscuits to the prepared baking sheet, spacing them at least 1-inch apart. Gather the scraps into a ball, pat it into a 1-inch-thick circle, and cut out more biscuits. Repeat as needed until you have 6 biscuits in total. Bake until the biscuits are golden brown, about 15 minutes. Set the biscuits aside to cool on a wire rack.


For the fried chicken, arrange the chicken in a shallow baking dish and sprinkle it all over with salt; set the chicken aside at room temperature. In a shallow bowl, stir together the flour, paprika, cayenne pepper (if using), and thyme. Pour the buttermilk over the chicken and toss the chicken to coat it well. Add the vegetable or canola oil to a large, straight-sided cast-iron skillet or frying pan. The oil should be 1 1/2 to 2 inches deep, reaching slightly less than halfway up the sides of the pan. Warm the oil over medium heat until it reaches 340° on a candy thermometer. When the oil is ready, lift a piece of chicken from the buttermilk, letting the excess drip off, then dip the chicken into the flour mixture, coating it completely. Shake off any of the excess flour. Fry the chicken until it is cooked through and golden brown, turning the pieces halfway through the cooking process, about 6 to 8 minutes in total. The interior of the chicken should register 155° on an instant-read thermometer when you remove the chicken from the oil; the temperature will rise to 165° as the chicken rests. Drain the chicken on a paper towel-lined plate.


To serve, split the biscuits and place a piece of the fried chicken on the bottom half of each biscuit. Add dill pickles, hot sauce, and the optional honey, or any other condiments you may like, cover the chicken with the biscuit top, and serve.


There is nothing quite like having a piece of fried chicken, and having it on a flaky, moist buttermilk biscuit just seems to make it even better. I always add pickles to my chicken biscuits and they go really well with coleslaw either on the side or right on the biscuit itself with the chicken. Adding a little hot sauce to the mix also can kick it up just a bit if you like that kind of flavor, though the honey is also a nice touch and Sean did add some honey to the top of his piece of chicken and he said it went really well with the biscuit. You can serve these pretty simply with coleslaw or potato salad or any other type of salad you might like, or even some homemade or store-bought French fries if you prefer. Overall I think it is a great sandwich you could even do for a buffet or a party if you are all getting together to watch the game or hang out.


That’s all I have for today. Check back next time for another recipe. Until then, enjoy the rest of your day, try to stay warm (it is about 4° here in New York without the wind, and with the wind it is about 15 below), and enjoy your meal!

chickbiscuit


Leave a comment

Posted by on January 8, 2015 in Biscuits, Breads, Cooking, Dinner, Poultry, Sandwiches


Tags: , , , , , ,

Warm Up on a Cold Day with Potato Leek Soup

It seems that it is pretty frigid just about everywhere across the United States today, and I know that it is below zero here with the wind chill this morning with predictions that it will get even colder here tonight and tomorrow. I hate the cold weather a great deal as it is so I do my best to stay inside, stay warm and make the best of it. Days like today are ideal for breaking out the soup recipes and I plan to make a few different soups over the next week or so, but here is a recipe for a family favorite that I actually made around the holidays for a potato leek soup. We love potato leek soup in my house and it goes pretty quickly around here so I try to make a lot of it so we can have it available for lunches as well. While this is a soup you can serve hot or cold, I always prefer it warm. I tried this simple recipe from Alton Brown this time out and it is pretty similar to ones I have tried in the past, though it has a slight change with a larger ratio of leeks to potatoes.

Potato Leek Soup

1 pound leeks, cleaned and dark green sections removed, about 4 to 5 medium

3 tablespoons butter

Heavy pinch kosher salt, plus additional for seasoning

14 ounces (about 3 or 4 small) Yukon gold potatoes, peeled and diced small

1 quart chicken or vegetable broth

1 cup heavy cream

1 cup buttermilk

1/2 teaspoon white pepper

1 tablespoon snipped chives

After thoroughly cleaning the leeks, chop the leeks into small pieces. In a 6-quart saucepan or Dutch oven set over medium heat, melt the butter. Add the leeks and a heavy pinch of the kosher salt and sweat the leeks for about 5 minutes. Decrease the heat to medium-low and cook until the leeks are tender, about 25 minutes, stirring the leeks occasionally.

Add the potatoes and the vegetable or chicken broth, increase the heat to medium-high and bring the mixture to a boil. Reduce the heat to low, cover and gently simmer until the potatoes are soft, about 45 minutes.

Turn off the heat and puree the mixture with an immersion blender until the soup is smooth. Stir in the heavy cream, buttermilk and white pepper. Taste the soup and adjust the seasoning as needed. Sprinkle with chives and serve immediately or chill and serve cold.

I love the creamy, silky texture of this soup and all of the great flavor you get from the potatoes and leeks, and this version has the leeks really shining through for some excellent flavor. You can make this vegetarian by using vegetable broth instead of chicken if you like and the combination of buttermilk and heavy cream is nice for this dish, though you could just use heavy cream if you prefer it that way. This soup makes an excellent first course for any meal or it can be a great meal on its own, which is how we often have it. Serve it with some homemade bread, rolls, or biscuits or even with sandwiches and you have a great dinner that is easy to make.

That’s all I have for today. Check back next time for another recipe. Until then, enjoy the rest of your day and enjoy your meal!

potatoleeksoup


Tags: , , , , , , ,

Roasted Turkey Breast – It’s Not Just For Weekends and Holidays

With all of the cooking I have done recently you would think most of it was just for big holiday dinners where things would be fancy with lots of courses. While it is true that that involved a lot of the recipes that I tried, I also wanted to make some things just to have at home for the 3 of us for a weeknight meal. We all really like to have turkey around here but finding a turkey that is a reasonable size for just the 3 of us is never an easy thing. Luckily this time of year you can usually get a turkey breast that is a decent size so that you can get a good meal out of it and have some leftovers to do some other things like turkey pot pie, turkey sandwiches, turkey soup or a wide variety of other things. When I made the roasted turkey breast, I used a recipe from Williams-Sonoma. It is a pretty basic recipe and a lot easier than roasting an entire turkey. This recipe takes about 2 hours so you are able to get it done during the week if you wanted to have something different for a weeknight dinner.


Roasted Turkey Breast

1 large onion, halved

2 large carrots

2 large celery stalks

1 large parsnip

1 garlic clove

1 bone-in full turkey breast, about 6 to 8 pounds

1 tablespoon butter, at room temperature

1 teaspoon kosher salt

1/8 teaspoon freshly ground pepper

3 to 4 cups chicken broth

Position a rack in the lower 3rd of the oven and preheat the oven to 450°. Place the 2 onion halves next to each other in the center of a roasting pan. Line up the carrots, celery and parsnip on either side of the onions. Place the garlic cloves in among the other vegetables.


Pat the turkey breast dry with paper towels. Working your hand carefully under the skin of the turkey to avoid tearing it, separate the skin from the meat on both sides of the turkey breast, but do not detach it. Pat the meat dry with a paper towel. Rub the butter over the turkey meat under the skin on each side of the breast. Season the turkey breast with salt and pepper. Pull the skin down to cover the meat. If necessary, stick toothpicks through the skin and the ribs to secure the skin. Set the turkey breast, skin side down, on top of the vegetables. Pour in 3 cups of the chicken broth. Roast the turkey breast for 30 minutes.


Reduce the oven temperature to 325°. Turn the breast to rest on one side and baste with the liquid in the pan. Roast the turkey breast for another 30 minutes. Turn the turkey breast to rest on the opposite side and baste it again with the pan liquid. Roast the breast for another 30 minutes. Turn the breast skin side up and baste it again with the pan liquid. If the liquid has begun to evaporate, add the remaining 1 cup of the chicken broth to the pan. Roast the turkey breast for another 30 minutes, baste and then continue roasting until an instant-read thermometer inserted into the thickest part away from the bone registers 165°, about 2 to 2 1/2 hours total cooking time at approximately 20 minutes per pound. If the top of the turkey breast begins to over brown, tent it loosely with aluminum foil.


Remove the turkey breast from the oven and transfer it to a cutting board. Allow the turkey breast to rest for 20 minutes. The internal temperature of the meat will rise to 170° during the 1st 10 minutes of resting, and the juices will settle. Carve the turkey breast into slices and serve immediately.


While this particular recipe does involve a little bit of work since you have to turn in baste the turkey every 30 minutes, it is certainly worth the results. You get a really nice crisp skin on the turkey and the turkey meat itself is very moist and tender. The drippings that were left in the pan make an excellent gravy as well. Of course, with just the 3 of us a 6 pound turkey breast meant there were plenty of leftovers so there will definitely be some turkey sandwiches in our future.


That’s all I have for today. Check back next time for another recipe. Until then, enjoy the rest of your day, and enjoy your meal!

turkeybreast


Leave a comment

Posted by on January 6, 2015 in Cooking, Dinner, Poultry, Turkey


Tags: , , , , ,

A New Year, New Posts, New Stuff and a New Recipe – Peppermint Brownie Ice Cream Cake

I took most of last week off from blogging and doing any work so that we could spend some time together as a family and do some things around the house, including taking down all of the Christmas decorations and ornaments that were around the house. So now that Christmas and New Year’s are complete, it is time to get back to regular blogging. I did get a number of things for Christmas this year that are related to cooking, including a couple of great cookbooks that I hope to go into detail about in a future blog post. I also got a great new bread maker that I had wanted for a while and I will do a blog post about that as well as I have already used it a couple of times and I have been very happy with the results. But for now, I have lots of recipes to share as I tried out a number of things and did a bunch of cooking between Christmas and New Year’s, including stuff I made for Christmas dinner. One of the items we made for dinner that day was a special dessert based on a recipe that I found at the blog Life, Love and Sugar. It is for a very easy peppermint brownie ice cream cake that makes use of some quick ingredients so that you can easily put together a fantastic looking dessert in no time at all. The original recipe does call for use of cream cheese to help create a type of ice cream for the filling of the cake. We decided it seemed better to actually use ice cream in the cake itself so we substituted some mint chocolate chip ice cream as an alternative. The recipe that I am posting here is the one that we altered a little bit to make use of the ice cream.


Peppermint Brownie Ice Cream Cake

1 box brownie mix, plus the ingredients required for the recipe on the brownie box

1 pint mint chocolate chip ice cream

2 teaspoons peppermint extract

1 10-ounce bag Andes peppermint crunch candy

1/2 cup chocolate syrup (plus a little more for drizzling)

2 cups whipped cream (homemade whipped cream or store-bought)


For the brownies, make the brownie dough according to the instructions on the back of the box. Grease two 8-inch cake pans and line the bottoms of each pan with parchment paper to allow for easy removal of the brownies. Bake the brownies at the temperature listed on the box, reducing the baking time to about 20 minutes. When the brownies are done baking, allow them to completely cool.


For the assembly of the cake, removal of one of the brownies from the 8 inch pan and place it on a large platter, springform cake pan or cake holder. Spread half of the mint chocolate chip ice cream mixture on top of the brownie. Add the 2nd brownie layer on top of the ice cream. Cover the brownie with 1/2 a cup of chocolate syrup. Top the 2nd brownie layer with any remaining peppermint ice cream. Place the brownies with the ice cream in the freezer. Allow the ice cream cake to freeze completely, about 1 to 2 hours. When the cake is frozen remove the cake from springform pan, if using. Mix the 2 teaspoons of peppermint extract in with the 2 cups of whipped cream. Frost the ice cream cake with the whipped cream and.the top of the cake with the peppermint crunch candy. Drizzle on more chocolate syrup if desired and served.


This is one of the easiest cakes you can put together because you are really using everything pre-made other than if you decide to use homemade whipped cream or perhaps you want to use homemade ice cream instead of store-bought. We could not find a particular peppermint ice cream to use for the cake so he went with mint chocolate chip, but if you can make peppermint ice cream at home or find some of your local store it would fit perfectly. The picture I took of the cake is before we added any of the chocolate syrup, but it is really up to you if you want to add it or not. You really need to make sure that you let the cake set up in the freezer for an hour or 2 before you put the frosting on to make sure that the ice cream is nice and firm in the center. Everyone seemed to really like the cake and it was gone right away so it is certainly one worth trying again since it is so easy to do.


That is all I have for today. Check back next time for another recipe. I want to thank everybody for a great 2014 as this blog hit all-time highs in the number of visits and followers for the year and I cannot thank you enough for following along and checking things out. I hope 2015 it is just as good and I will continue to work at the blog and make improvements to make things even better than before. Enjoy the rest of your day, and enjoy your meal!

peppermintbrowniecake

 
Leave a comment

Posted by on January 5, 2015 in Cakes, Cooking, Dessert


Tags: , , , ,

30 Quick, Last-Minute Appetizers for New Year’s Eve Slideshow – Bon Appétit

30 Quick, Last-Minute Appetizers for New Year’s Eve Slideshow – Bon Appétit.

There’s still time for you to put together some quick and easy appetizers for yourself or for a get-together you may be having for New Year’s Eve tomorrow. Bon Appetit has put together 30 last-minute appetizer recipes to fill every niche and wow your guests for a late-night party. Check it out!

 
Leave a comment

Posted by on December 30, 2014 in Appetizers, Cooking, Cooking Websites, Holidays, Snacks


Tags: , , , , , ,

Butter Up Some Cinnamon-Raisin Swirl Breakfast Loaf

For me, many mornings for breakfast are nothing more than a cup of coffee and a piece of fruit, but occasionally I also love to have a piece of toast along with it. It does not matter to me if it is an English muffin, a bagel, a roll or a piece of any kind of bread, I just really like to have a piece of toast, particularly with an egg, for breakfast. Ever since I was a kid I always really enjoyed cinnamon raisin bread as a piece of toast. That warm bread with the warm, plumped up raisins and the hint of cinnamon across the bread just smells great while it is toasting and tastes even better with a little bit of soft butter on it. This made me want to try to make my own cinnamon raisin bread so we could have some for Christmas morning this year after we opened presents. I found this recipe from Williams-Sonoma and it seemed to fit everything perfectly, so I gave it a try.

Cinnamon-Raisin-Swirl Breakfast Loaf

1/2 cup milk

1/2 cup sugar

4 tablespoons butter, at room temperature, plus 2 tablespoons melted butter for brushing

1 package (2 1/4 teaspoons) quick-rise yeast

3 cups bread flour, or as needed

1 teaspoon salt

2 teaspoons ground cinnamon

1/2 cup raisins

In the bowl of a stand mixer fitted with the paddle attachment, combine 1/2 cup of cold water, the milk, 1/4 cup of the sugar, the 4 tablespoons of room temperature butter and the yeast. Add 2 1/2 cups of the bread flour and the salt. With the mixer on medium-low speed, add enough of the remaining to make a soft dough that does not stick to the bowl. Remove the paddle attachment and fit the stand mixer with the dough hook attachment. Knead the dough on medium-low speed, adding more flour if needed, until the dough is smooth but soft, about 6 to 7 minutes. Shape the dough into a ball.

Lightly butter a large bowl and add the dough and turn to coat it with the butter. Cover the bowl tightly with plastic wrap. Let the dough rise in a warm spot until it doubles in bulk, about 1 1/4 to 1 1/2 hours.

Lightly butter a 9-by-5-inch loaf pan. Punch down the dough and turn it out onto a floured work surface. Dust the top of the dough with flour. Roll out the dough into a 9-inch square. In a small bowl, mix together the cinnamon, the raisins and the remaining 1/4 cup of the sugar. Sprinkle the cinnamon mixture evenly over the dough, leaving a 1/2-inch border around all sides. Roll up the dough into a log and pinch the seam to seal it. Transfer the dough to the loaf pan, seam side, and lightly press the top of the dough to evenly fill the pan. Loosely cover with plastic wrap. Let the dough stand in a warm spot until the dough rises to the top of the pan, about 1 hour.

Preheat the oven to 350 degrees. Brush the loaf gently with the melted butter. bake the bread until the top of the loaf is golden brown and the bottom, when the loaf is carefully removed from the pan, sounds hollow when rapped on the bottom with your knuckles, about 35 to 40 minutes. Transfer the loaf to a wire rack and allow it to cool in the pan for 10 minutes. Invert the loaf onto the rack, then invert it again and let it cool for at least 30 minutes before slicing.

The bread came out perfectly and let it sit overnight, wrapped, before slicing it on Christmas morning and it sliced perfectly. There was a nice swirl throughout the bread and the bread had great chew and texture with a nice crust. Of course, the true test for me was when it was toasted and it was perfect. I loved the smell of the bread as it was baking in the oven, but it seemed even better in the toaster and made great toast for Christmas morning. I would make this bread any time as it was pretty easy to do and turned out a great loaf.

That’s all I have for today. Check back next time for another recipe. Until then, enjoy the rest of your day and enjoy your meal!

cinnamonraisinbread cinnamonraisintoast

 
Leave a comment

Posted by on December 26, 2014 in Breads, Breakfast, Cooking


Tags: , , , ,

Christmas Brunch Recipes and Ideas : Food Network

Christmas Brunch Recipes and Ideas : Food Network.

There’s still time to put together some ideas for a great Christmas breakfast or brunch. Food Network gives you some ideas that are easy to put together and look fantastic. I’ll be back after the Christmas holiday with some fun recipes I have tried. I hope you all have a very Merry Christmas and thanks for following along!


Tags: , , , , ,

Christmas Dinner Recipes & Ideas : Cooking Channel

Christmas Dinner Recipes & Ideas : Cooking Channel.

You still have time to plan a great Christmas dinner if you have been sidetracked with other holiday chores and haven’t come up with some ideas yet. Cooking Channel has 70 dinner recipes and ideas for you to cover everything that you will need to make a memorable Christmas meal. Check it out!


Tags: , , , , , , ,

 
National Day Calendar

Fun, unusual and forgotten designations on our calendar.

Jennifer Probst

a little bit naughty a little bit nice

Laissez Faire

Letting Life Lead

simple cooking recipes

a blog to share with you the best