RSS

Category Archives: Dinner

Keeping it Basic with Baked Ziti

Although I myself am not a pasta eater, Michelle and Sean both love pasta so we do have it around the house and often make some favorite classic pasta dishes. Two of their favorites of course are lasagna and baked ziti. For me, I would rather have a sausage and peppers hero any night of the week than have baked ziti, but far be it from me to begrudge them something that they both really love. I am sure just like with lasagna, everyone has their own tried and true family recipe when it comes to making baked ziti and when we make it here, we pretty much just stick to the basics.
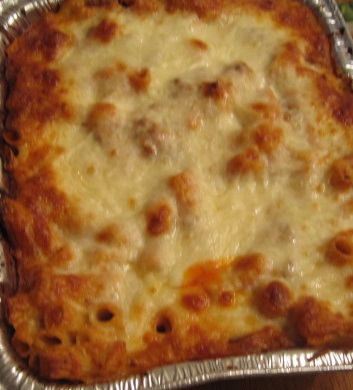
Baked Ziti

1 pound ziti pasta

Salt and pepper

1 pound ricotta cheese

11/2 cups Parmesan cheese, grated

2 tablespoons olive oil

5 garlic cloves, minced

1 (28-ounce) can tomato sauce

1 (14,5-ounce) can diced tomatoes

1 teaspoon dried oregano

1/2 cup plus 2 tablespoons chopped fresh basil

1 teaspoon sugar

3/4 teaspoon cornstarch

1 cup heavy cream

1 1/2 cups (8 ounces) mozzarella cheese, cut into 1/4-inch pieces

Adjust an oven rack to the middle position and preheat the oven to 350 degrees. Bring 4 quarts of water to a boil in a large pot. Add the ziti and 1 tablespoon of salt and cook, stirring often, until the pasta begins to soften but is not yet cooked all the way through, about 5 to 7 minutes. Drain the pasta and leave it in the colander.

Meanwhile, whisk the ricotta cheese and the Parmesan cheese together in a medium bowl and set it aside. Heat the olive oil and the minced garlic in a large skillet over medium heat. Cook, stirring often, until the garlic turns golden but not brown, about 3 minutes. Stir in the tomato sauce, diced tomatoes and oregano and bring the mixture to a simmer and then cook until it is thickened, about 10 minutes. Off the heat, stir in 1/2 cup of the chopped basil and the sugar and season with salt and pepper to taste.

Stir the cornstarch and heavy cream together in a small bowl and transfer it to the now-empty large pot you used for the pasta and set it over medium heat. Bring the mixture to a simmer and cook until it is thickened, about 3 to 4 minutes. Off the heat, stir in the ricotta cheese mixture, 1 cup of the tomato sauce and 3/4 cup of the mozzarella cheese. Add the pasta to this sauce and toss to combine it all well.

Transfer the pasta to a 13 x 9 inch baking dish and spread the remaining tomato sauce evenly over the top. Sprinkle the top with the remaining 3/4 cup of mozzarella cheese and the remaining 1/2 cup of Parmesan cheese. Cover the dish tightly with aluminum foil that has been sprayed with a nonstick cooking spray. Bake for 30 minutes, then remove the foil and continue to bake until the cheese is bubbling and beginning to brown, about 30 minutes longer. Cool the baked ziti for about 15 minutes, then sprinkle with the remaining chopped basil before serving.

Sometimes Michelle does put meat in the ziti and when she does she uses about a half pound of ground beef that has been sautéed until it is browned with the garlic and the tomato sauce mixture and then mixes it in. Baked ziti is a great dish to make when you are having a party or serving a buffet style meal because it goes a long way and everyone likes it. It is also something you can easily put together and take to a pot luck dinner or a party. Of course, you can easily just serve it at home as well for dinner with a nice side salad and maybe some garlic bread.

That’s all I have for today. Check back next time for another recipe. I have made some good things recently to try out so there’s always plenty more to come. Until next time, enjoy the rest of your day and enjoy your meal!

003

 
1 Comment

Posted by on February 7, 2014 in Cooking, Dinner, One Pot Meals, Pasta, Vegetarian


Tags: , ,

Some Comfort Food Midst All This Snow – Hoisin Glazed Meatloaf

Okay, I don’t know about you, but I am pretty sick of all of the snow around here. I am not much of a fan of winter in the first place – it’s too cold and ever since I was sick it’s harder to breather in the cold and walk in the snow, and my feet hurt in the cold weather too. perhaps it’s time to think about relocating to a warmer climate! In the meantime, weather like this makes us all yearn for  comfort food, and in my mind there is not much more comforting than a meatloaf. If you follow the blog, you know I love it and I have tried various recipes all of the time, so when I came across this idea from Bon Appetit awhile back I was just waiting for the right moment to spring it out. I modified the original recipe a bit since they were really making it with the intent of sandwiches and I had a dinner, and I also added a couple of things on the inside of the meatloaf as well to round out the flavor and texture.

Hoisin Glazed Meatloaf

For the Glaze:

3/4 cup hoisin sauce

1/2 cup rice vinegar

1 1-inch piece ginger, peeled and minced

1 garlic clove, minced

For the Meatloaf:

Nonstick vegetable oil spray

2 cups 1/2-inch cubes day-old crustless white bread (from 2 slices)

1/2 cup chicken broth

1 carrot, peeled and diced

1 celery stalk, peeled and diced

4 slices bacon, minced

1 1/3 cups thinly sliced scallions (dark green parts separated)

1 4-inch piece ginger, peeled, minced

4 garlic cloves, minced

1 pound ground beef

1 pound ground pork

2 eggs, beaten to blend

1 teaspoon Chinese five-spice powder

For the glaze, add the hoisin sauce, rice vinegar, ginger and garlic to a medium saucepan and bring the mixture to a boil. Reduce the heat to low and cook, stirring often, until the sauce thickens to a glaze, about 8 to 10 minutes. Set aside.

For the meatloaf, preheat the oven to 375 degrees. Using the vegetable spray, spray a cooling rack with spray and insert it into the bottom of a rimmed baking sheet and set it aside. In a large bowl, soak the bread cubes in the chicken broth, stirring frequently, until all of the liquid has been absorbed and the bread is beginning to fall apart, about 4 to 5 minutes. in a large skillet over medium heat, add the carrots, celery and bacon until the vegetables are tender and starting to brown and the bacon has rendered its fat and begin to crisp, about 5 to 6 minutes. Add the scallions (the white and light green parts only), ginger and garlic and cook, stirring often until the vegetables begin to soften, about 3 to 4 minutes. Allow the mixture to cool in the pan for 5 minutes.

Combine the scallion mixture with the bread mixture in a large bowl. Add 2 tablespoons of the warmed and thickened hoisin glaze, the remaining scallion parts, the beef, the pork, the eggs and the Chinese five spice. Using your hands, work all the ingredients together until everything is very well incorporated and the mixture is beginning to get sticky. Form the mixture into a loaf shape and place it on the cooling rack inside the rimmed baking sheet. Cover the meat loaf with foil.

Bake the meatloaf in the foil for 30 minutes. Uncover the meatloaf and 2 to 3 tablespoons of the hoisin glaze over the top of the meatloaf. Place the meatloaf back in the oven, uncovered, and continue baking until an instant-read thermometer registers 165 degrees when inserted into the center of the meatloaf, about 1 hour longer.

Remove the meatloaf from the oven and allow it to rest for ten minutes before slicing and serving.

The flavors that you get from the unique mix of spices and the glaze for this meatloaf are very good. Everyone loved it and commented on liking the filling in the meatloaf with the carrots, celery scallions and bacon (Sean especially loved the bacon, of course) The original recipe does not call for the carrots and celery like this but I think they added a nice touch to the meat. We have had the leftovers for a couple of lunches as sandwiches and I have to admit it all tastes pretty darn good as a sandwich too. I’ll definitely keep this one in mind for a meatloaf recipe.

That’s all I have for today. Check back next time for another recipe. I have a lot to choose from to post, so I am not sure which one I will go with yet next, so you’ll have to wait and see. Until then, enjoy the rest of your day, stay dry, warm and safe and enjoy your meal!

001


3 Comments

Posted by on February 5, 2014 in Beef, Cooking, Dinner


Tags: , , , ,

Moving on From Chicken – Sweet and Spicy Pork Tacos

Cook’s Country is a constant supply of new recipes for me every time the newest issue of the magazine comes up. They usually have lots of great recipes, some that take more time than others, but many that are perfect for quick weeknight meals. Such is the case with this super easy recipe for sweet and spicy pork tacos. I had just happened to pick up some boneless country-style pork ribs that were on sale recently and was looking for something easy to do with them and this recipe fit the bill perfectly. We all love tacos in our house so this was a great variation for us.

Sweet and Spicy Pork Tacos

1 1/2 pounds boneless country-style pork ribs, trimmed and cut crosswise into 1/4-inch-thick slices

Salt and pepper

2 tablespoons vegetable oil

1 onion, chopped

4 garlic cloves, minced

1 teaspoon ground cumin

2 (8-ounce) cans pineapple rings, drained with 1/2 cup of juice reserved, rings cut into 1/2-inch pieces

2 tablespoons minced canned chipotle chile in adobo sauce

1/2 cup chopped fresh cilantro

12 (6-inch) corn or flour tortillas, warmed

Season the pork with salt and pepper. Heat 1 tablespoon of the vegetable oil in a nonstick skillet over medium-high heat until it is just smoking. Add the pork and cook until the pork is no longer pink, about 5 minutes. Remove the pork to a plate and set it aside.

Heat the remaining 1 tablespoon of vegetable oil in the now-empty skillet over medium heat until the oil is shimmering. Add the onion and cook until the onion is softened and beginning to brown, about 4 minutes. Add the garlic and the cumin and cook until both are fragrant, about 30 seconds. Add the pork and any accumulated juices back to the skillet along with the pineapple and the reserved pineapple juice and the chipotle. Bring the mixture to a simmer, cover the skillet and cook, stirring occasionally, until the pork is cooked through and the sauce has thickened, about 10 to 12 minutes. Stir in the cilantro, season with salt and pepper to taste, and serve the pork with the warm tortillas and any other accompaniments.

I served this just with some guacamole, sour cream and some lime wedges along with a side of Dominican-style rice, which I plan to post the recipe for tomorrow. The sauce was wonderful with a little beat of hear from the chipotle and the sweetness of the pineapple. I loved the mix of the pork and pineapple in these tacos. The taste was incredible and I could easily eat this outside of a taco as well. We didn’t have too much leftover, but was left was eaten for lunch the next day and tasted even better thanks to the sauce thickening even more in the refrigerator. I will definitely be making this one again.

That’s all for today. Check back next time for another recipe. I plan to give the recipe for the Dominican rice along with a quick cole slaw I had made with our fried chicken biscuits last week. Both were great side dishes that you can make with a bunch of different meals. I also still have lots of other recipes that I have tried recently to share, so keep checking back. Thanks to everyone who keeps following along with the blog. The response has been great and I had more visits in the month of January this year than I did in all of 2012, so I am glad people are enjoying what they are finding and thanks for coming along. Until next time, enjoy the rest of your day and enjoy your meal!

004 003

 
1 Comment

Posted by on February 3, 2014 in Cooking, Dinner, Pork


Tags: , , , ,

It’s a Chicken Invasion, Part 4 – Fried Chicken Biscuits

So yesterday was for a basic fried chicken sandwich from Cook’s Country, which was very tasty. Today is something that is just as easy, might taste even better and is a little more homemade. The recipe id for fried chicken biscuits and is from Bon Appetit, who got the recipe from the Pies-N-Thighs restaurant in Brooklyn, New York. The recipe sounded too good to pass up – delicate and spicy fried chicken on a nice fluffy homemade biscuit with honey butter. How could you not at least give it a try?

Fried Chicken Biscuits

For the Fried Chicken:
1 cup buttermilk
1 tablespoon hot sauce
½ teaspoon kosher salt
¼ teaspoon freshly ground black pepper
¼ teaspoon cayenne pepper
4 skinless, boneless chicken cutlets (about 1½ lb. total), pounded to ¼” thickness

For the Biscuits:

3 teaspoons baking powder
2½ teaspoons kosher salt
1 teaspoon sugar
¼ teaspoon baking soda
5½ cups all-purpose flour, plus more
1½ cups (3 sticks) chilled unsalted butter, cut into pieces
1½ cups chilled buttermilk
1 large egg, beaten to blend
For the Honey Butter and Assembly:

½ cup (1 stick) butter, room temperature
¼ cup honey
½ teaspoon kosher salt, plus more
Vegetable oil, for frying; about 2½ cups
2 cups panko Japanese breadcrumbs
Freshly ground black pepper
4 Pies-N-Thighs Biscuits (recipe above)
Hot sauce, for serving

For the chicken cutlets, combine the buttermilk, hot sauce, salt, black pepper, and cayenne in a resealable plastic bag; add the chicken. Seal the bag, turn the bag several times to coat, and chill the chicken in the refrigerator for at least 3 hours.

For the biscuits, preheat the oven to 375°. Pulse the baking powder, salt, sugar, baking soda, and 5½ cups of flour in a food processor. Add the butter and pulse until the texture is of coarse meal with a few pea-size pieces of butter remaining.
Transfer the mixture to a large bowl. Mix in the buttermilk with a fork, then gently knead the dough just until a shaggy dough comes together.
Pat out the dough on a lightly floured surface until it is about 1¼ inches thick. Cut out the biscuits with a 3” biscuit cutter, re-rolling the scraps once.
Place the biscuits on a parchment-lined baking sheet and brush the tops with egg. Bake the biscuits until they are golden brown, about 30–35 minutes.
To make the honey butter, mix the butter, honey, and ½ a teaspoon of the salt in a small bowl until smooth; set the honey butter aside.
To prepare the chicken, pour the vegetable oil into a large skillet, preferably cast iron, to a depth of ½ an inch and heat the pan over medium-high heat until the oil bubbles immediately when a little panko is added.
Meanwhile, place the panko bread crumbs in a shallow bowl. Remove the chicken from the marinade; season it with salt and pepper. Dredge the chicken in the panko, shaking off any excess. Working in 2 batches and maintaining the oil temperature, fry the chicken until it is golden brown, crisp, and cooked through, about 3 minutes per side. Transfer the chicken to a paper towel–lined baking sheet to drain.
Split the biscuits and spread each side of the biscuits with 1 tablespoon of the. reserved honey butter. Build the sandwiches with biscuits, chicken, and hot sauce, if desired and serve.
Just a couple of things about these recipes. I used chicken tenders that I had bought on sale this past week instead of the chicken breasts and they seem to work out just fine for me. I think you could probably just as easily use boneless thighs as well if you like them better. i did have a little trouble with the panko bread crumbs not sticking very well to all of the chicken pieces. I think I might flour them a little next time after they come out of the marinade to make them stick better, but overall the flavor was really good. To me, the real winner here is the biscuits. They tasted really good and were nice and fluffy. The recipe calls for you to use a 3 inch biscuit cutter, which seemed too big to me so I made them smaller, using a 2 inch cutter and got more biscuits out of the batch so we were able to use them for other meals. Everyone loved the biscuits so I know I’ll be making this one again. I made a little cole slaw to go along with the biscuits. I tried a different recipe this time, which I will post soon, but you can use any cole slaw recipe you like best.
That’s all I have for today. Check back next time for another recipe. until then, enjoy the rest of your day and enjoy your meal!
012 011
 
2 Comments

Posted by on February 1, 2014 in Biscuits, Breads, Cooking, Dinner, Poultry, Sandwiches


Tags: , , , , , , ,

It’s a Chicken Invasion Part 3 – Fried Chicken Sandwiches

This recipe is actually the first of two chicken sandwiches that I tried this past week. I think they are great simple sandwiches for dinner or for lunch, but they are also great to use for football Sunday if you want something easy that is a great snack alternative. This first recipe is for a fried chicken sandwich recipe that I got from the latest issue of Cook’s Country magazine. it’s a pretty simple one that tries a little bit of a different method for the coating for the chicken, but I think it worked out pretty well.

Fried Chicken Sandwiches

1 1/2 teaspoons kosher salt

1 teaspoon paprika

1 teaspoon pepper

1 teaspoon garlic powder

1/2 teaspoon dried thyme

1/2 teaspoon dried sage

1/4 teaspoon cayenne pepper

2 boneless, skinless chicken breasts, trimmed and halved crosswise

1 1/2 cups all-purpose flour

1 teaspoon baking powder

3 tablespoons water

2 egg whites, lightly beaten

2 quarts vegetable oil (I didn’t use this much oil, but the recipe calls for it)

4 sandwich rolls

Combine the salt, paprika, pepper, garlic powder, thyme, sage and cayenne pepper in a bowl. Measure out 1 tablespoon of the spice mixture and set it aside. Pat the chicken dry with paper towels. Using a meat pounder, gently pound each piece of chicken to about 1/2-inch thickness between two pieces of plastic wrap. Season the chicken all over with the remaining 2 3/4 teaspoons of the spice mixture.

Whisk the flour, baking powder, and the reserved 1 tablespoon of the spice mixture together in a large bowl. Add the water to the flour mixture and rub it together with your fingers until the water is evenly incorporated and shaggy pieces form. Place the egg whites in a shallow dish.

Set a wire rack in a rimmed baking sheet. Working with 1 piece of chicken at a time, dip the chicken in the egg whites to thoroughly coat them, letting any excess drip back into the dish, then dredge the chicken in the flour mixture, pressing on the flour to make sure it adheres. Transfer the chicken to the prepared wire rack and refrigerate the pieces for at least 30 minutes and up to 1 hour.

Add the vegetable oil to a large Dutch oven until it measures about 1 1/2 inches deep and heat the oil over medium-high heat to 375 degrees. Add the chicken to the hot oil. Adjust the burner, if necessary to maintain the oil temperature between 325 and 350 degrees. Fry the chicken, stirring gently to prevent the pieces from sticking together, until the chicken is golden brown and registers 160 degrees on an instant-read thermometer, about 4 to 5 minutes, flipping the chicken pieces halfway through the frying. Transfer the chicken to a clean wire rack and allow the pieces to cool for 5 minutes. Serve on the rolls.

Adding that little bit of liquid to the seasoned flour makes the flour clumpy, which gives it a lot more texture when it has cooked. To me it seemed a lot more like good fried chicken pieces and had better crunch to it than a typical fried chicken sandwich, which was great. As I said, I hate using that much oil for frying and I pretty much cut the amount in half and still got good results. I just don’t like to use that much myself and it is a pain to dispose of, so I try to get away with less when I can but if you want to follow the recipe exactly, go for it. I got good results with less but maybe you get a better fry with more oil. I served the sandwiches with some pickles, lettuce and bacon and some french fries, but some cole slaw would have been great with this. I actually made a cole slaw with the other chicken sandwich I made, so you’ll see that recipe next time :). Overall, I think it was a good recipe with a really crispy crunch, which was great.

That’s all I have for today. Check back next time for another chicken recipe. until then, enjoy the rest of your day and enjoy your meal!

005 004

 
Leave a comment

Posted by on January 31, 2014 in Cooking, Dinner, Poultry, Sandwiches


Tags: , , , , , ,

It’s a Chicken Invasion, Part 2 – Pan Seared Chicken Breast with Herb Jus and Potato Vegetable Hash

For the next chicken meal for the week I decided again to try to keep something simple and different. I find I don’t but chicken breasts very often, but I saw some on sale recently and picked up a package because it was on sale. Usually the bone-in chicken breasts are pretty large and end up cutting them in half so we get more meals out of them. That is what I did this time and then I decided I was going to try this recipe that I saw from Robert Irvine of the Food Network. it is for a simple pan seared chicken breast with herb jus and a really tasty potato vegetable hash. it’s a simple recipe that’s easy enough to make during the week for a nice dinner.

Pan Seared Chicken Breast with Herb Jus and Potato-Vegetable Hash

For the Chicken:

2 tablespoons vegetable oil

2 skin-on, bone-in chicken breasts, cut in half

Salt and freshly ground black pepper

1 cup dry white wine

1 clove garlic, minced

1 tablespoons minced fresh thyme leaves

1 teaspoon chopped rosemary leaves

1 teaspoon chopped fresh parsley leaves

2 tablespoons butter

1 tablespoon minced fresh chives

For the Potato-Vegetable Hash:

1 potato

1 zucchini

1 yellow squash

1 small red onion, thinly sliced

1 egg, beaten

2 tablespoons all-purpose flour

1 clove garlic, minced

1 teaspoon minced fresh thyme leaves

1 teaspoon minced fresh tarragon leaves

1 teaspoon Cajun spice

Vegetable oil

Salt

For the chicken, heat a large saute pan over high heat and add the vegetable oil. Heat the vegetable oil until it is shimmering. Season both sides of the chicken breasts with salt and pepper to taste. Sear the chicken, skin side down, until the skin is a golden brown, about 5 to 6 minutes. Reduce the heat to medium, flip the chicken breasts over, cover the pan and cook on the second side for 7 to 8 minutes.

After the second side has been cooked, add the white wine, the garlic, thyme, rosemary and parsley and continue to cook the chicken until the liquid is reduced by half, about 7 minutes. Transfer the chicken to a serving platter and cover it loosely with aluminum foil to allow it to rest.

Remove the saute pan from the heat and whisk in the butter, scraping up any browned bits from the bottom of the pan.

For the potato-vegetable hash, using a box grater, shred the potato, zucchini and yellow squash and add them to a large bowl. Stir in the red onion, egg, flour, garlic, thyme, tarragon and the Cajun spice. Blend the mixture well and add more flour if the mixture seems too wet. The mixture should hold its shape when it is squeezed.

Heat a large saute pan over medium heat and add two tablespoons of vegetable oil. Heat the oil just until it is shimmering and portion the potato mixture into cakes, gently patting and forming them in your hands. Cook the cakes until they are golden brown on one side, about 2 to 3 minutes. Flip the cakes over and cook until the other side is browned, about another 3 minutes. Remove the cakes from the pan and set them on a paper towel-lined plate and season with salt to taste.

Serve the potato vegetable hash warm with a chicken breast piece on time and some of the herb jus sauce.

This was a very simple meal that makes good use of the white meat of the chicken if you need a new recipe. Sean is a big white meat-eater so he really liked this meal. The sauce for me was the winner as it had great flavor and everyone really liked the potato-vegetable hash, which was the real hit of the meal. The combination of the potato, zucchini and squash was perfect with the herbs and spices and it wasn’t cooked so long that it got all dried out. It was nice and flavorful from the vegetables with some crispness. It was definitely one I would make again.

That’s all I have for today. Check back next time for the next chicken recipe. I have some fried chicken sandwiches, an oven roasted turkey breast, a skillet roasted chicken and more still to come. Until next time, enjoy the rest of your day and enjoy your meal!

003 002

 
Leave a comment

Posted by on January 29, 2014 in Cooking, Dinner, Poultry, Sauce, Vegetables


Tags: , , , , , ,

It’s a Chicken Invasion! Part One – Bourbon Glazed Chicken

It seems like every time I go to the grocery store lately for the last few weeks there is chicken on sale and I come home with a lot of it. We have been making a lot of chicken lately and cutting back on red meat where we can to try to be a little healthier and let’s face it – no matter where I seem to shop lately beef is very expensive so we may as well have some poultry. I have a lot of chicken recipes to use, so there is always plenty for me to try, so we’ll be doing chicken recipes all week this week. First up was a simple dish that I saw from Bon Appetit that they actually use for their wings but I simply adapted it to use with chicken thighs and drumsticks instead. It is for bourbon glazed chicken and the glaze tastes delicious.

Bourbon Glazed Chicken

2 tablespoons butter

1 cup chopped onion

3 garlic cloves, peeled, thinly sliced

1 cup bourbon, divided

1 cup ketchup

1/2 cup hot sauce

1/4 cup tomato paste

3 tablespoons packed light brown sugar

4 pounds bone-in chicken parts (thighs, drumsticks and wings)

Melt the butter in a large heavy saucepan over medium-high heat. Add the chopped onion and garlic and saute until golden brown, about 5 to 6 minutes. Add 3/4 of a cup of the bourbon and boil the mixture until most of the liquid is absorbed, about 6 to 8 minutes. Whisk in the remaining 1/4 cup of the bourbon, the ketchup, hot sauce, tomato paste, and the brown sugar until it is well blended. Reduce the heat and simmer until the sauce thickens slightly, stirring occasionally, about 10 minutes. Season the marinade with salt and pepper to taste. Remove the marinade from the heat and allow it to cool to room temperature.

Place the chicken parts in a large glass baking dish or roasting pan. Pour the marinade over the chicken parts and turn the chicken to well coat it. Cover the chicken and refrigerate it overnight.

Preheat the oven to 375 degrees. Line a baking sheet with foil or with parchment paper. Place a cooling rack on top of the prepared baking sheet. Arrange the chicken pieces on the cooling rack, spacing each piece slightly apart. Spread any of the remaining marinade from the dish over the chicken parts. Sprinkle the chicken with salt and pepper. Bake the chicken on the cooling rack in the baking sheet until the parts are cooked through and an instant read thermometer inserted into the thickest part of a thigh registers 165 degrees and the skin is browned, about 45 to 50 minutes. Transfer the chicken to a serving platter and serve.

I can see that this recipe would work really well with chicken wings and I think it tasted great with the chicken parts. The bourbon gave a nice sweetness and with the brown sugar, the ketchup and the hot sauce it was like a nice barbecue sauce with a little heat and sweetness. I would certainly use this recipe again for any chicken parts. It might even be better if you can use it on the grill. Marinading it really makes a big difference with this one as it really enhances the flavor, so let it sit overnight if you can. I served the chicken with some wild rice and fresh green beans.

That’s all I have for today. Check back next time to see the next chicken recipe. until then, enjoy the rest of your day and enjoy your meal!

007 006


4 Comments

Posted by on January 27, 2014 in Cooking, Dinner, Poultry, Sauce


Tags: , , , , ,

When it’s This Cold, Part 2 – This Time It’s Soup – Alton Brown’s Lentil Soup

It is still freezing cold here in New York and today it is snowing again. It seemed even colder yesterday and the day before that. It would be nice if we got a little bit of a break in the weather and I cannot wait for winter to be over already. For now, we’ll just have to deal with it and that means more warm and hearty meals. Yesterday it was the bean stew recipe, today it is a recipe for lentil soup. Again, I was going for soup recipes that were quick and easy and didn’t need all day to cook or prepare. I found this one from Alton Brown for a simple lentil soup and I wanted to give it a try.

Alton Brown’s Lentil Soup

2 tablespoons olive oil

1 cup finely chopped onion

1/2 cup finely chopped carrot

1/2 cup finely chopped celery

2 teaspoons kosher salt

1 pound lentils, picked and rinsed

1 cup peeled and chopped tomatoes

2 quarts chicken or vegetable broth

1/2 teaspoon ground coriander

1/2 teaspoon ground cumin

1/2 teaspoon ground grains of paradise

Place the olive oil into a large Dutch oven and set it over medium heat. Once the pot is hot, add the onion, carrot, celery and kosher salt and sweat the vegetables until the onions are translucent, about 6 to 7 minutes. Add the lentils, chopped tomatoes, chicken or vegetable broth, coriander, cumin and grains of paradise and stir the mixture until it is well combined. Increase the heat to high and bring the mixture just to a boil. Reduce the heat to low, cover the  pot and cook the soup at a low simmer until the lentils are tender, about 35 to 40 minutes. Using a stick blender, puree the soup to your preferred consistency and serve.

Just a few points about this recipe. First, you are probably wondering what the heck grains of paradise is. I love Alton Brown, but he can make use of some unusual and really hard to find ingredients sometimes. Grains of paradise is a spice from West Africa that is very much like a mix of pepper, cardamom and coriander. For the amount needed for this recipe, I couldn’t see myself going out and buying it since it can be quite expensive and the odds are pretty good I would not be able to find it locally anyway. Instead, I looked around on the Internet and saw that as a substitute many people use freshly ground black pepper or cardamom. I decided to go with the black pepper myself and just used that. Also, this time of year the tomatoes in this area are not very good, so I simply substituted a cup of canned diced tomatoes instead and I think they worked out just fine anyway. You also want to make sure that you pick over your lentils before you use them. Most of the time there is no issue at all, but rinsing and picking over them just to check for pebbles and such is always a good idea when you are using dried beans like this. Nothing spoils a meal faster than getting a rock in your soup. As for the soup itself, I love lentil soup and this one had a nice flavor from the coriander and the cumin. It was very filling and hit the spot and took no time at all to make. I made some cream biscuits to go along with the meal and we were all good to go with leftovers for another day.

That’s all I have for today. Check back next time for another recipe. until then, enjoy the rest of your day, keep staying warm, and enjoy your meal!

001


Tags: , , , , ,

When It’s This Cold, It Has to Be Soup or Stew. This Time It’s Stew…

Yikes it has been crazy cold here the last few days. I get up and start working at about 5:30 AM and for the last few days it has been zero or less outside when I get up. it has been so cold I have been using fingerless gloves while I type in the morning just to keep my hands warm! Anyway, when the weather is this cold all you want to eat is something warm and hearty, and for us that means soup or stew. I found this recipe from Giada De Laurentiis of the Food Network about a week ago and it seemed perfect to make when it was this frosty outside. it is for a cannellini and sausage stew. The recipe is easy, it uses easy ingredients and you can have the whole thing done in about 35 or 40 minutes, so you can’t ask for a meal much better than that!

Cannellini and Sausage Stew

Vegetable oil cooking spray

2 tablespoons extra-virgin olive oil

2 medium fennel bulbs, outer layers removed, chopped

1 medium onion, chopped

1 1/2 teaspoons kosher salt

One 28-ounce can diced tomatoes

One 15-ounce can cannellini beans

One 10-ounce bunch kale, center rib removed, leaves chopped into 1/2-inch pieces

1 cup chicken broth

4 turkey or chicken Italian sausage links

Place an oven rack in the center of the oven and preheat the oven to 375 degrees. Spray a grill pan with the vegetable oil cooking spray.

In a Dutch oven, heat the olive oil over medium-high heat. Add the fennel bulbs, onion and 1 teaspoon of the kosher salt. Cook, stirring constantly, until the vegetables are soft, about 5 minutes. Add the tomatoes plus the juices, the cannellini beans, the kale and the chicken broth. Bring the mixture to a boil and then cover the pan with a tight-fitting lid and transfer the pot to the oven. Cook the stew until the vegetables are tender and the kale has wilted, about 25 to 30 minutes.

While the stew is cooking, place the grill pan over medium-high heat. Add the sausages to the grill pan and cook, turning occasionally, until the sausages are cooked through, about 20 to 25 minutes. Cool the sausages and cut them into 1/2-inch thick slices and set them aside,

Remove the pot from the oven and add the cooked sausage slices to the stew. Season the stew with the remaining 1/2 teaspoon of kosher salt. Spoon the stew into bowls and serve.

I did make a few minor changes to the recipe. Instead of using kale, I had spinach on hand and used that instead. I actually prefer the flavor of spinach to the kale and I think it worked just as well in the stew, so the choice is yours as to which you like better. Giada also puts in 1/2 teaspoon of red pepper flakes, which I left out. My family is not too big on the heat so I didn’t see the need to put the flakes in, but if you like the stew a little hot (and I think it would be good with some heat) I think you could put it in or even use hot sausage instead of regular sausage. I loved the flavor you got from the mix of the beans, sausage and spinach and the tomatoes and broth added just enough liquid to the mix. The fennel gave the whole dish a great flavor too. I will definitely be making this one again.

That’s all I have for today. Check back next time for another recipe. I actually have a soup recipe I am making tonight that I’ll be happy to share. It’s Alton Brown’s take on lentil soup and it smells pretty darn good right now. Until next time, enjoy the rest of your day, try to stay warm and enjoy your meal!

009 008


1 Comment

Posted by on January 24, 2014 in Cooking, Dinner, One Pot Meals, Sausage, Soups & Stews


Tags: , , , , , ,

Fancy Roasted Turkey…Okay, Roasted Turkey Breast… I Mean Roasted Half a Turkey Breast

Half a turkey breast may not even sound like a lot of meat for you, but for just the three of us it worked out fine and there were even leftovers for sandwiches the next day. If you have a  small family or are just cooking for yourself, using just a half a breast is ideal. They may not always be easy to find but if you look around in the meat area of your supermarket or ask your butcher, you may be able to find one. I actually got ours for only $4.00 and we got a full dinner and several lunches out of it, making it really worthwhile. I had to hunt around a bit to try to find a unique recipe for a piece this small. You could simply roast it in the oven, but this recipe that I found from Sweet and Crumby was just perfect and gave some great flavor to the meat.

Roasted Half Turkey Breast

1 half bone-in turkey breast with skin, rinsed and patted dry

2 teaspoons dry rosemary

2 teaspoons dried thyme

2 teaspoons dried sage

2 teaspoons salt

1 teaspoon freshly ground black pepper

2 tablespoons freshly squeezed orange juice

2 tablespoons olive oil

1 orange, thinly sliced

2 whole sprigs rosemary

4 large washed but unpeeled carrots

1-2 cups chicken broth

4 tablespoons butter

Preheat the oven to 325 degrees. In a small bowl mix together the dried rosemary, thyme, sage, salt and pepper. Squeeze in the orange juice and drizzle in the olive oil. Mix everything together to form a paste. Rub the paste all over the meat and skin of the turkey breast and then underneath the turkey skin.

Take the thinly sliced orange slices and tuck them under the turkey skin. in a single layer. Tuck 2 sprigs of the rosemary under the skin as well. Cut the butter into small pats and place single pats of butter all over the turkey skin and meat. Place the carrots lined up in a small roasting pan, casserole dish or cast iron skillet and the place the turkey breast on top of the carrots. Pour the chicken broth into the roasting pan, but not over the turkey and drop any remaining pieces of the orange into the pan as well. Tent the turkey with the aluminum foil and roast for 45 minutes. Remove the foil and let the turkey roast for another 30 minutes or until an instant read thermometer inserted into the thickest part of the breast registers 165 degrees.

Remove the turkey from the oven and tent with a fresh piece of aluminum foil. Allow the turkey to rest for 10 to 15 minutes before slicing.

Roasting time here will really depend on how big of a piece of turkey you have. The breast I had was just over two pounds and was done in just over an hour. A 3 or 4 pound breast will take longer, perhaps as long as 90 minutes, so you will want to check the temperature to be on the safe side. I liked the flavors from the paste and from the orange slices. It really added something nice to the dish that you might not normally think of. You’re not going to get much in the way of juices in the pan with this one, even with adding broth to the pan, but if you add some after you remove the turkey you can make a little bit of gravy or au jus for your meal as well. Overall I would say it is a great inexpensive way to have turkey during the week for a little bit of a change from chicken.

Speaking of chicken, I have lots of chicken recipes we have used lately to share, so keep an eye out for those among the recipes I will be sharing. That’s all I have for today. Check back again next time for a new recipe. Until then, enjoy the rest of your day, stay warm, and enjoy your meal!

003 002

 
7 Comments

Posted by on January 22, 2014 in Cooking, Dinner, Poultry, Turkey


Tags: , , , , ,

 
National Day Calendar

Fun, unusual and forgotten designations on our calendar.

Jennifer Probst

a little bit naughty a little bit nice

Laissez Faire

Letting Life Lead

simple cooking recipes

a blog to share with you the best