RSS

Perhaps the Best Lamb Recipe I Ever Tried – Slow-Roasted Andalusian-Style Lamb and Potatoes

This is one of those times of the year where you can actually get a leg of lamb or a portion of a leg of lamb at a reasonable price so I usually try to get one to do something with it for a special weekend meal. If you are intimidated by trying to cook a leg of lamb since it can be quite large and seem like it would be tough to cook, there are smaller portions you can get or even boneless legs that have been butterflied that may cost a little bit more but are easier to work with. this particular recipe that I cam across from Bon Appetit makes all of that difficulty go away for you. This slow-roasted leg of lamb leaves you with the easiest leg of lamb you will ever have to carve as it simply falls off the bone for you. it is easy to make and provides you with a really succulent meal.

Slow-Roasted Andalusian-Style Lamb and Potatoes

4 cloves garlic, crushed

2 tablespoons fresh thyme leaves

2 tablespoons kosher salt, plus more for seasoning

4 bay leaves, divided

3 pounds Yukon Gold potatoes (about 6 to 8), peeled and cut into 1/4-inch slices, divided

7 tablespoons olive oil, divided

Freshly ground black pepper

1 3 1/2 – 4 pound bone-in leg of lamb

2 pounds tomatoes, cut into 1/4-inch slices

2 onions, cut into 1/2-inch slices

2 cups dry white wine

Preheat the oven to 350 degrees. Combine the garlic, thyme, and 2 tablespoons of kosher salt together in a small bowl. Using your fingertips, rub the mixture together until it resembles the texture of wet sand. Larger pieces of garlic will still remain. Set the mixture aside. Crush the bay leaves.

Combine half of the potatoes with 1 tablespoon of the olive oil and 1 crushed bay leaf in a large roasting pan. Season the potatoes with salt and pepper and toss them well to coat them. Spread out the potatoes in a single layer in the bottom of the roasting pan.

Place the leg of lamb on top of the potatoes and rub the lamb with the garlic mixture. Layer the tomatoes, onions, the remaining 3 crushed bay leaves and the remaining potatoes around and up the sides of the leg of lamb, seasoning them with salt and pepper and drizzling the remaining 6 tablespoons of olive oil as you go along. The lamb will be nearly covered. Add the white wine to the pan and cover the pan tightly with aluminum foil.

Roast until the lamb is very tender, about 3 to 4 hours. Remove the foil and increase the oven temperature to 425 degrees. Roast, turning the lamb halfway through, until the lamb is golden, about 20 to 25 minutes longer. Let the lamb rest in the roasting pan for about 15 to 20 minutes.

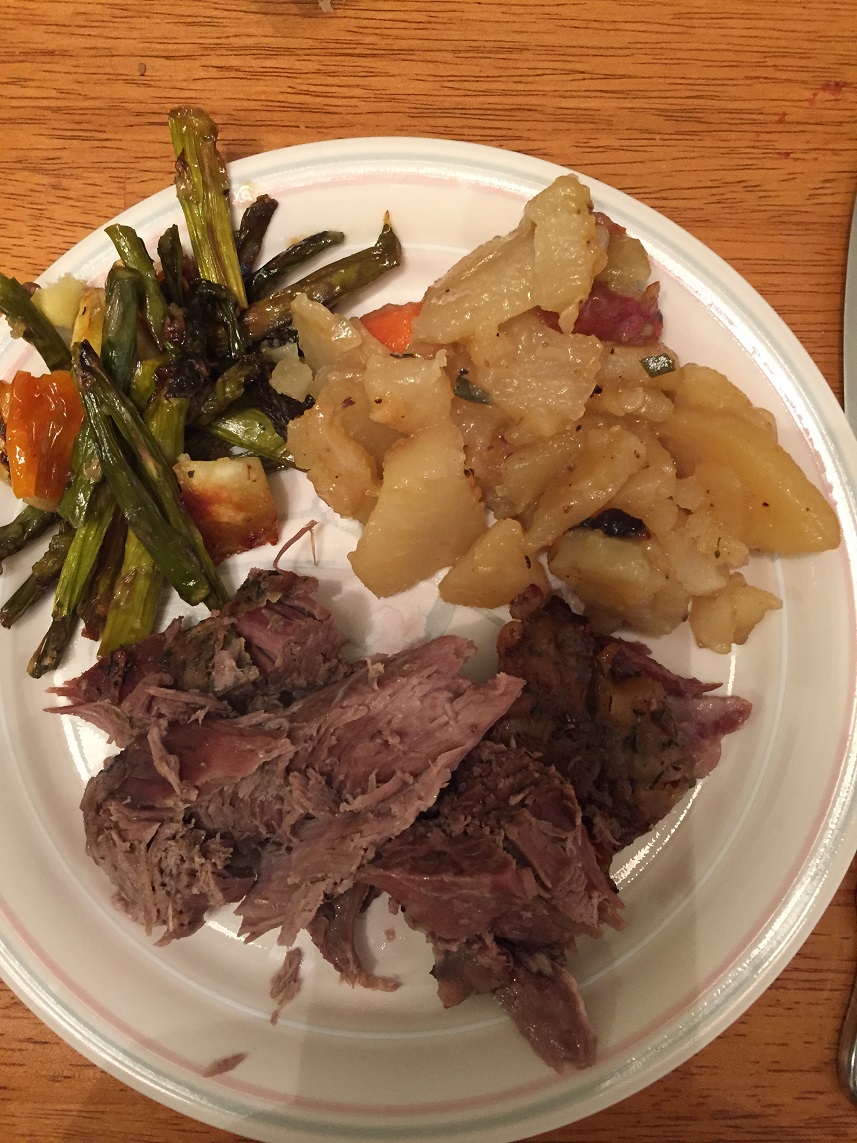
Pull the meat from the bones in large chunks. Discard the bones and any fat. Place the meat and the vegetables together on a large platter. Skim fat from the surface of the cooking juices in the pan. Spoon some of the cooking juices over the lamb and the vegetables and serve the remained alongside the lamb.

I have to say that this may be the best lamb recipe I ever tried. The lamb easily fell off the bones and was almost like a pot roast or a pulled pork after it had been slow cooked. The braising it goes through in the oven is fantastic and the whole house smelled great while it was cooking, but the lamb itself had fantastic flavor even with just the simplest spice mixture of garlic, salt and thyme. The potatoes were fantastic as well and really added nicely to the dish. You certainly don’t have to worry about any carving of the lamb since it falls right apart for you and every agreed it was a great way to cook the lamb and one I will certainly try again.

That’s all I have for today. Check back next time for another recipe. Until then, enjoy the rest of your day and enjoy your meal!

andalusianlamb andalusianlamb1

 
Leave a comment

Posted by on April 9, 2015 in Cooking, Dinner, Lamb, Potatoes


Tags: , , , ,

Steak in a Snap – Cook’s Country Strip Steaks with Sauteed Onion and Mushrooms

Now that the Easter holiday is over and a couple of really big work projects are out of the way for me, hopefully I can get back to doing some more regular posts here on my cooking blog. I have made a few different things recently, with a number of them coming out of the last issue of Cook’s Country magazine. They was have some good choices and therefore meals that have recipes that are easy to follow and make use of some basic ingredients. I particularly like their recipe card dinners that can be done in under 30 minutes or so. That is the case with this particular recipe for a strip steaks with sautéed onion and mushrooms. I had just happened to get some New York strip steaks on sale last week and saw it was a great opportunity to give this easy recipe a try. It makes use of just a few ingredients and makes a really nice and flavorful sauce to go along with the steak, mushrooms and onions.

Strip Steaks with Sautéed Onion and Mushrooms

2 (one-pound) boneless strip or rib-eye steaks, 12 1 1/2 inches thick

Salt and pepper

2 tablespoons vegetable oil

8 ounces mushrooms, trimmed and sliced thin

one onion, halved and sliced thin

2 garlic cloves, minced

1/4 cup balsamic vinegar

3 tablespoons chopped fresh chives

2 Tablespoons Butter

Pat the steaks dry with paper towels and season each steak well with salt and pepper. Heat 1 tablespoon of the vegetable oil in a large cast-iron or stainless steel skillet set over medium-high heat until the oil is just smoking. Cook the steaks until they are well browned and the meat registers 125° on an instant read thermometer inserted into the center of the steak (for medium rare), about 5 minutes per side. Transfer the steaks to a carving board and tent it loosely with aluminum foil and allow the steaks to rest for about 5 minutes.

Heat the remaining 1 tablespoon of vegetable oil in the now empty skillet over medium-high heat until the oil is just smoking. Add the mushrooms, onion 1/2 teaspoon of salt and 1/2 teaspoon of pepper and cook until the vegetables are well browned, about 5 minutes. Add the minced garlic and cook until the garlic is fragrant, about 30 seconds.

Stir the balsamic vinegar and any accumulated beef juices into the skillet and simmer, scraping up any browned bits in the pan, until the sauce has thickened, about 1 to 2 minutes. Take the skillet off the heat and stir in 2 tablespoons of the chives and the 2 tablespoons of butter. Season the sauce with salt and pepper to taste. Slice the steaks and transfer them to a platter. Top the steaks with the sauce and sprinkle the steaks with the remaining 1 tablespoon of chives and serve.

It might be hard for you to get a recipe that is much easier than that and supplies you with such great flavor. The mix of the balsamic vinegar with the mushrooms, onions and garlic really provide great flavor for the steaks. I made some mashed potatoes to go along with it and the sauce was just as great on the potatoes as it was on the steak. The steak was cooked perfectly to medium rare (that is the way we prefer it anyway) but if you like it cooked a little more well you could always cook it for an extra minute or 2 to get the doneness that you prefer. You get a great sear on the steaks and a nice sauce to go with them and mushrooms and onions go with steak so well that it seemed perfect together.

That’s all I have for today. Check back next time for another recipe. Until then, enjoy the rest of your day and enjoy your meal!

stripssteakswithonionandmushrooms


Leave a comment

Posted by on April 6, 2015 in Beef, Cooking, Dinner, Sauce


Tags: , , , ,

A Perfect Play on a One Pot Meal – Cook’s Country One-Pan Pork Chop Dinner

One pot meals are the dream of any busy home cook. You love to have a meal that tastes great, gets everything together in one dish and has easy clean up and cooking time. it may not always be as easy as it sounds and I am always on the lookout for different variations on the one pot meal. It is not often you see one involving pork that doesn’t involve a stir fry, so when I saw this recipe listed in the latest issue of Cook’s Country I was intrigued. It roasts the vegetables and the pork chops together, not something you often see because pork chops, even really think ones, do not take the same amount of time to roast as most of your vegetables do. I was wondering just how the chops would get nicely browned without doing them on the stovetop and still have everything roasted together in one pan.

One-Pan Pork Chop Dinner

4 (10-ounce) bone-in center-cut pork chops, 1 to 1 1/4 inches thick, trimmed

1/3 cup extra-virgin olive oil

Kosher salt and black pepper

1 teaspoon paprika

1 teaspoon ground coriander

1 pound Yukon Gold potatoes, unpeeled, halved lengthwise and cut crosswise into 1/2-inch thick slices

1 pound carrots, peeled and cut into 3-inch lengths, thick ends quartered lengthwise

1 fennel bulb, stalks discarded, bulb halved, cored and cut into 1/2-inch thick wedges

10 garlic cloves, peeled

2 teaspoons minced fresh rosemary

2 tablespoons minced fresh parsley

1 small shallot, minced

4 teaspoons red wine vinegar

1/8 teaspoon sugar

Adjust an oven rack to the upper-middle position and heat the oven to 450 degrees.Pat the pork chops dry with paper towels and rub each chop with 1 teaspoon of the olive oil. Combine 2 teaspoons of the kosher salt, 1 teaspoon of black pepper, the paprika and the coriander together in a small bowl. Season the pork chops all over with the spice mixture and set the pork chops aside.

Toss the potatoes, carrots, fennel, garlic cloves, rosemary, 1 tablespoon of the olive oil, 1 1/2 teaspoons of kosher salt and 1/4 teaspoon of the black pepper together in a large bowl until the vegetables are well coated. Spread the vegetables in a single layer on a rimmed baking sheet. Roast the vegetables until they are just tender, about 25 minutes.

Carefully place the pork chop on top of the vegetables and return the baking sheet to the oven. Roast the pork chops until they register 140 degrees on an instant read thermometer inserted into the thickest part of the pork chops and the vegetables are fully tender, about 10 to 15 minutes longer, rotating the baking sheet halfway through the roasting process.

Meanwhile, combine the parsley, shallot, red wine vinegar, sugar, 1/2 teaspoon of kosher salt, 1/4 teaspoon of black pepper and the remaining 1/4 cup of olive oil together in a bowl.Transfer the vegetables and the pork chops to a platter and drizzle with the vinaigrette before serving.

The chops and the vegetables both were nicely browned and had great flavor. the spice run on the chops really helped them to brown nicely and provide just the flavor they needed for the dish and roasting the pork chops on top of the vegetables added some extra flavor to the veggies as well. Since the vegetables were nice and hot when I added the pork they helped to cook the pork nicely as well. The vinaigrette was a nice finish to the dish but I think it tasted great without it as well and we just passed the vinaigrette on the side for those that might want it on their meal. I love roasted carrots and throw in the potatoes, garlic and fennel (I added an onion too to the dish; who doesn’t love roasted onion?)and the flavors were phenomenal. Best of all, of course is that there was only one pan to clean up when dinner was done. It makes for a great weeknight meal in one dish that you can do in under 45 minutes.

That’s all I have for today. Check back next time for another recipe. Until then, enjoy the rest of your day and enjoy your meal!

onepanporkchopdinner


Tags: , , , , ,

Is This the Best Meatloaf Recipe? Bon Appetit Says So

If you have spent any time following my blog here you know that meatloaf is always been one of my particular favorites. I am pretty willing to try just about any recipe that comes along when it comes to meatloaf which is because I like to try different things with it and I do enjoy it. You can look back in the archives here and see the many different recipes that I have tried from different places like Alton Brown, America’s Test Kitchen, different Food Network chefs and many other recipes that I have tried over time. When I saw the listing from Bon Appétit in an article they did last month for what they say is the best beef and bacon meatloaf recipe out there I figured it was not going to be too long before I tried it out. Sean particularly likes it when I make a meatloaf that incorporates baking in some way and this one looked like it was pretty good bet to taste good so I knew I was going to give it a try.

Bon Appetit’s Best Beef and Bacon Meatloaf

1 tablespoon olive oil

1 onion, grated with the large holes of a box grater

1 garlic clove, finely chopped

3/4 cup ketchup

1/4 cup apple cider vinegar

3 tablespoons dark brown sugar

1/4 teaspoon cayenne pepper

3/4 cup chicken broth

1/2 cup chopped fresh parsley

2 eggs

2/3 cup fine breadcrumbs

1/2 cup finely grated Parmesan cheese

1 tablespoon kosher salt

1/4 teaspoon freshly ground black pepper

2 pounds ground beef chuck (15% fat)

6 thin strips of bacon 

Preheat the oven to 350°. Line a rimmed baking sheet with aluminum foil, then parchment paper. Set the pan aside.

Heat the olive oil over medium heat in a small skillet. Cook the grated onion and garlic, stirring occasionally, until both are very soft, about 4 to 5 minutes. Transfer the onion mixture to a large bowl.

Meanwhile, bring the ketchup, apple cider vinegar, brown sugar, and cayenne pepper to a boil in a small sauce pan. Reduce the heat, and simmer, stirring occasionally, until the mixture is slightly reduced and syrupy, about 5 to 6 minutes. Transfer 2 tablespoons of the ketchup mixture to a blender; add the chicken broth and parsley to the blender and blend the mixture until it is smooth. Set the remaining of the ketchup mixture aside.

Add the chicken broth mixture, eggs, breadcrumbs, Parmesan cheese, kosher salt and pepper to the onion and garlic mixture. Mix the ingredients together until they are combined well. Add the ground beef and mix well with your hands to combine everything. Transfer the meatloaf mixture to the prepared pan and form the mixture into a long log (about 12″ x 5″), smoothing the surface of the mixture. Spread the reserve ketchup mixture over the top of the meatloaf and drape the bacon pieces in a crisscross pattern over the meatloaf, tucking the pieces underneath the meatloaf. Bake the meatloaf until an instant read thermometer inserted into the center registers 165° and the bacon is crisp, about 70 to 80 minutes. Allow the meatloaf to rest for 10 minutes before slicing.

I do have to say that while it may not be the best meatloaf I have ever had, it is certainly one of the top that I have made. The glaze that is used for the meatloaf is very tasty and the combination of the brown sugar, cayenne pepper, vinegar and ketchup really does seem to make a difference. Using chicken broth in the meatloaf mixture was something new for me but it did add a nice layer of flavor and there was just the right enough breadcrumbs to hold everything together nicely without completely drying out the meat. Of course, the bacon is always a nice touch to put on top of the meatloaf and actually I found that draping the bacon in this particular manner seem to work pretty well as it added good flavor to the meat without completely overpowering the dish. I will definitely try the recipe again as it was one of the tastier choices for meatloaf I have tried in a while.

That’s all I have for today. Check back next time for another recipe. Until then, enjoy the rest of your day, and enjoy your meal!

beefandbaconmeatloaf


4 Comments

Posted by on March 31, 2015 in Beef, Cooking, Dinner


Tags: , , , ,

Kicking Cook’s Country Cracker-Crusted Fried Chicken

Fried chicken is an awesome thing when it is done right. Sure it can be messy and take some time to get done with brining and making the coating and deep-frying, but in the end, if it is all done right, you end up with a great crunchy coating and juicy chicken pieces to make the meal perfect. I have tried a bunch of different fried  chicken recipes in the past and I am always up for a new one to try out to get the perfect coating. I have had some where the coating is disappointing and without crunch but when I saw this recipe in the latest issue of Cook’s Country for a cracker-crusted fried chicken the picture along made it worth giving a shot to. I had four pieces of bone-in chicken thighs and nothing to do with them and then Sean saw this picture in the magazine and said “let’s have this tonight.” The ingredient list is pretty basic and we had everything on hand, so we gave it a try.

Cracker-Crusted Fried Chicken

Salt and pepper

2 tablespoons Worcestershire sauce

2 tablespoons soy sauce

2 teaspoons cayenne pepper

2 teaspoons granulated garlic

3 pounds bone-in chicken pieces (split breasts cut in half crosswise, drumsticks, thighs and/or wings)

36 square saltines (1 sleeve)

1/2 cup all-purpose flour

1/2 cup cornstarch

1 teaspoon baking powder

3 quarts peanut or vegetable oil

Whisk 1 1/2 quarts of cold water, 2 tablespoons of salt, Worcestershire sauce, soy sauce, cayenne pepper and granulated garlic together in a large container until the salt dissolves. Add the chicken pieces, cover the container and refrigerate the chicken for at least 1 hour or up to 4 hours.

Place the saltines in a gallon zipper-lock bag, seal the bag and crush the crackers to medium-fine crumbs with a rolling pin or mallet. you should have about 1 cup of cracker crumbs. Transfer the crumbs to a large bowl and whisk in the flour, cornstarch, baking powder, 2 teaspoons of pepper and 1/2 teaspoon of salt until the ingredients are well combined.

Set a wire rack in a rimmed baking sheet. Set a second wire rack in a second rimmed baking sheet and line half of the rack with a triple layer of paper towels. Working with 1 piece at a time, remove the chicken from the brine mixture and transfer it to the saltines mixture, pressing the chicken firmly so the coating adheres well to the chicken. Transfer the coated chicken to the prepared rack without the paper towels and repeat the process with the remaining chicken. Refrigerate the coated chicken pieces for at least 30 minutes or up to 2 hours.

Add the peanut or vegetable oil to a large Dutch oven until it measures about 2 inches deep and heat the oil over medium-high heat to 350 degrees. Add half of the chicken to the hot oil and fry the chicken until the breasts register 160 degrees and the drumsticks, thighs or wings register 175 degrees on an instant-read thermometer, about 13 to 16 minutes total. Adjust the burner, if necessary, to maintain the oil temperature between 300 and 325 degrees. transfer the cooked chicken to the paper towel-lined side of the second wire rack to drain on each side for 30 seconds, then move the pieces to the unlined side of the rack. Return the oil to 350 degrees and repeat the process with the remaining chicken pieces.

I did adjust the recipe down a bit since I was only making 4 pieces of chicken, so I cut the recipe by about 1/3 and it seemed to work out pretty well for me with the size chicken thighs I had. The coating was great with a nice crunch to it and it was perfect in color and texture. the chicken remained moist as well and it was well seasoned thank to brining the pieces ahead of time. Refrigerating the pieces with the coating did help to settle the coating on the pieces as well. I really liked the additions to the brine of the soy sauce, Worcestershire and cayenne as it imparted some great flavor on the chicken. Everything came out nicely with the chicken and of course this would be great for leftovers for lunch the next day, but Sean liked it enough so we had none leftover to save.

That’s all I have for today. Check back next time for another recipe. Until then,enjoy the rest of your day and enjoy your meal!

crackercrustedfriedchicken


Leave a comment

Posted by on March 30, 2015 in Cooking, Dinner, Poultry


Tags: , , , , , ,

A Warm and Cozy Dessert Anytime – Irish Apple Cake

it has been a very hectic week around here, which is why I haven’t had a chance to really post anything since a few days ago. I have been busy at work and with meetings at Sean’s school, Michelle was away on business and then came home, Sean has been busy at school and then sick and spring break is upon us with Easter right around the corner. It feels like we haven’t even had a chance to breather lately and the weather has been helping, with snow falling here on and off all day. Anyway,enough complaining about all of that stuff and let’s try to get down to some cooking! I had made this dessert last week as a nice Irish dessert that seemed perfect for right around St. Patrick’s Day and I got the recipe from The Complete Irish Pub Cookbook. It is for an apple cake that makes use of just a few ingredients and it does not take any time at all to put it together. In about an hour you can have a nice dessert so it is a good one to keep in mind anytime you have a few apples around and you want a dessert in a hurry.

Irish Apple Cake

2 large cooking apples, such as Granny Smith

1 1/3 cups all-purpose flour

2 teaspoons baking powder

1 teaspoon ground cinnamon

1/2 teaspoon salt

1/2 cup (1 stick) butter, plus extra for greasing

1/2 cup plus 1 tablespoon superfine sugar

2 eggs

1-2 tablespoons milk

confectioner’s sugar, for dusting

For the Streusel Topping:

1 cup all-purpose flour

6 tablespoons butter

1/2 cup superfine sugar

Preheat the oven to 350 degrees. Grease a 9-inch round springform cake pan. To make the streusel topping, sift the flour into a medium bowl and rub in the butter with your fingers until the mixture resembles coarse crumbs or bread crumbs. Stir in the superfine sugar and set the topping aside.

Peel, core and thinly slice the apples. To make the cake, sift the flour into a medium bowl with the baking powder, ground cinnamon and the salt. Place the butter and the superfine sugar in a separate large bowl and beat them together with an electric mixer until the mixture is light and fluffy, about 2 to 3 minutes. Gradually beat in the eggs, adding a little bit of the flour mixture with the last addition of egg. Gently fold in half of the remaining flour mixture, then fold the rest of the flour mixture in with the milk.

Spoon the batter into the prepared springform pan and smooth the top of the batter. Cover the top with the sliced apples and then sprinkle the streusel topping evenly over the top of the apples. Bake the cake in the preheated oven for 1 hour or until the top is browned and firm to the touch. Let the cake cool in the pan before removing the sides of the springform pan. Dust the cake with confectioners’ sugar before serving.

This cake tastes great when it is a little bit warm and you can serve it with some ice cream or fresh whipped cream on the side. It rose more than I thought it would at first as I was a little concerned as I put the batter in the pan that it seemed to dry, but it all came out nicely in the end and the cake was moist and flavorful. If you do not have superfine sugar you can make your own simply by processing granulated sugar in the food processor for about 1 minute. This is a nice dessert to make since it uses things you typically have around the house so you can throw it together if you need something last-minute for home or to bring to someone else’s home.

That’s all I have for today. Check back next time for another recipe. Hopefully this week will be better than the last and I will have more time to get on here and share some recipes. Until then, enjoy the rest of your day and enjoy your meal!

irishapplecake

 
Leave a comment

Posted by on March 28, 2015 in Brunch, Cakes, Cooking, Dessert, Fruit


Tags: , , , , ,

A One Pan Favorite – Chicken and Potatoes Sheet Pan Supper

One pot meals are always a favorite of mine no matter what time of year it may be. Anything that can get you a meal in one dish that tastes great and gives you fast and easy clean up is usually a winner in my book, particularly when you are rushed and need to get a lot of things done. Lately that seems to be the case around here nearly every day, with lots of work going on for Michelle and me and Sean keeping pretty busy with school as the school year comes up on their last break of the year before summer comes around. he’s been busy picking classes for his first year of high school next year so it’s been chaotic for all of us, which makes an easy meal to cook all the better for during the week. This recipe, from the Kitchn, is for a simple chicken and potatoes roasted together on a sheet pan. I did change it around just a bit as I added some carrots to the mix to really make it a complete meal in one, but it could stand on its own as the original as well.

Chicken and Potatoes Sheet Pan Supper

2 tablespoons olive oil

Zest of one lemon, grated on a fine microplane or grater

2 teaspoons Italian herbs, poultry seasoning or other spice or herb blend that you prefer

1/2 teaspoon salt

1/4 teaspoon ground black pepper

2 pounds mixed chicken parts, bone-in and skin-on (thighs, legs, drumsticks and/or breasts)

4 russet potatoes, cut into 2-inch pieces

Preheat the oven to 400 degrees. For easier clean-up, line a baking sheet with aluminum foil, parchment paper or a silicon baking mat. You can also use just a bare sheet pan if your prefer. In a small bowl, mix together the olive oil, lemon zest, seasonings or herbs that you are using, salt and pepper until they are well blended.

Spread out the chicken and the potatoes on the sheet pan in a single layer. Drizzle the oil and herb mixture evenly over the chicken and potatoes. Using your hands or a pair of tongs, flip and move the chicken and potatoes around until each piece is evenly coated with the mixture.

Place the sheet pan on the middle rack in the oven and allow the chicken and potatoes to roast for 25 to 30 minutes, or until the chicken pieces register 165 degrees on an instant read thermometer inserted in the thickest part of the chicken meat and the potatoes are tender. If the chicken skin is not crisp enough to your liking, run the tray under the broiler for 2 to 3 minutes until the skin is crispy.

transfer the chicken and potatoes to a serving dish or platter and serve hot.

As I said, I added carrots to the mix to round out the meal and a little bit of onion as well. You could put just about any type of vegetable you would like in the mix and I think they would roast nicely, like squash, turnips, Brussels sprouts, sweet potatoes, parsnips or whatever you like best. I used only chicken breasts when I made it because that is what I had on hand but any pieces will work well. the only thing I found is that I needed to add a little bit more olive oil to the mixture with the herbs in order to get the consistency where it would drizzle nicely. With the original amounts it seemed more like a paste to me, which is fine if you don’t mind spreading it on with your hands. another tablespoons of oil though will do the trick I think. Overall it was a fast and easy meal that was perfect for a weeknight, with a nice mix of lemon and herbs (I used dried Italian seasoning on mine) to coat everything. You can serve this with a salad and you have the perfect meal in minutes.

That’s all I have for today. Check back next time for another recipe. Until then, enjoy the rest of your day and enjoy your meal!

chickenandpotatoessheetpansupper


Tags: , , , , ,

A Spicy Start to Spring with Crispy Potato and Chorizo Tacos

While the weather here has not completely warmed up to my liking just yet, it is slowly getting there. We had another 3 inches or snow of snow this past Friday but luckily most of it has melted away already, even though it has been windy and chilly here. the promise of spring is coming with warmer weather on the horizon towards the end of this week so maybe I will actually be able to walk out onto the back lawn without worrying about slipping and falling on the ice. in the meantime, I decided to warm things up in the kitchen a little bit by making a nice spicy meal for dinner the other day. I had picked up some freshly made chorizo when I went shopping and wanted to make something with it that was quick and easy so I decided to try out this recipe, which I found at Serious Eats, for crispy potato and chorizo tacos. With only a few ingredients needed it seemed like an easy meal that would come together quickly and promised to taste great.

Crispy Potato and Chorizo Tacos

1 pound russet potatoes, cut into 1/2-inch dice (about 3 large potatoes)

Kosher salt

1 tablespoon white vinegar

6 tablespoons vegetable oil, divided

1 pound fresh chorizo

12 warm soft tortillas, corn or flour, for serving

1 onion, minced, for serving

1/2 cup chopped fresh cilantro leaves, for serving

Homemade or store-bought salsa or salsa verde, for serving

Avocado slices, for serving

Sour cream, for serving

2 limes cut into 8 wedges each, for serving

Place the diced potatoes in a large pot and cover with cold water by 1 inch. Add the vinegar and 2 tablespoons of kosher salt. Bring the potatoes to a boil over high heat and cook until the potatoes are just cooked through, about 5 minutes after coming to a boil. Drain the potatoes and let them rest over sink until they are mostly dry.

Heat 4 tablespoons of the vegetable oil in a large non-stick or cast iron skillet set over medium-high heat until the oil is lightly smoking. Add the dry potatoes, shake the pan to distribute the potatoes and oil around the pan, and cook, tossing and stirring occasionally until the potatoes are very crisp and golden brown on all sides, about 15 minutes.

Meanwhile, heat the remaining oil in a medium non-stick or cast iron skillet set over high heat until the oil is shimmering. Add the chorizo and cook, stirring, until it is heated through. Continue cooking, stirring and tossing frequently, until all the liquid has evaporated from the pan, some fat breaks out, and the chorizo starts sizzling, and eventually is quite dry and well-browned, about 15 minutes.

Transfer the cooked chorizo to the pan with the potatoes. Toss the ingredients to combine them and season to taste with salt. Serve the chorizo and potato mixture immediately with tortillas, onions, cilantro, salsa, avocado slices, sour cream and limes on the side.

This meal comes together as quickly as any traditional taco meal might and you get something different for sure. I really liked the combination of the potatoes and chorizo and the heat and spice of the chorizo transferred really nicely to the rest of the dish. Combine it into a taco with some fresh avocado slices, salsa and sour cream and you have a real treat. I think Sean was little skeptical when I told him what I was making, but it seemed to go over pretty well for dinner as he gobbled up several of the tacos for dinner. you want to get the potatoes really crispy and the chorizo nicely browned and crispy to really get the most out of it. I think this dish worked really well and I’ll be making it again.

That’s all I have for today. Check back next time for another recipe. Until then, enjoy the rest of your day and enjoy your meal!

chorizotaco2 chorizotaco1

 
2 Comments

Posted by on March 23, 2015 in Cooking, Dinner, Pork, Potatoes


Tags: , , , , , ,

Dark Meat Chicken Recipes – Bon Appétit

Dark Meat Chicken Recipes – Bon Appétit.

While sometimes boneless chicken breasts can be a great answer to make for dinner, I find you can get a lot more flavor out of chicken thighs and legs and use them much more often myself. They also are usually a lot cheaper to buy so you can get a better deal than the white meat. Bon Appetit has put together 25 recipes of dark meat chicken that you can add to your cooking rotation of tasty meals. Check it out!

 
Leave a comment

Posted by on March 21, 2015 in Cooking, Cooking Websites, Dinner, Poultry


Tags: , , , , ,

Why is it Still Cold? Looks Like Time For Another Soup – Chicken and Barley Soup

We are still experiencing windy and cold weather here today in my area of New York and even though Spring starts tomorrow night, we are expecting 2 to 4 inches of snow tomorrow, which does not bring a smile to anyone’s face around here after all of the snow and cold we have had this winter. In any case,cold weather, and even early spring weather that can be chilly, is still a good time to break out the soup recipes and make something nice and warming. This particular recipe that I found at the Kitchn worked perfectly with some leftover chicken that I had. It is for chicken and barley soup and makes use of chicken, some veggies and barley to create a hearty and warming soup.

Chicken and Barley Soup

1 tablespoon olive oil or vegetable oil

2 carrots, peeled and diced

4 stalks celery, diced

1 onion, diced

1/2 teaspoon dried oregano

1/2 teaspoon salt

1 quart chicken broth

1 cup water

1 cup pearl barley

2 cups diced cooked chicken

1 to 2 tablespoons lemon juice, to taste

Parsley, to garnish, if desired

Heat the olive oil or vegetable oil in a Dutch oven or large, heavy-bottomed soup pot. Add the carrots, celery, onion, oregano and salt. Stir to coat the vegetables with the oil and herbs, then cover the pot and allow the vegetables to sweat until the onions are translucent and the carrots are softened, about 10 to 12 minutes.

Add the chicken broth, water and the pearl barley to the pot. Bring the mixture up to a simmer and then cover the pot and turn the heat down to low. All the soup to simmer until the barley is cooked through, about 30 to 40 minutes. Uncover the pot and add the cooked chicken. Allow the chicken to warm through, about 2 to 3 minutes, then add 1 tablespoon of the lemon juice. Taste the soup to adjust the seasonings and add more lemon juice, salt or pepper to suit your tastes. Serve the soup immediately and garnish it with parsley, if desired.

If you do not have any cooked or leftover chicken in the fridge, you can easily add some uncooked  cubed chicken after you have sweat the vegetables and cook the chicken until it is no longer pink and cooked through, about 5 to 6 minutes. the lemon juice adds a nice touch to the soup but I found 1 tablespoon to be plenty and left it at that. I really liked the barley with this soup and it added great texture and flavor overall to make the soup a bit heartier than just your standard chicken soup or chicken and rice soup. You could always add different vegetables or other veggies if you prefer and this soup is hearty enough to stand on its own as a meal, though some nice crunchy homemade bread with it does go rather nicely. Hopefully it will be the last soup recipe of the winter for us here!

That’s all I have for today. Check back next time for another recipe. Until then, enjoy the rest of your day and enjoy your meal!

chickenandbarleysoup


Tags: , , , , , , ,

 
National Day Calendar

Fun, unusual and forgotten designations on our calendar.

Jennifer Probst

a little bit naughty a little bit nice

Laissez Faire

Letting Life Lead

simple cooking recipes

a blog to share with you the best