RSS

Monthly Archives: February 2014

Romance in the Air and On the Plate, Part 1 – Roasted Beet Salad

Even though the weather around here has been absolutely atrocious this week, I had planned Valentine’s Day dinner late last week, of the ingredients I needed last week or early in the week and I was completely prepared to make everything. I even put extra hours of work in so I could be sure I had enough time to cook everything and spent the better part of the afternoon preparing everything. We had a nice, elegant meal for the three of us, something we do not do too often and it tasted great and was fun. I’ll be sharing the recipes I made over the next several days, so we may as well start off with the salad. The original thought for the recipe comes from Williams-Sonoma, but I actually ended up changing quite a bit of it because Michelle is not a big fan of a couple of the ingredients, so I did switch some things around for this roasted beet salad. I’ll give you the original recipe and then let you know what I did to change it around.

Roasted Beet Salad

3 golden beets, trimmed and washed

6 red beets, trimmed and washed

1/2 cup olive oil

Kosher salt and freshly ground black pepper

2 tablespoons fresh lemon juice

5 tablespoons creme fraiche

1 tablespoon chopped fresh dill

2 teaspoons minced shallots

4 cups baby watercress

4 ounces goat cheese, crumbled

1/3 cup toasted chopped walnuts

Preheat the oven to 350 degrees. Place the golden and red beets on a baking sheet. Coat the beets with 3 tablespoons of the olive oil and season them well with the kosher salt and black pepper. Cover the baking sheet with aluminum foil and roast until the beets are fork tender, about 1 hour. When the beets are cool enough to handle, peel the beets and cut them into 1-inch wedges.

Meanwhile, combine the lemon juice, creme fraiche, the remaining 5 tablespoons of olive oil, the dill and the shallots in the blended or food processor. Blend or emulsify the ingredients until they are well mixed and season the vinaigrette with kosher salt and pepper to taste.

Arrange the beet wedges in a layer on a platter and top them with the watercress. Garnish with the goat cheese and toasted walnuts. Drizzle the vinaigrette over the salad and serve.

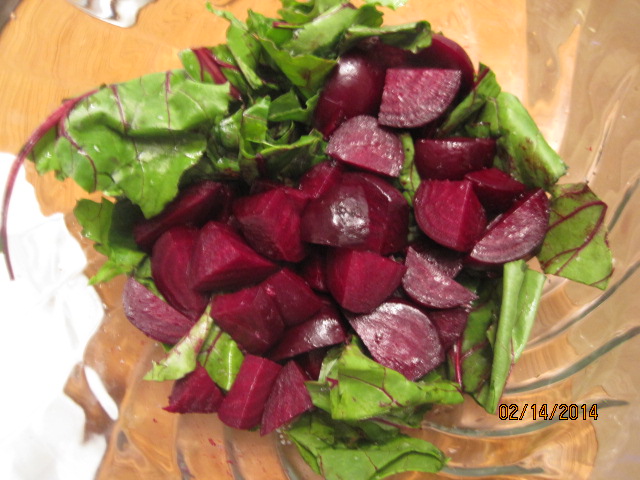
Okay, looking back at this I made quite a few changes to the recipe. First, I could only find red beets in my area so that is what I used. I would have loved to have the golden ones too, but it just wasn’t happening this time. Next, I omitted the goat cheese and the toasted walnuts. Michelle doesn’t like either one of them so they both went out. I also couldn’t locate any creme fraiche in the area so I had to make my own using equal parts of sour cream and heavy cream and mixing them together. It turned out just fine and was perfect to use. Finally, I hated to waste the beet greens so I decided to use them in the salad with the watercress. One thing to not about beet greens – they are very dirty and need extensive washing and spinning in the salad spinner if you have one. Also, they can be quite bitter when they are raw so if you don’t like the bitter flavor you can try blanching them or even wilting them a little in a saute pan for a few minutes. They are too tasty to waste though and make a nice addition to the meal if you can use them. We all loved the beets and always forget how great roasted beets can taste. I really need to buy them more often to make them. I really enjoyed the dressing as well with the shallots and dill adding some great flavor and I can see how the goat cheese and walnuts would add a lot to this salad. It was good as we had it, but the additions would make it even better. The picture I took does not have the dressing on it yet and you can really only see the beets and beet greens so it doesn’t do it justice.

That’s all I have for today. Check back next time for the next part of the dinner menu. I’ll be going over the two sides we had with the meal – sautéed spinach with garlic and garlic-thyme smashed potatoes. Until next time, enjoy the rest of your day and enjoy your meal!

006


2 Comments

Posted by on February 15, 2014 in Cooking, Dinner, Dressings, Holidays, Salad


Tags: , , , , , , ,

A Quick Week Night Meal – Stir-Fried Beef with Onions and Ginger

As I have written about before, I make a lot of stir fry dinners. They are a great way to do an easy weeknight meal in a flash and you can use just about any ingredients you happen to have on hand to make a good combination for a meal. All you need after that is some rice and you can have your dinner on the table in under 30 minutes if you time everything right. You can even make things easier for yourself if you want and keep a bag of frozen sir fry vegetables around just for such an occasion. For this recipe, which I got from Mark Bittman, I used a company of some fresh with some frozen even though his original recipe doesn’t really call for any vegetables at all. it is a quick beef stir fry with onions and ginger that you can make yourself and will taste better than any takeout that you can get that will cost you even more. I did alter his original recipe by marinating the beef for a bit first. I was using a London broil and wanted to break it down some and impart some flavor, so that is what I did. You can always just use the beef on its own if you prefer and ignore my marinating instructions.

Stir-Fried Beef with Onions and Ginger

3 cloves garlic, minced

2 teaspoons lemon juice

3 tablespoons balsamic vinegar

2 tablespoons Worcestershire sauce

1/2 cup red wine

1 tablespoon soy sauce

1 teaspoon honey

Salt and freshly ground black pepper

2 to 2 1/2 pounds top round London broil or flank steak

Salt and freshly ground black pepper

2 tablespoons vegetable oil
2 large or 3 medium onions, thinly sliced
2 cups fresh or frozen vegetables, cut to bite size

1 teaspoon minced garlic
1 tablespoon plus 1 teaspoon minced or grated fresh ginger
1/2 cup beef or chicken stock or water
1 tablespoon hoisin sauce or soy sauce

To marinade the beef, mix together all of the ingredients except for the meat. Place the meat in a shallow dish and cover it with the marinade. Cover the meat with plastic wrap and refrigerate for at least 4 hours but no more than 24 hours.

Remove the meat from the refrigerator and bring it to room temperature before cooking.

Slice the beef as thinly as you can, across the grain. It’s easier if you freeze it for 15 to 30 minutes first. Cut the slices into bite-sized pieces. Sprinkle with salt and pepper and set aside.
Heat a large skillet over high heat until it smokes, 3 to 4 minutes. Add 1 tablespoon of oil and the onions. Stir immediately, then stir every 30 seconds or so until the onions soften and begin to char slightly, 4 to 5 minutes. Sprinkle the onions with salt and pepper, then remove them; keep the heat high.

Add 1/2 tablespoon of oil to the pan and then add the vegetables. Cook, stirring occasionally until the vegetables are heated through and crisp-tender, about 2 to 3 minutes. Remove the vegetables from the pan and set them aside.
Add the remaining oil to the pan, then the garlic and 1 tablespoon of the ginger; stir and immediately add the beef. Stir immediately, then stir every 20 seconds or so until it loses its color, just a minute or two longer; stir in the onions and the vegetables. Add the stock, hoisin, and remaining teaspoon of ginger; let some of the liquid bubble away and serve immediately, over rice.

The nice thing about this recipe is that you can make it all very quickly and it tastes fantastic. if you don’t want to use beef, you can just as easily use pork, chicken or shrimp or even just make all vegetables if that is what you prefer. You will still get great flavor from the sauce to help things along. I make about one stir fry a week because it is so easy and very often just use whatever leftover protein I have along with some leftover vegetables and put together a sauce of whatever I feel like having that night.

That’s all I have for today. Check back next time for some more recipes. If you are in the middle of this blizzard like we are, stay warm and safe. Until next time, enjoy the rest of your day and enjoy your meal!

002

 
Leave a comment

Posted by on February 13, 2014 in Beef, Cooking, Dinner, One Pot Meals


Tags: , , , ,

It’s a Snack Attack, Part 3 – Pork Dumplings

Okay, here is the last of the snacks I made this past week. This one also comes from Kelsey Nixon of the Cooking Channel and is for pork dumplings. Sean has been asking me to make these for quite a while now and I finally had some ground pork and wonton wrappers on hand so I thought I would give it a try. There are only a few ingredients to these and they are very simple to make as an easy snack or appetizer if you are planning an Asian-style meal for dinner or just feel like having some kind of a snack.

Pork Dumplings

For the Pork Dumplings:

1 tablespoon minced garlic

2 teaspoons minced ginger

2 teaspoons sesame oil

1 small bunch, scallions, white and green parts, chopped

12 ounces ground pork

3 tablespoons hoisin sauce

2 teaspoons soy sauce

1 teaspoon Chinese five-spice powder

1 egg

1 package dumpling or wonton wrappers

1 tablespoon vegetable oil, for frying

For the Dipping Sauce:

1 cup soy sauce

2 1/2 tablespoons Sriracha sauce

Juice of 3 lemons

For the dipping sauce, combine the soy sauce, Sriracha and lemon juice in a bowl and set the sauce aside until you are ready to serve the dumplings.

For the pork dumplings, heat a large nonstick skillet over medium-high heat. Add the garlic, ginger, sesame oil and scallions and cook until the mixture is fragrant, about 1 to 2 minutes. Remove the skillet from the heat and allow the mixture to cool for about 1 minute.

Combine the cooked garlic, ginger and scallions with the ground pork, hoisin sauce, soy sauce, Chinese five-spice powder and the egg in a large bowl.

Working with the dumpling wrappers, start with the floured surface of the wrappers facing down. Place about 1 1/2 teaspoons of the filling in the center of a wrapper. Wet the edge of the dumpling with water, using your  finger, and fold the dumpling in half without sealing it, like a taco. Pinch one end closed. Create the pleats of the dumpling on one side using your thumb and forefinger, pressing against the other flat edge to seal the dumpling as you go. Flatten the bottoms so that the bottom surface of the dumpling can get a good sear on it when you pan fry them. Repeat the process until all the dumplings are filled. Keep the dumplings on a lightly-floured sheet tray to keep them from sticking and cover the dumplings with a slightly damp towel to keep them from drying out while you make the rest of the batch.

Heat the vegetable oil over high heat in a large nonstick skillet. Working in batches, pan fry the dumplings by placing them bottom-side down and frying them until they are golden brown, about 1 to 2 minutes.

Once the dumplings are golden brown, working carefully, pour 1/2 cup of water into the skillet to cover the dumplings halfway. Immediately cover the skillet with a lid, leaving a small crack for steam to escape. Cook the dumplings until the water has evaporated, about 5 to 7 minutes. Transfer the dumplings to a paper towel-lined plate to soak up any excess oil and repeat the process with the remaining dumplings.

I can tell you that this recipe makes a lot of dumplings, so you can certainly freeze them and heat them up any time you want to have a little snack. We all enjoyed the dumplings as they had some great flavor with the ginger, scallions and hoisin sauce. They were pretty easy to make and while the recipe calls for round dumpling wrappers, i only had square wonton wrappers and I think they worked out just fine for my purposes. It is a perfect party snack you can make pretty easily and I think you could substitute out the pork for beef, chicken, turkey, shrimp or even just vegetables and get great results.

That’s all I have for today. Check back next time for another recipe. I have some other great recipes we have tried lately and I still have my recipes I am making on Valentine’s Day this year to share as well. Until next time, enjoy the rest of your day and enjoy your meal!

004

 
2 Comments

Posted by on February 12, 2014 in Appetizers, Cooking, Pork, Sauce, Snacks


Tags: , , , , ,

It’s a Snack Attack, Part 2 – Buttery Garlic Knots

Here is the second of the snacks I decided to try out this past weekend. This one is really easy and comes from Kelsey Nixon on the Cooking Channel. It is for a batch of very easy to make buttery garlic knots. This is one that you can use with some quick made pizza dough in the food processor or you can just as easily use some store-bought pizza dough and whip these up in no time at all. The actual preparation of the garlic knots and the cooking takes no time at all, so this is a great quick snack you can make just about anytime you want.

Buttery Garlic Knots

1 recipe Food Processor Pizza Dough, or 1 package of store-bought pizza dough

16 tablespoons (2 sticks) butter, room temperature

2 tablespoons fresh thyme leaves, minced

2 tablespoons fresh rosemary leaves, minced

3/4 cup grated Parmesan cheese, divided

8 cloves garlic, grated

All-purpose flour, for dusting

2 teaspoons kosher salt

Prepare the recipe for the food processor pizza dough or take the store-bought pizza dough and let it come to room temperature. Preheat the oven to 375 degrees.

Mix the softened butter with the thyme, rosemary, 2 tablespoons of the Parmesan cheese and the grated garlic. Set the mixture aside.

Turn the pizza dough out onto a lightly floured work surface. Stretch the pizza dough into a rectangle. Spread half of the butter mixture on half of the dough. Fold the dough in half, covering the butter with the pizza dough. Using a pizza wheel, divide the dough into 18 strips. First cut through the middle of the dough and then you can cut each half into 9 separate pieces to get your 18 strips. Stretch each strip of dough and then tie it into a knot and tuck the ends underneath the center of the knot. Place the knots on a baking sheet.

Sprinkle the knots with some of the Parmesan cheese and bake until they are a golden brown color, about 15 to 20 minutes. Meanwhile, in a small saucepan over low heat, melt the remaining herb butter. Once the knots come out of the oven, baste them with the melted butter and sprinkle them with the remaining Parmesan cheese. Serve warm.

I actually basted the knots with some of the butter after they had been baking for about 10 minutes and then again at the end of the baking so they had a really nice baked in garlic flavor. They came out perfectly and has a nice crunch on the outside with a soft and buttery inside. These would go great with any Italian dinner you might be having like spaghetti and meatballs, baked ziti, lasagna, pizza, sausage and peppers or really just about any meal. They also make a great snack or appetizer and you could even put some together as a great afterschool snack for something a little different. You could certainly do a lot of different things with it and even use different herbs if there are some you would prefer instead, like basil or oregano.

That’s all I have for today. Check back next time for another recipe. I have one more good snack I tried recently to come for tomorrow so check back for that one. Until then, enjoy the rest of your day and enjoy your meal!

006

 
2 Comments

Posted by on February 11, 2014 in Appetizers, Breads, Cooking, Pizza, Snacks


Tags: , , , , ,

It’s a Snack Attack, Part 1 – Southwestern Egg Rolls with Avocado-Ranch Dipping Sauce

Since I spent most of the weekend working I did not have a chance to do any posting on here. However I did find the time to try out some new snack recipes that I had been wanting to make for a while and we all sat down and tested them out last night to see how they were. This first one I think was the real hit and turned out the best. It is a take on Chili’s Southwestern eggrolls  recipe. If you have ever eaten at Chili’s or many other places just like it now, you have likely seen this one listed on their menu and perhaps have tried it out. It has always been one of Michelle’s favorites and when I came across it at Chef’s Catalog website I knew I had to give it a try and see how it was. Though they might seem complicated to make, they are actually pretty easy and I think worth the time to put into it.

Southwestern Eggrolls

1 boneless, skinless chicken breast

1 tablespoon vegetable oil

2 tablespoons minced red bell pepper

2 tablespoons minced green onion

1/3 cup frozen corn kernels

1/4 cup canned black beans, rinsed and drained

2 tablespoons frozen spinach, thawed and drained

2 tablespoons diced jalapeno peppers

1/2 tablespoon minced fresh parsley

1/2 teaspoon cumin

1/2 teaspoon chili powder

1/4 teaspoon salt

Dash cayenne pepper

3/4 cup shredded Monterey Jack cheese

5 7-inch flour tortillas

1 egg, beaten

6 cups vegetable oil, for frying

For the Avocado-Ranch Dipping Sauce:

1/4 cup fresh avocado, smashed (about half an avocado)

1/4 cup mayonnaise

1/4 cup sour cream

1 tablespoon buttermilk

1 1/2 teaspoons white vinegar

1/8 teaspoon salt

1/8 teaspoon dried parsley

1/8 teaspoon onion powder

Dash dried dill weed

Dash garlic powder

Dash pepper

Heat a large skillet over high heat with 1 tablespoon of the vegetable oil until it is shimmering. Saute the chicken breast until it is cooked through, about 4 to 5 minutes per side. Set the chicken aside until it cools down enough for you to handle. Wash and dry the skillet to use for the next step.

In the now-empty skillet, heat 1 tablespoon of vegetable oil over medium-high heat until it is shimmering. Add the red pepper and the green onions and saute for 2 to 3 minutes until the vegetables are tender. Dice the cooked and cooled chicken into small cubes and add it to the pan. Add the frozen corn, black beans, spinach, jalapeno peppers, parsley, cumin, chili powder, salt and cayenne pepper to the pan and mix thoroughly. Saute the mixture until it is heated through, about 4 to 5 minutes. Stir the mixture well so that the spinach breaks up and is incorporated into the mixture. Remove the pan from the heat and add the Monterey Jack cheese. Stir until the cheese has melted into the mixture.

Wrap the flour tortillas in a moist cloth and microwave them on high for 1 1/2 minutes or until they are hot. Spoon approximately 1/5 of the mixture into the center of a warm tortilla. Fold in the ends of the tortilla and then roll the tortilla over the mixture. Roll the tortilla very tightly but before you finish rolling brush some of the beaten egg on the inside edge of the tortilla. Finish rolling the eggroll, then set the eggroll with the “glued” seam facing down until the egg sets. Repeat the process with the remaining tortillas and filling until you have five large eggrolls. Arrange the eggrolls on a plate with the sealed edges facing down, cover the plate with plastic wrap and freeze for at least 4 hours or overnight.

While the eggrolls freeze, prepare the avocado-ranch dipping sauce by combining the avocado, mayonnaise,, sour cream, buttermilk, white vinegar, salt, dried parsley, onion powder, dill weed, garlic powder and pepper in a small bowl and mixing until everything is well combined. Refrigerate the dipping sauce until you are ready to serve the eggrolls.

Preheat the 6 cups of vegetable oil in a deep cast iron pan or Dutch oven until the temperature reaches 350 degrees. Deep fry the eggrolls, in batches if necessary, in the hot oil for 8 to 10 minutes until they are golden brown. Remove the eggrolls to a paper towel-lined plate or a cooling rack to drain for about 2 minutes. Slice each eggroll diagonally lengthwise and arrange them on a plate around a small bowl of the dipping sauce and serve.

Just a couple of quick notes about this recipe. If you don’t want to use the jalapenos, leave them out. I didn’t have any on hand when I made them and the final results were fine, but if you want more heat put them in. Also, I never use as much oil as they recommend when deep-frying. I just hate using that much oil and I try not to deep fry very often, but for something like this I think they came out much better than if we tried them in the oven first. We all loved the results of this recipe. It tastes a lot like what you get at the restaurant and was not hard to make at all. Letting them freeze really does help things to set up nicely and you get a nice dark color when they are deep-fried because of it, but to be honest I only froze them for a little over and hour and I think they turned out fine with that little time. Five may not sound like a lot to get but they are a decent size. If you are making these for a crowd you may want to make a double batch, though I actually got 7 out of the filling I made, so it really depends on how you want to go about it. Michelle has always loved the avocado ranch sauce they serve and this home version did not disappoint. It has the nice mix of flavor you like in the sauce and is perfect not just for egg rolls but for anything else you may want to dip in there, like chips or vegetables. Overall, this recipe is definitely a keeper.

That’s all I have for today. Check back next time for another a recipe. I have a couple of more snack foods I just tried out that you may like to try and I do have some plans for a nice Valentine’s Day dinner involving some steak, lobster tails, a beet salad and molten lava cakes, so check back for those. Until next time, enjoy the rest of your day and enjoy your meal!

005


6 Comments

Posted by on February 10, 2014 in Appetizers, Cooking, Sauce, Snacks


Tags: , , , , ,

Keeping it Basic with Baked Ziti

Although I myself am not a pasta eater, Michelle and Sean both love pasta so we do have it around the house and often make some favorite classic pasta dishes. Two of their favorites of course are lasagna and baked ziti. For me, I would rather have a sausage and peppers hero any night of the week than have baked ziti, but far be it from me to begrudge them something that they both really love. I am sure just like with lasagna, everyone has their own tried and true family recipe when it comes to making baked ziti and when we make it here, we pretty much just stick to the basics.

Baked Ziti

1 pound ziti pasta

Salt and pepper

1 pound ricotta cheese

11/2 cups Parmesan cheese, grated

2 tablespoons olive oil

5 garlic cloves, minced

1 (28-ounce) can tomato sauce

1 (14,5-ounce) can diced tomatoes

1 teaspoon dried oregano

1/2 cup plus 2 tablespoons chopped fresh basil

1 teaspoon sugar

3/4 teaspoon cornstarch

1 cup heavy cream

1 1/2 cups (8 ounces) mozzarella cheese, cut into 1/4-inch pieces

Adjust an oven rack to the middle position and preheat the oven to 350 degrees. Bring 4 quarts of water to a boil in a large pot. Add the ziti and 1 tablespoon of salt and cook, stirring often, until the pasta begins to soften but is not yet cooked all the way through, about 5 to 7 minutes. Drain the pasta and leave it in the colander.

Meanwhile, whisk the ricotta cheese and the Parmesan cheese together in a medium bowl and set it aside. Heat the olive oil and the minced garlic in a large skillet over medium heat. Cook, stirring often, until the garlic turns golden but not brown, about 3 minutes. Stir in the tomato sauce, diced tomatoes and oregano and bring the mixture to a simmer and then cook until it is thickened, about 10 minutes. Off the heat, stir in 1/2 cup of the chopped basil and the sugar and season with salt and pepper to taste.

Stir the cornstarch and heavy cream together in a small bowl and transfer it to the now-empty large pot you used for the pasta and set it over medium heat. Bring the mixture to a simmer and cook until it is thickened, about 3 to 4 minutes. Off the heat, stir in the ricotta cheese mixture, 1 cup of the tomato sauce and 3/4 cup of the mozzarella cheese. Add the pasta to this sauce and toss to combine it all well.

Transfer the pasta to a 13 x 9 inch baking dish and spread the remaining tomato sauce evenly over the top. Sprinkle the top with the remaining 3/4 cup of mozzarella cheese and the remaining 1/2 cup of Parmesan cheese. Cover the dish tightly with aluminum foil that has been sprayed with a nonstick cooking spray. Bake for 30 minutes, then remove the foil and continue to bake until the cheese is bubbling and beginning to brown, about 30 minutes longer. Cool the baked ziti for about 15 minutes, then sprinkle with the remaining chopped basil before serving.

Sometimes Michelle does put meat in the ziti and when she does she uses about a half pound of ground beef that has been sautéed until it is browned with the garlic and the tomato sauce mixture and then mixes it in. Baked ziti is a great dish to make when you are having a party or serving a buffet style meal because it goes a long way and everyone likes it. It is also something you can easily put together and take to a pot luck dinner or a party. Of course, you can easily just serve it at home as well for dinner with a nice side salad and maybe some garlic bread.

That’s all I have for today. Check back next time for another recipe. I have made some good things recently to try out so there’s always plenty more to come. Until next time, enjoy the rest of your day and enjoy your meal!

003

 
1 Comment

Posted by on February 7, 2014 in Cooking, Dinner, One Pot Meals, Pasta, Vegetarian


Tags: , ,

Some Comfort Food Midst All This Snow – Hoisin Glazed Meatloaf

Okay, I don’t know about you, but I am pretty sick of all of the snow around here. I am not much of a fan of winter in the first place – it’s too cold and ever since I was sick it’s harder to breather in the cold and walk in the snow, and my feet hurt in the cold weather too. perhaps it’s time to think about relocating to a warmer climate! In the meantime, weather like this makes us all yearn for  comfort food, and in my mind there is not much more comforting than a meatloaf. If you follow the blog, you know I love it and I have tried various recipes all of the time, so when I came across this idea from Bon Appetit awhile back I was just waiting for the right moment to spring it out. I modified the original recipe a bit since they were really making it with the intent of sandwiches and I had a dinner, and I also added a couple of things on the inside of the meatloaf as well to round out the flavor and texture.

Hoisin Glazed Meatloaf

For the Glaze:

3/4 cup hoisin sauce

1/2 cup rice vinegar

1 1-inch piece ginger, peeled and minced

1 garlic clove, minced

For the Meatloaf:

Nonstick vegetable oil spray

2 cups 1/2-inch cubes day-old crustless white bread (from 2 slices)

1/2 cup chicken broth

1 carrot, peeled and diced

1 celery stalk, peeled and diced

4 slices bacon, minced

1 1/3 cups thinly sliced scallions (dark green parts separated)

1 4-inch piece ginger, peeled, minced

4 garlic cloves, minced

1 pound ground beef

1 pound ground pork

2 eggs, beaten to blend

1 teaspoon Chinese five-spice powder

For the glaze, add the hoisin sauce, rice vinegar, ginger and garlic to a medium saucepan and bring the mixture to a boil. Reduce the heat to low and cook, stirring often, until the sauce thickens to a glaze, about 8 to 10 minutes. Set aside.

For the meatloaf, preheat the oven to 375 degrees. Using the vegetable spray, spray a cooling rack with spray and insert it into the bottom of a rimmed baking sheet and set it aside. In a large bowl, soak the bread cubes in the chicken broth, stirring frequently, until all of the liquid has been absorbed and the bread is beginning to fall apart, about 4 to 5 minutes. in a large skillet over medium heat, add the carrots, celery and bacon until the vegetables are tender and starting to brown and the bacon has rendered its fat and begin to crisp, about 5 to 6 minutes. Add the scallions (the white and light green parts only), ginger and garlic and cook, stirring often until the vegetables begin to soften, about 3 to 4 minutes. Allow the mixture to cool in the pan for 5 minutes.

Combine the scallion mixture with the bread mixture in a large bowl. Add 2 tablespoons of the warmed and thickened hoisin glaze, the remaining scallion parts, the beef, the pork, the eggs and the Chinese five spice. Using your hands, work all the ingredients together until everything is very well incorporated and the mixture is beginning to get sticky. Form the mixture into a loaf shape and place it on the cooling rack inside the rimmed baking sheet. Cover the meat loaf with foil.

Bake the meatloaf in the foil for 30 minutes. Uncover the meatloaf and 2 to 3 tablespoons of the hoisin glaze over the top of the meatloaf. Place the meatloaf back in the oven, uncovered, and continue baking until an instant-read thermometer registers 165 degrees when inserted into the center of the meatloaf, about 1 hour longer.

Remove the meatloaf from the oven and allow it to rest for ten minutes before slicing and serving.

The flavors that you get from the unique mix of spices and the glaze for this meatloaf are very good. Everyone loved it and commented on liking the filling in the meatloaf with the carrots, celery scallions and bacon (Sean especially loved the bacon, of course) The original recipe does not call for the carrots and celery like this but I think they added a nice touch to the meat. We have had the leftovers for a couple of lunches as sandwiches and I have to admit it all tastes pretty darn good as a sandwich too. I’ll definitely keep this one in mind for a meatloaf recipe.

That’s all I have for today. Check back next time for another recipe. I have a lot to choose from to post, so I am not sure which one I will go with yet next, so you’ll have to wait and see. Until then, enjoy the rest of your day, stay dry, warm and safe and enjoy your meal!

001


3 Comments

Posted by on February 5, 2014 in Beef, Cooking, Dinner


Tags: , , , ,

Sidle Up for Side Dishes – Dominican-Style Yellow Rice and Creamy Buttermilk Coleslaw

With all of the different main dishes that I have made lately, I have been making some news sides to go along with some of them. Two in particular really stood out for me anyway. The first was one that I made to go along with the pork tacos we had for dinner. It is a recipe from Bon Appetit for Dominican-style yellow rice. it is a very simple rice dish with some vegetables and spices that are great unique flavor to it.

Dominican-Style Yellow Rice

1/4 cup vegetable oil

1/2 cup red onion, chopped

1/2 red or yellow pepper, seeded and chopped

1 celery stalk, chopped

2 scallions, white and light green parts only, sliced 1/2-inch thick

2 garlic cloves, finely chopped

1 bay leaf

1 teaspoon cumin seeds

1 teaspoon ground turmeric

1/4 teaspoon cayenne pepper

1 cup long-grain rice

2 cups chicken broth

1/2 teaspoon kosher salt

2 tablespoons chopped fresh cilantro

2 tablespoons chopped fresh parsley

Heat the oil in a medium saucepan over medium-high heat. Add the onion, bell pepper, celery and scallions and cook, stirring often, until the vegetables are softened, about 5 minutes. Add the garlic, bay leaf, cumin seeds, turmeric and cayenne pepper and cook, stirring, until the mixture is fragrant, about 2 minutes. Add the rice and stir to coat the rice, then add the chicken broth and the salt. Bring the mixture to a boil, stir it once, and the cover the pan. Reduce the heat to low and cook until the rice is tender and all of the liquid has been absorbed, about 15 to eighteen minutes. Allow the ride to stand in the pot for 10 minutes, covered. Uncover the pot and fluff the rice with a fork. Stir in the cilantro and parsley and serve.

The rice had great color from the turmeric and other spices and the flavor was very good. The combination of the peppers and onion with the rice was just perfect for me. I can see using this side dish with any chicken meal that you make or with pork and I think it would be great.

On the night where I made the fried chicken biscuits, I also tried a new recipe for some coleslaw. I have a bunch of different coleslaw recipes and I am always trying something a little different. This time, since I had some buttermilk on hand I thought I would try out this buttermilk coleslaw recipe from Cook’s Country. it uses a couple of ingredients to make it really creamy without being too watery.

Creamy Buttermilk Coleslaw

1 medium head green cabbage, cored and chopped fine

2 carrots, peeled and shredded with a box grater

Salt

2/3 cup buttermilk

1/2 cup mayonnaise

1/4 cup sour cream

8 scallions, chopped fine

2 tablespoons sugar

1 teaspoon Dijon mustard

1/4 teaspoon ground black pepper

Toss the shredded cabbage and the carrots with 1 teaspoon of salt in a colander set over a medium bowl. Allow the vegetables to stand until they are wilted, about 1 hour. Rinse the cabbage and carrots under cold water, drain, dry well with paper towels and transfer the vegetables to a large bowl.

Stir in the buttermilk, mayonnaise, sour cream, scallions, sugar, mustard and pepper plus some salt to taste. Refrigerate the coleslaw until it is chilled, about 15 minutes. Adjust the seasonings and serve.

I liked this coleslaw because salting the cabbage helps to draw a lot of the moisture out of it so there is not too much water or moisture. Then the buttermilk adds some great tangy flavor to the mix and the sour cream, mayonnaise and mustard each help to add flavor and body to the mix so you get a nice, thick, creamy sauce. If I am going to make a recipe using mayonnaise, I think this is the best one I have tried so far. Of course it is great with any sandwich or along side of burgers, ribs, hot dogs or really just about anything else.

That’s all I have for today. Check back next time for some more recipes. Until then, enjoy the rest of your day and enjoy your meal!

013 002

 
Leave a comment

Posted by on February 4, 2014 in Cooking, Rice, Salad, Side Dishes


Tags: , , , , , ,

Moving on From Chicken – Sweet and Spicy Pork Tacos

Cook’s Country is a constant supply of new recipes for me every time the newest issue of the magazine comes up. They usually have lots of great recipes, some that take more time than others, but many that are perfect for quick weeknight meals. Such is the case with this super easy recipe for sweet and spicy pork tacos. I had just happened to pick up some boneless country-style pork ribs that were on sale recently and was looking for something easy to do with them and this recipe fit the bill perfectly. We all love tacos in our house so this was a great variation for us.

Sweet and Spicy Pork Tacos

1 1/2 pounds boneless country-style pork ribs, trimmed and cut crosswise into 1/4-inch-thick slices

Salt and pepper

2 tablespoons vegetable oil

1 onion, chopped

4 garlic cloves, minced

1 teaspoon ground cumin

2 (8-ounce) cans pineapple rings, drained with 1/2 cup of juice reserved, rings cut into 1/2-inch pieces

2 tablespoons minced canned chipotle chile in adobo sauce

1/2 cup chopped fresh cilantro

12 (6-inch) corn or flour tortillas, warmed

Season the pork with salt and pepper. Heat 1 tablespoon of the vegetable oil in a nonstick skillet over medium-high heat until it is just smoking. Add the pork and cook until the pork is no longer pink, about 5 minutes. Remove the pork to a plate and set it aside.

Heat the remaining 1 tablespoon of vegetable oil in the now-empty skillet over medium heat until the oil is shimmering. Add the onion and cook until the onion is softened and beginning to brown, about 4 minutes. Add the garlic and the cumin and cook until both are fragrant, about 30 seconds. Add the pork and any accumulated juices back to the skillet along with the pineapple and the reserved pineapple juice and the chipotle. Bring the mixture to a simmer, cover the skillet and cook, stirring occasionally, until the pork is cooked through and the sauce has thickened, about 10 to 12 minutes. Stir in the cilantro, season with salt and pepper to taste, and serve the pork with the warm tortillas and any other accompaniments.

I served this just with some guacamole, sour cream and some lime wedges along with a side of Dominican-style rice, which I plan to post the recipe for tomorrow. The sauce was wonderful with a little beat of hear from the chipotle and the sweetness of the pineapple. I loved the mix of the pork and pineapple in these tacos. The taste was incredible and I could easily eat this outside of a taco as well. We didn’t have too much leftover, but was left was eaten for lunch the next day and tasted even better thanks to the sauce thickening even more in the refrigerator. I will definitely be making this one again.

That’s all for today. Check back next time for another recipe. I plan to give the recipe for the Dominican rice along with a quick cole slaw I had made with our fried chicken biscuits last week. Both were great side dishes that you can make with a bunch of different meals. I also still have lots of other recipes that I have tried recently to share, so keep checking back. Thanks to everyone who keeps following along with the blog. The response has been great and I had more visits in the month of January this year than I did in all of 2012, so I am glad people are enjoying what they are finding and thanks for coming along. Until next time, enjoy the rest of your day and enjoy your meal!

004 003

 
1 Comment

Posted by on February 3, 2014 in Cooking, Dinner, Pork


Tags: , , , ,

The Key to a Truly Great Chicken Wing – NYTimes.com

The Key to a Truly Great Chicken Wing – NYTimes.com.

Who doesn’t love chicken wings? Especially on Super Bowl Sunday? If you are still  looking for a good recipe for wings for tonight, Mark Bittman wrothe this great article for the New York Times a few months ago about how grilling your wings provides you with the best option in making great wings and gives you some great recipes and sauces to use so you can make all kinds of chicken wings when you want them. You can always break out the grill pan and give them a try or just fry them and try the different sauce recipes he offers. Check it out!

 
Leave a comment

Posted by on February 2, 2014 in Cooking, Cooking Websites, Grilling, Poultry, Sauce


Tags: , , , , , , ,

 
National Day Calendar

Fun, unusual and forgotten designations on our calendar.

Jennifer Probst

a little bit naughty a little bit nice

Laissez Faire

Letting Life Lead

What To Have For Dinner Tonight

Simple and delicious dinner inspiration