RSS

Category Archives: Pork

Rib-Tickling Good – Low and Slow Oven Baked Ribs

As good as ribs can be when they are cooked on the grill, or even better in a smoker, you can still get pretty results from making ribs in the oven. Since I don’t have access to a grill or a smoker, the oven has really been my only choice and since we really like ribs around here, I have to find new ways to make them great. I have made them in the past with pretty good results, but they never seemed to be that falling off the bone great that you get at good barbecue places or from smoking them for hours. I cam across this recipe at Food.com that changed all of that for me and it can’t get any easier than this one. it is just two ingredients, a couple of steps and letting the ribs do their thing in the oven and you end up with a fantastic result.

Low and Slow Oven Baked Ribs

2 racks St. Louis style ribs (or baby back ribs, whatever you prefer)

Your favorite barbecue or spice rub, grill seasoning, or salt and pepper

1 cup of your favorite store-bought barbecue sauce or homemade barbecue sauce

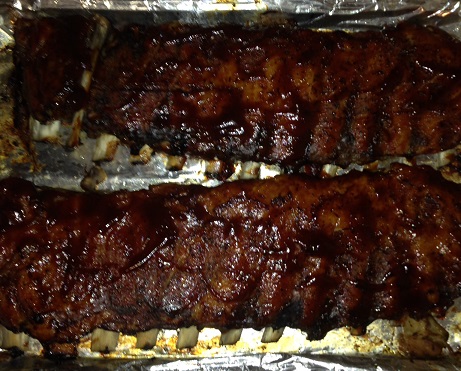
Preheat the oven to 225 degrees. Place the ribs on a cutting board and season them well with your favorite spice rub, grill seasoning, barbecue rub or salt and pepper, on both sides. Line one large rimmed baking sheet or two smaller baking sheets with aluminum foil. Place the ribs meat side down on the baking sheet or sheets and cover the baking sheets or sheet tightly with aluminum foil, making sure all of the edges are well sealed.

Bake the ribs in the oven. If you are using baby back ribs, bake the ribs for about 3 1/2 hours. For St. Louis style ribs, bake the ribs for about 4 hours. Remove the ribs from the oven and carefully remove the top covering of the aluminum foil. Drain any liquid or drippings from the baking sheet and then flip the ribs over so that they are now meat side up. Be careful flipping the ribs as they will be quite hot and very tender so they may start to fall apart.

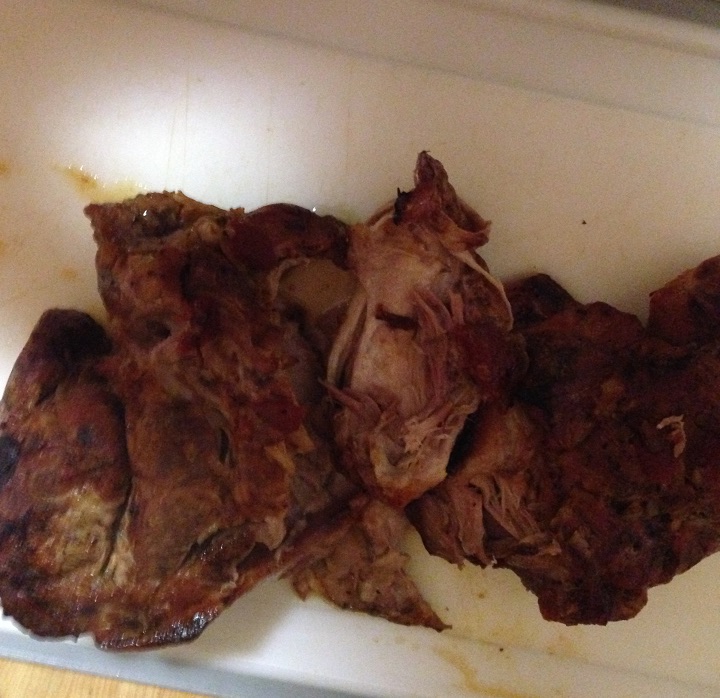
Paint the ribs with a layer of barbecue sauce and then return the ribs to the oven, uncovered, for an additional 20 to 30 minutes until the sauce has baked in. You can add additional coatings of sauce if you think the ribs need it. Remove the ribs from the oven and gently transfer them to the cutting board. Cut the ribs into 1 or 2 rib sections and place them on a serving platter. Serve the ribs with extra barbecue sauce on the side.

I have to say these were among the most tender ribs I have ever had and certainly the best ones I have made at home. They were coming easily off the bone and just melted in your mouth when you bit into them. I used the St. Louis ribs for this recipe since they were on sale here last week and were a lot cheaper than the baby backs. They are a little larger and a bit fattier but I think they have great flavor as well. You can serve these with your favorite recipes of potato salad and baked beans and you have a great meal. All you need to do is put them in the oven, go about your business for a few hours and you have great ribs for dinner.

That’s all I have for today. Check back next time for another recipe. Until then, enjoy the rest of your day and enjoy your meal!

01ce422ad187c660cd7c4aa38038c31c8aac6f17b2_00001 01708ff996b39210ca8a2a9a3802d77ec46836f5cd


Leave a comment

Posted by on November 10, 2014 in Cooking, Dinner, Pork


Tags: , , , , ,

Fall Soups and Stews – Photo Gallery | SAVEUR

Fall Soups and Stews – Photo Gallery | SAVEUR.

It is definitely that time of year when my attention (and perhaps yours) turns to warm, comforting meals like soups and stews. These make great tasting, nourishing meals that are perfect for you to make any time, like on the weekend to get ready to have for lunches or dinner during the week. Saveur Magazine has put together 60 soup and stew recipes so you can try just about anything that you like. Check it out!


Tags: , , , , , , ,

Make a Mess of These Meatball Sliders

I am always on the lookout for different meatball recipes. It is just one of those meal items that I like to tinker with and I am looking to add new flavors to meatballs to jazz them up a little bit. Whether it is for a simple meal with spaghetti in tomato sauce, as an appetizer for a buffet or party, to have in gravy over rice or noodles or to make a nice sub or sandwich meatballs are one of those things that you can do a lot of things with and make them in wide variety of ways with many different ingredients. I came upon this recipe from Alton Brown for meatball sandwiches on Parmesan parsley biscuits and thought it sounded great, but to me they are perfect meatball sliders for an appetizer, party or dinner. it’s a very easy recipe that gives you some basic meatballs with great tasting biscuits and a nice spaghetti sauce to boot.

Alton Brown’s Meatball Sandwiches (Meatball Sliders)

For the Meatballs:

1 pound ground beef
1 pound ground pork
1 pound ground veal
1 egg
1/2 small onion, chopped
1 teaspoon dried parsley
1 teaspoon granulated garlic
1 teaspoon dried oregano
1 teaspoon salt
1/2 teaspoon freshly ground black pepper
Parmesan Parsley Biscuits, recipe follows
Spaghetti Sauce, recipe follows
Provolone cheese, thinly sliced

For the Parmesan Parsley Biscuits:
3 cups all-purpose flour
1 cup grated Parmesan
1/4 cup sugar
2 tablespoons baking powder
1/2 teaspoon salt
1/2 teaspoon freshly ground black pepper
1 stick chilled unsalted butter, cut into cubes
1/4 cup chopped fresh parsley or chives
1 cup whole milk, chilled

For the Spaghetti Sauce:
1 medium onion, chopped
2 cloves garlic, minced
2 tablespoons olive oil
2 (14-ounce) cans diced tomatoes
20 fresh basil leaves, chopped

Preheat the oven to 375 degrees.

For the meatballs,in a large bowl, combine the beef, pork, veal, egg, onion, parsley, garlic, oregano, salt, and pepper and mix all of the ingredients until they are well combined. Scoop the mixture into mini muffin tins or onto a wire rack set over a rimmed baking sheet. Bake the meatballs until they are browned and cooked through, about 15 to 20 minutes.

For the Parmesan parsley biscuits:
Preheat the oven to 400 degrees.

In a large bowl, combine the flour, 1/2 cup of the Parmesan, sugar, baking powder, salt, and pepper. Whisk until everything is well blended. Add the butter and combine the mixture with your fingertips until a coarse meal forms. Mix in the parsley. Gradually add the milk, tossing the mixture with a fork until moist clumps form. Add extra milk if the mixture is too dry. Put the dough on a floured work surface, folding 8 to 10 times until it becomes firm. Let the dough rest for 10 minutes under a damp towel. Roll out the dough on a lightly floured work surface. Using a 2-inch-diameter biscuit ring, cut out the biscuits and put them on a parchment paper-lined baking sheet. Sprinkle the tops of the biscuits with the remaining 1/2 cup of Parmesan cheese and bake until the biscuits are puffed and golden, about 15 minutes.

For the spaghetti sauce, in a medium pan set over high heat, saute the onion and the garlic in olive oil until both are softened, about 3 minutes. Add the tomatoes and allow the mixture to simmer until it is slightly reduced and thickened, about 25 minutes. Stir in the fresh basil just before serving.

To build the sliders, slice a biscuit in half and place a meatball on the bottom half of the biscuit. Cover the meatball with as much spaghetti sauce as you like and top each meatball with a slice a provolone cheese. Place the biscuit top on top of the meatball and continue until all of the biscuits are filled.

I have to say I really liked these. While the meatball recipe is very basic, it does taste good and produces a moist meatball that goes well with the sauce. The real star of this one I think is the Parmesan biscuit, which comes out perfectly and goes really nicely with the meatballs as a slider. The biscuit has great flavor and is really easy to make so you can make this to go with other meals besides this one. we even used some to make breakfast sandwiches with some bacon or sausage and egg. Of course the meatballs and sauce can be for anything that you would use meatballs for as well besides just sliders if you want a nice, basic and easy meatball recipe.

That’s all I have for today. Check back next time for another recipe. Until then, enjoy the rest of your day and enjoy your meal!

IMG_0730


Tags: , , , , , , ,

Sweet and Simple for a Monday – Sausage and Bean Dutch Oven Stew

I don’t know about you, but for me Monday is the busiest day of the week. even though I work from home, the bulk of my assignments come in over the weekends or on Monday so I spend most of the day doing research and writing, trying to get as much done as I can. this often means that Monday tends to be a leftover day or one where we have made something for dinner the night before and can cook it quickly and easily Monday night. this recipe for today could really fit into either of those categories. It is easy enough to do with leftovers right on the spot or you could put it all together the day before and simply heat it up for a great meal. The idea for the recipe comes from MyRecipes.com, but I did change it a little bit to fit my needs since their original version is designed to be cooked when you are camping and cooking over an open flame. I changed it slightly to fit into a nice, home-cooked meal of an easy sausage and bean Dutch oven stew.

Sausage and Bean Dutch-Oven Stew

2 cans (15.5-ounce size) each cannellini beans and chickpeas (garbanzo beans), drained and rinsed

2 tablespoons olive oil

1 tablespoon chopped fresh rosemary leaves

1/2 red bell pepper, seeded and sliced

1/2 yellow bell pepper, seeded and sliced

1/2 orange bell pepper, seeded and sliced

1 onion, sliced

1 poblano chile or jalapeno, seeded and sliced

4 garlic cloves, chopped

1 1/2 pounds cooked Italian sausages, cut into 1-inch chunks

Salt and freshly ground black pepper

1 tablespoon dried oregano

In a Dutch oven set over medium-high heat, add the olive oil and heat until it is shimmering. Add in the red pepper, yellow pepper, orange pepper, poblano or jalapeno and the onions and saute until the vegetables have just softened, stirring occasionally, about 3 to 4 minutes. Add the chopped garlic and heat until the garlic is fragrant, about 30 seconds to 1 minute. add the cannellini beans and chickpeas, the rosemary and the Italian sausage pieces, along with 3/4 cup of water, and stir until the mixture is incorporated. Bring the mixture to a boil and reduce the heat until the stew is simmering. Cover the pot and continue cooking until the sausages swell and all of the vegetables are cooked through, checking the pot every 10 minutes and adding more water if the stew gets dry, until it has cooked for about 30 to 40 minutes. Season the stew with salt and pepper to taste and sprinkle the top with the oregano before serving.

It is very simple and quite tasty. The sausage and beans go very nicely together and the peppers and onions help round it out with the poblano giving it just a hint of heat, which is nice. I think this would be even better with kielbasa or a smoked sausage instead of the Italian sausage, but it all works really well together and gives you a nice one pot meal in under an hour that does not take a lot of work. If you have leftover Italian sausage they are perfect for this meal (which is what I did) but if you don’t you can cook some up quickly before putting them in with the other ingredients. I really liked the beans used in the recipe, but you could use other beans if you prefer them as well.

That’s all I have for today. Check back next time for another recipe. Until then, enjoy the rest of your day and enjoy your meal!

IMG_0729


Tags: , , , , ,

Simple and Satisfying – Butternut Squash Polenta with Sausage and Onion

I always seem to forget about polenta. It’s not something I do on purpose, it’s just not a dish that I think of very often to make and then I realize just how versatile and great-tasting it can be. Sean was just saying to me the other day that we had not had polenta in a long time and he was right. I couldn’t even remember the last I made it and we always have some around the house to make. Polenta, much like it is with rice, oatmeal, grits and the like, is so great because you can add lots of things to it to bring out even greater flavors. That’s what I really liked about this particular recipe from the New York Times for butter nut squash polenta with sausage and onion. It makes great use of one of my favorite fall vegetables by incorporating it into the creamy polenta, adding another great layer of flavor and texture to the polenta itself.

Butternut Squash Polenta with Sausage and Onion

1 1/2 teaspoons kosher salt, more as needed

1 bay leaf

1 cup fine polenta (not quick cooking)

1 cup seeded and peeled butternut squash, coarsely grated

3 tablespoons butter

Freshly ground black pepper, as needed

1 tablespoon extra-virgin olive oil, more as needed

1 1/2 pounds sweet or hot Italian pork sausage, sliced into 1/4-inch rounds

2 teaspoons minced rosemary

2 onions, peeled, halved and sliced into 1/4-inch half moons

1 teaspoon fennel seeds (optional)

Rosemary sprigs, for garnish (optional)

In a large pot set over medium-high heat, combine 4 1/2 cups of water, the kosher salt and the bay leaf. Bring the water to a boil and then slowly whisk in the polenta. Stir in the butternut squash to the polenta. Reduce the heat to medium-low and simmer, stirring frequently, until the polenta and the squash are very tender, about 20 to 30 minutes. If the mixture is getting too thick while cooking, add a little bit more water to the pot to thin it out. Stir in the butter and the black pepper. Taste the polenta and adjust the seasoning with salt and pepper if it is needed.

While the polenta cooks, heat 1 tablespoon of the olive oil in a large skillet set over medium-high heat. Add the Italian sausage, the rosemary and the fennel seeds (if using). Cook, stirring occasionally, until the sausage is golden and cooked through, about 7 to 10 minutes. You can cook the sausages in batches if necessary, adding more olive oil to the pan if the pan looks dry. Transfer the sausages to a paper towel-lined plate to drain.

Add more olive oil to the skillet if it looks dry and then add the onions. Cook, stirring occasionally, until the onions are tender and golden, about 10 to 15 minutes. Return the sausage to the pan and stir it together with the onions to heat the sausage through. Spoon the polenta into bowls and top it with the sausage and onion and garnish with the rosemary sprigs if you like.

It’s a very simple meal that packs some great flavor and is very satisfying. I love the way the squash and the polenta worked together here and it gave the polenta great texture and color. The sausages went really well with the polenta and the whole meal only takes about 30 minutes to cook. If you have polenta left, it sets really nicely when it is chilled and you can cut it into squares and saute it up as a side dish for all kinds of meals if you like. This is a great easy meal for a busy weeknight when you want something quick to put together and I think it would work well with just about any type of fall squash that you might want to use.

That’s all I have for today. Check back next time for another recipe. Until then, enjoy the rest of your day and enjoy your meal!

IMG_0720

 
Leave a comment

Posted by on October 17, 2014 in Cooking, Dinner, Pork, Vegetables


Tags: , , , , , , , ,

A New Way to Try Pulled Pork – Asian Oven Roasted Pulled Pork

We are big pulled pork eaters in our house. I make mine in the oven most of the time (though I have tried the slow cooker as well) and have a standard recipe I have used in the past that makes a nice, spicy pulled pork with a great barbecue sauce, but sometimes I like to try things a little different to spice things up a bit. I have a couple of recipes for pork that I had been holding onto and when I saw pork shoulder on sale the other day I decided to pick it up and give one a try. I chose to use this recipe, which came from White on Rice Couple, for an Asian oven roasted pulled pork. It was easy to make, used some great spices and created a great tasting meal for us.

Asian Oven Roasted Pulled Pork

4-5 pound pork butt or pork shoulder

1 onion, diced

2 tablespoons olive oil

5-6 garlic cloves, minced

1 15-ounce can diced tomatoes

2 tablespoons finely grated fresh ginger

1/4 cup fish sauce or soy sauce

2 tablespoons chili garlic sauce

1 tablespoon spicy brown mustard

1/4 cup brown sugar, packed

1 teaspoon freshly ground black pepper

Preheat the oven to 350 degrees. Heat a medium saucepan over medium-high heat. Add the olive oil and heat the oil until it is shimmering. Add the onion and the garlic and cook until the onions are soft and fragrant, about 4 to 5 minutes. Add the tomatoes, ginger, fish sauce or soy sauce, chili garlic sauce, brown mustard, brown sugar and black pepper. Gently stir the sauce and simmer the sauce on low heat for about 5 minutes. Remove the pan from the heat and set it aside.

Heat a large cast iron pan or deep ovenproof skillet on medium-high heat. Lightly coat the pork butt or pork shoulder with olive oil and season the pork on all sides with salt and pepper. Sear each side of the pork in the skillet until the pork has browned all over, about 3 to 5 minutes per side. Remove the pan from the heat and pour the tomato sauce mixture over the pork to coat it completely. Cover the pork with aluminum foil. Bake the pork for about 3 to 4 hours or until the pork is tender and easily shreds when a fork is inserted into the meat.

Allow the pork to rest on a  cutting board for about 15 minutes before shredding the entire piece of pork. Keep aluminum foil over the pork to keep it warm until you are ready to serve it.

You get some tremendous flavors from the pork thanks to the fish sauce, ginger and chili sauce in this one and the mustard and brown sugar set in with their own sweetness and spiciness as well. I used a boneless pork butt for my meal but I think you could use either one if you prefer the flavoring you get with the bone in. I would recommend using fish sauce over soy sauce if you have it since it adds a completely different type of flavor, but soy sauce will work well if that is what you have around.Also, I did place the pork under the broiler for a couple of minutes to crisp up the outside just a little bit before I shredded it to add some extra crunch. This dish is perfect on rolls for pulled pork sandwiches, or to serve for tacos or quesadillas or even just by itself with some rice, which is what I did with it when we first made it and then used leftovers for tacos. It’s a nice twist if you want something a little different from the usual pulled pork.

That’s all I have for today. Check back next time for another recipe. Until then, enjoy the rest of your day and enjoy your meal!

IMG_0718

 
Leave a comment

Posted by on October 15, 2014 in Cooking, Dinner, Pork, Sandwiches


Tags: , , , , , , ,

Make it Simple Monday – Hoisin Glazed Pork Tenderloin

Very often for me Monday is the toughest day of the week when it comes to cooking dinner. I do a lot of cooking on the weekends and many times Monday is just a leftover day, using whatever we have from the weekend to put something together. Sometimes you want something a little different though and you want to put something together without having to go through a ton of effort to put dinner on the table. Luckily for me, the latest issue of Cook;s Country magazine came in the mail just recently and they always have some great ideas for quick and easy weeknight meals that are full of flavor. I had actually just picked up some pork tenderloins that were on sale recently when I came upon this recipe for a hoisin-glazed pork tenderloin that would give you great flavor without having to marinade the meat for hours.

Hoisin-Glazed Pork Tenderloin

2 (12-ounce) pork tenderloins, trimmed

Salt and pepper

3/4 cup chicken broth

1/4 cup hoisin sauce

1 tablespoon packed brown sugar

1 tablespoon ketchup

2 teaspoons soy sauce

1 tablespoon vegetable oil

2 scallions, sliced thin on a bias

1 teaspoon sesame seeds, toasted

Pound the pork tenderloins between two sheets of plastic wrap so that they are an even 1-inch in thickness. Pat the tenderloins dry with paper towels and then season them well with salt and pepper. Whisk the chicken broth, hoisin sauce, brown sugar, ketchup and soy sauce together in a medium bowl.

Heat the vegetable oil in a large nonstick skillet set over medium heat until the oil is shimmering. Cook the pork tenderloins until they are well browned on both sides and the meat registers 140 degrees on an instant read thermometer inserted into the tenderloins, about 7 to 9 minutes per side. Add the hoisin mixture to the skillet over the tenderloins and simmer the mixture until it is slightly thickened, about 3 to 5 minutes, making sure to turn the tenderloins to coat them in the glaze.

Remove the skillet from the heat and let the pork rest in the sauce for 5 minutes, then slice the tenderloins into 1/2-inch thick slices. Serve the tenderloins, drizzled with the hoisin glaze from the skillet and sprinkled with the scallions and toasted sesame seeds.

You get a really great glaze from the hoisin sauce, soy sauce, sugar and ketchup and the chicken broth helps from it getting too thick. I really liked the flavor of it and it gives the whole meal a great Asian-style flair to it, making this perfect to serve with some rice and maybe some quickly sautéed vegetables or just some steamed broccoli or cauliflower. You can put the whole meal together in about 20 minutes and have everything done very easily. If there are any leftovers you can always dice up the pork tenderloin, take some of the leftover rice and make yourself a simple and quick fried rice that is great for lunch or as a side dish for another meal later in the week.

That’s all I have for today. Check back next time for another recipe. until then, enjoy the rest of your day and enjoy your meal!

IMG_0692

 
Leave a comment

Posted by on September 29, 2014 in Cooking, Dinner, Pork, Sauce


Tags: , , , , ,

From Butternut Squash to Faux Pho, Soups to Make This Season – Bon Appétit

From Butternut Squash to Faux Pho, Soups to Make This Season – Bon Appétit. As the fall weather gets closer and closer I start to think more about making some, warm,comforting meals for dinner. This very often includes making an array of different types of soup that are perfect for the season and are great for dinners, lunches and leftovers. Bon Appetit has put together 31 soups that are great for this time of year. Take a look at the recipes and find your favorite one to try. Check it out!


Tags: , , , , , ,

The Best Slow-Cooker Recipes : Cooking Channel

The Best Slow-Cooker Recipes : Cooking Channel.

It’s getting into the Fall time of year where you want to make some housewarming meals at home but may not have the time to do just everything you want during the week. This is where your slow cooker can really come in handy and Cooking Channel has put together 26 of their best slow cooker recipes for you to tryr so you can make some great meals with just a little bit of work and have everything ready when you get home. Check it out!


Tags: , , , ,

Indoors or Out Enjoy Grilled NY Style Sausages with Balsamic Onion Sauce and Grilled Tomatoes

Not having a grill to use can be a detriment when I come across recipes that sound wonderful and would taste great. An electric grill just does not provide the same type of results and experience as a gas or charcoal grill, in my opinion, so when I see a grilling recipe I want to try I often try to adapt it to indoor cooking and use either a grill pan (much to the chagrin of my smoke alarm many times) or find a way to cook it in the oven. While the results may not be exactly the same for me, they can still get pretty close, or at least good enough for my purposes.. Such is the case of this recipe I saw from Bobby Flay for grilled New York-style sausages with a balsamic onion sauce and grilled tomatoes, a great alternative to the average hot dog on the grill. I am posting the grilling recipe that Bobby Flay uses even though I did everything indoors in cast iron pans or in the case of the sausages, in the oven.

Grilled NY Style Sausages with Balsamic Onion Sauce and Grilled Tomatoes

For the Balsamic Onion Sauce:

1/2 cup balsamic vinegar
2 tablespoons canola oil
2 large Spanish onions, halved and thinly sliced
Kosher salt and freshly ground black pepper
1 teaspoon ancho chile powder
1/2 teaspoon ground cinnamon
1/4 cup ketchup
1 teaspoon hot sauce

For the Grilled Cherry Tomatoes with Basil:

1 pint cherry tomatoes, cored
1 tablespoon canola oil
Kosher salt and freshly ground black pepper
2 tablespoons extra-virgin olive oil
2 tablespoons chopped fresh basil

For the Grilled Sausage:
4 hot Italian sausage links
4 sweet Italian sausage links
1 loaf seeded semolina bread, cut into thick slices

For the balsamic onions: Put the balsamic vinegar, oil, onions and some salt and pepper in a medium skillet over medium heat. Cook, stirring frequently, until the onions are very soft and soupy, about 15 minutes.

Stir in the chile powder and cinnamon and cook for 1 minute. Add the ketchup, 1/2 cup of water, the hot sauce, 1/2 teaspoon of salt and 1/4 teaspoon of black pepper, and bring to a simmer. Simmer, stirring occasionally, until the sauce has thickened, about 10 minutes. Transfer the onions to a bowl and cool to room temperature before serving.

For the grilled tomatoes: Heat the grill for high direct and indirect heat. Put the tomatoes in a bowl and toss them with the canola oil and some salt and pepper. Transfer the tomatoes to a grill basket and grill over direct heat, tossing occasionally, until the tomatoes are slightly charred all over and softened, about 5 minutes. Transfer the tomatoes to a bowl, drizzle them with the olive oil, and crush them lightly with a fork. Toss the tomatoes with the basil, then set them aside.

For the sausage: Put the sausages over the direct heat and cook until they are slightly charred on all sides, about 2 minutes per side. Move the sausages to the indirect heat, cover, and cook until they are just cooked through, about 10 minutes.

Transfer the sausage to a cutting board. Grill the bread over direct heat until it is lightly charred, about 15 seconds, then transfer the bread to a platter.

Slice the sausages about 1-inch thick. Top each slice of bread with some of the grilled tomatoes, a few slices of sausage and a dollop of the onion sauce.

As I stated, I made everything inside, using a cast iron skillet for the onion sauce, a grill pan for the tomatoes and the oven for the sausages. The onions were straightforward as I could follow the recipe. The tomatoes on the grill pan were cooked over low heat for about 4 minutes until they blistered and popped and then I took them off the pan and proceeded with the recipe. The sausages I baked in the oven for about 45 minutes in a 375 degree oven, half the time covered in foil and the other half without, allowing them to crisp up a bit. To me, this works out better than simply frying the sausages in a pan and you get better texture and pop. Overall, I loved the mix of the sausages with the tomatoes and the onion sauce. The onion sauce is the real winner, in my opinion, and we used it again on hamburgers and even as a topping on some pizza. It makes a great grilling alternative for you when you want something more than a hot dog or hamburger. I forgot to take a picture of the sausages, but I do have a picture of the onions and the tomatoes.

That’s all I have for today. Check back next time for another recipe. Until then, enjoy the rest of your day and enjoy your meal!

IMG_0672 IMG_0671

 
Leave a comment

Posted by on September 9, 2014 in Cooking, Dinner, Grilling, Pork, Side Dishes, Vegetables


Tags: , , , , , , , ,

 
National Day Calendar

Fun, unusual and forgotten designations on our calendar.

Jennifer Probst

a little bit naughty a little bit nice

Laissez Faire

Letting Life Lead

simple cooking recipes

a blog to share with you the best